Cat Pose Yoga to Improve Flexibility and Promote Spinal Health

Cat Pose in Yoga: Benefits, Instructions, and Teaching Tips for All Levels

Cat pose yoga is a foundational posture accessible to all levels and commonly practiced in Hatha, Vinyasa, and therapeutic styles. As part of the Core family of postures, it primarily emphasizes opening the back body through flexion (forward bending). Known in Sanskrit as Marjariasana (Marjari = Cat, Asana = Pose), cat pose yoga offers a dynamic opportunity to explore spinal health and sensory activation.

Paired with Cow Pose for Spinal Mobility

Cat pose yoga is almost always performed in tandem with Bitilasana (Cow Pose), which extends the spine into backbending. This harmonious pairing delivers a powerful formula for keeping the spinal muscles and joints mobile, supple, and pain-free. Whether used in a warm-up or as part of a restorative sequence, the combination ensures a comprehensive approach to spinal wellness.

Marjariasana - cat pose

Cat Pose Yoga Instructions

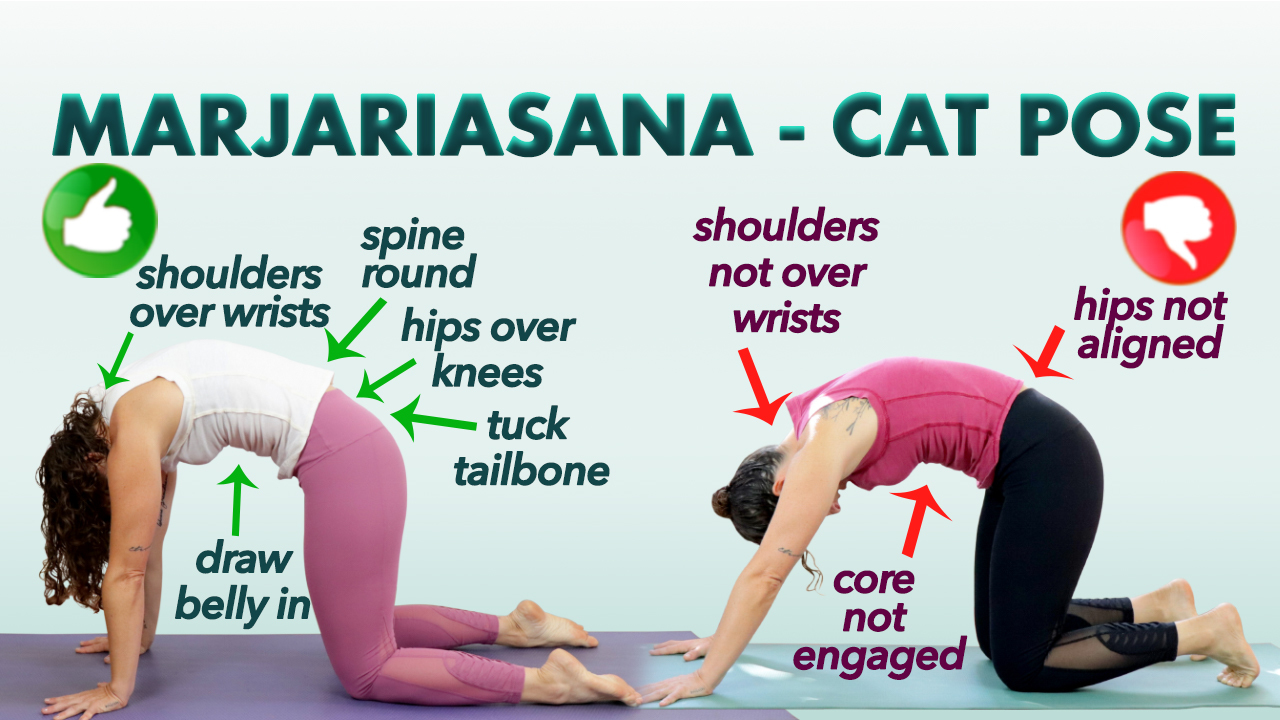
  1. Start by standing on all four limbs with your shoulders directly over your wrists and your hips directly over your knees. Making sure to align your wrist crease parallel to the front edge of your mat.
  2. Exhale tailbone rounds towards the earth, your back middle ribs then lift and eventually you round through your upper back and shoulders. You want to find articulation through every bone of your spine from below to above like falling dominos.

Make sure your shoulders are still directly over your wrists and push into the earth so your upper back lifts towards the sky and exits the body.

Now push-push-push into the earth to enhance the stretch, feel your shoulder blades lift and spread east to west, your chin tucks and your low belly coils in and up. Essentially your spine looks like a rainbow or… an angry cat.

Marjariasana Modifications – Variation & Alignment

Modifications- Perform Cat Pose in a chair or with your hands on your knees. This lessens gravity’s influence and is a great choice if you are working with a wrist, elbow or shoulder injury.

Variations- A little more spice? How about adding Uddiyana Bandha (low belly in and up) at the bottom of your exhales. You can also practice a variation where you lift your knees 2 inches (no more as it lessens the intensity) of the ground at the very bottom of your exhales, this adds tremendous abdominal strengthening.

Common Misalignment- Shoulders tend to drift back towards the heels which still feels really good but takes the stretch out of the upper back where we need it most. Consider that the Thoracic (mid-upper back) spine has the least amount of mobility when forward folding, back bending and twisting compared to the rest of the spine. So Cat Pose represents a huge opportunity to address this dormant area and bring new life! 

Fix It- Draw the shoulders forward over the wrists and actually feel how that subtle adjustment shifts the stretch into the upper back spine (thoracic). Your shoulder blades lift into the back body and spread east to west. You want to feel the impact of your efforts by pushing the floor actively away from you.

For Teachers- On Language… It’s a paradox as its our main tool as educators but words don’t actually teach, experience teaches. However words can articulate actions, point to experiences and help bring the pose to life… We can use metaphors, action words and silence to point at an experience we want our students to have. Play with language and see how many ways you can teach the same thing – differently.

Keep your eyes open and don’t let students get away with drawing their shoulders back behind the wrists. Keep the bar high and let them know WHY they are doing what they are doing so they feel educated and empowered rather than controlled and restricted. 

Adjustment- Place your hand on their upper back- between their shoulder blades and ask them to push up into your hand. Very simple and highly effective. Give it a try and let me know your experience!

cat pose in yoga marjariasana Infographic

Conclusion

Cat Pose is a MUST in my daily morning practice. It’s a medicinal Pose that awakens the spinal muscles, brings suppleness and mobility to the joints and just feels GOOD! It stretches the back body, shoulders and neck and is prescribed for relieving sciatic and back pain. When paired with Cow pose it improves overall posture.

Consider that every single bone in your spine is a slight idderation of the one above it and the one below, it’s like a puzzle. Some areas of the spine forward bend easier by design, some Back Bend easier by design and some areas rotate much easier, simply by design. Many of us simply bend where we are already bendy and move in a two dimensional way.

Now, play with initiating movement from the center of gravity (your pelvis) and letting each bone influence the one above it in time so your neck spine rounds last. This is super therapeutic and yields great benefit when practiced regularly. Your learning to segment out the movement so you feel you can access and intentionally move any specific area on purpose. 

In yoga Cat Pose targets the area that is most dormant when forward bending, back bending and rotating. Think on this, you’ve never even seen this area of the upper back and certainly can’t get any sunblock there! Cat Pose is one of very few asanas that actually awaken this area behind the back of the heart and is worth investigating.

Instead of viewing this Cat Pose a gateway to other more stimulating poses take it on as its own thing. Study it, see what it can teach you about your body.

Child’s Pose is a great preparatory pose as it ground you prior to movement. You can counter pose with Eagle or Downward Facing Dog which continues to build energy.

Lastly, follow up with Eagle Pose and see if you have any newfound articulation in the upper back.

Click here to access the full course and elevate your teaching or personal practice today!

cat_pose_yoga

About

Jane

 I teach a SOULFUL, slow flow alignment based Vinyasa where self inquire is encouraged and joy of being is the pinnacle. Read More..

Supine Spinal Twist Stretch Supta Matsyendrasana

Introduction: Unlock the Power of the Spinal Twist Stretch for Full-Body Relief

The Spinal Twist Stretch, known in Sanskrit as Supta Matsyendrasana, offers a deeply restorative and rejuvenating experience. If you’re searching for a gentle yet effective way to stretch your spine, hips, and shoulders, this reclined twist—often referred to as Reclined Lord of the Fishes Pose—provides exactly that. Named after the yogi master Matsyendra, this supine version of the seated Half Lord of the Fishes Pose (Ardha Matsyendrasana) is accessible to all levels and delivers profound benefits with minimal effort.


What Is the Spinal Twist Stretch?

The Spinal Twist Stretch in its supine variation is a calming yoga posture that lies on your back, offering a mild but thorough twist to the spine. In Sanskrit:

  • Supta = reclined

  • Matsyendra = lord of the fishes

This stretch is widely embraced in both Hatha and Restorative Yoga for its soothing and therapeutic nature. Because it is so gentle, it’s often used at the beginning or end of a yoga session, requiring no significant warm-up to practice safely.


When and How to Practice the Supine Spinal Twist

This spinal twist stretch is typically used:

  • At the beginning of your practice: Pair it with Sun Salutations to awaken the spine.

  • At the end of your session: Ease into Shavasana with calm, grounded energy.

Its versatility allows it to function as both a warm-up and cool-down posture, making it one of the most adaptable poses in your routine.


Benefits of the Spinal Twist Stretch

Incorporating the spinal twist stretch into your practice can provide the following physical and physiological benefits:

Deep Stretch and Spinal Lengthening

  • Gently stretches the back, hips, chest, and shoulders

  • Encourages healthy spinal alignment and lengthening

Energizing and Detoxifying Effects

  • Stimulates the spinal discs, enhancing fluid exchange and mobility

  • Promotes fresh blood flow to digestive organs, improving overall digestion           

Important Precautions

Although the spinal twist stretch is mild, always approach it with mindfulness and caution, especially if you experience:

  • Chronic back pain

  • Hip or knee injuries

  • Degenerative disc conditions

When in doubt, consult a qualified yoga instructor or healthcare provider before attempting the pose.


Supine Spinal Twist - Supta Matsyendrasana

Supine Spinal Twist Instructions

  1. Begin on your back in Supine Tadasana. 
  2. Bend your right knee, wrap your interlaced hands around your shin and draw the knee towards your chest. Keep your left leg straight and active. 
  3. On exhale, take your bent right knee and draw it across the body towards the left side of your mat. 
  4. Scooch your left hip back a few inches so you’re twisting around the centerline of your spine and not at an angle.
  5. Stack right hip on top of left (never forward) so your sacrum is vertical, this may require a block at medium height underneath your right thigh.  
  6. Extend your right arm open to the right, keep at shoulder height with palm facing up. 
  7. Your head can also turn to the right and passively hang heavy. 
  8. Your welcome to close your eyes as this pose is traditionally performed near the end of class on the way to Savasana | Corpse Pose. 
  9. Allow the alchemy between the pose, breath and gravity to shape your experience. 
  10. Stay for at least 10 breath cycles up to five minutes (restorative approach).
  11. When complete, inhale return to center, recenter your hips and draw both knees into your chest. Repeat on the left side.

Supine Spinal Twist – Modification Variations & Alignment

Modification- If this feels too intense in any way you can perform this with your legs together as if they were one, both knees bent and stacked and then rotate. 

Variation- Twine the legs before you twist so they resemble Eagle Pose in the lower body. 

Common Misalignment #1- This ones for the bendies, to over twist and exploit mobility. If your top hip crosses past your bottom leaving your sacrum at an angle instead of perfectly vertical. 

FIX #1 Rest your top knee on a bolster or a block, this keeps your sacrum vertical and hips stacked. 

Common Misalignment #2-  Twisting on an angle. This occurs when you don’t center your hips before or after rotation.

FIX #2- Imagine you have a line down the centerline of our mat. Right knee come in to your chest and twists across the centerline of your body. Once this happens you can lift your left hip and scootch it back to the center of your mat so your now twisting along the access of your spine instead of twisting at an angle which is more of a hip swivel than spinal rotation. 

Supine Spinal Twist-Supta Matsyendrasana TN Infographic

Conclusion

The Spinal Twist Stretch, or Supta Matsyendrasana, is a deeply restorative and therapeutic yoga pose that naturally decompresses the spine and helps release stored emotional tension from the day. Practicing this gentle twist encourages emotional release while physically massaging the abdominal organs, purifying the digestive system, and enhancing posture.

Whether you’re guiding a group or practicing solo, this pose works beautifully at the end of an all-levels classmarking the shift from dynamic “Yang” movement to a more introspective “Yin” stillness. Alternatively, place it at the beginning of your practice to awaken your spine and prepare for deeper engagement.

Personally, I enjoy practicing the spinal twist stretch before bed. It helps clear away any residual tension, stress, or discomfort, offering a gentle path into restful sleep.

Bonus Tip: You can also try a chair variation of the spinal twist stretch. Sit sideways on a chair with both legs facing one direction, then gently rotate your torso toward the back of the chair using your arms to deepen the twist.

Important Reminder: If you’re experiencing back pain, degenerative disc disease, or related conditions, it’s best to refrain from this pose or consult with a professional to avoid aggravating any injuries.

Want to explore more deeply restorative postures like this one? Click here to access the full course and start your journey to physical and emotional renewal.

spinal twist stretch


About

Jane

 I teach a SOULFUL, slow flow alignment based Vinyasa where self inquire is encouraged and joy of being is the pinnacle.Read More..

Urdhva Hastasana Mastery -Upward Salute

Urdhva Hastasana is one of those poses you were naturally doing before you even knew it was yoga!  Upward Salute is a natural stretch for the entire body. As you stretch your fingertips away from your toe tips you will feel a natural boost in energy, and bonus – it feels really good!

Urdhva Hastasana  is pronunciationOORD-vah hahs-TAHS-uh-nuh and translates from Sanskrit to English as Upward Salute.  Urdhva means “upward”, Hasta means “hand” and Asana means “pose” or “seat”. 

It’s an all levels Standing balance with a mild backbending component. It’s often practiced in Hatha, Iyengar, Vinyasa and Power. In Ashtanga Yoga it’s part of the in the Sun Salutation A and B sequence and practiced to warm up the body. 

It’s quite natural upon awakening to take a stretch of the fingers away from toes and often done without even thinking about it. 

Urdhva Hastasana Benefits & Precautions

  • It stretches the spine, shoulders and arms, lengthens the side body and improves posture.
  • It tones the legs and strengthens the spine, stimulates digestion and relieves fatigue. 
  • It creates space in the muscles between the lungs, the intercostal and their for assists in relieving  asthma and congestion.

No need to prepare for this one as its often presented in the warm up phase of the class and you can follow up with Uttanasana or Sun Salutations. 

Please exercise precautions if you are working with spine, shoulder or neck injuries, otherwise its therapeutic for all.

Urdhva Hastasana – Upward Salute Infographic

Urdhva Hastasana Infographic

Upward Salute Pose Instructions

  1. Let’s start by standing at the front of your mat in Tadasana – Mountain Pose. Bring your feet to touch with heels slightly off one another or feet at hips width distance apart and parallel to the outside edges of your mat. 
  2. Take your arms alongside you, externally rotate at the shoulder joint so palms face forward and the head of the shoulders roll back, leaving the chest broad east to west. 
  3. Straighten the arm by contracting the triceps and feel the skin cling to the muscles and muscles drawing towards the bone.  
  4. On an inhale, slowly raise your arms without borrowing movement from the spine. In other words, try not to default to a backbend right out of the gate. 
  5. Your biceps will frame your ears with palms facing one another.
  6. Draw both straight arms back on each inhale and keep softening your front ribs back and down towards the waist on each exhale. 
  7. All the major joints of the body are aligned. Your wrists are stacked over your shoulders, your shoulders over your hips, your hips over your knees and your knees over your ankles. 
  8. Look up between your hands if your neck is comfortable with it and you can maintain the natural curve of the cervical, one way to tell is if you can breathe freely. 

Upward Salute - Urdhva Hastasana

Modifications Variations & Alignment

Modification- If you are working with a shoulder injury you can practice the same actions in the lower body without raising you arms above your head. 

Variations- If you want to add intensity and feel the body is prepared for it, you can add a backbend in the upper back.

Common Misalignments- It’s super common to turn this into more of a backbend rather than spinal awakener and shoulder opener. 

The FIX- Keep your front ribs contained as you raise your arms, that way you emphasize chest and shoulder opening vs just giving the shape away to bending where your already bendy, which is typically your low spine (lumbar) and neck spine (cervical). Make sure your gaze is the last thing to land. 

Feature Video: Urdhva Hastasana – Upward Salute

Conclusion

Urdhva Hastasana- Upward Salute is a standing balance pose with a mild backbending quality. When we extend from the feet to the fingers it lengthens the side body, strengthens the spine, chest and shoulders and stimulates overall energy

It contains all the alignment principles necessary for inversions like Downward-Facing Dog, Feathered Peacock Pose and Handstand. However, in Upward Salute you are standing on your feet as you were designed instead of your hands which can be challenging for many. 

It’s also much more difficult to find your balance when your upside down and your relationship to gravity is different. But, Urdhva Hastasana can teach us the same actions in a less demanding way. 

  • If you are naturally a bendy body, your tendency will be to make most everything into a backbend. What this looks like in Upward Salute is moving your front ribs forward and overly bending into your lumbar spine. 
  • If you are naturally a forward folder or are tight in the arms, chest and shoulders. There will likely be a tendency to borrow movement from the spine as you extend your arms overhead. Opposed to creating shoulder opening by keeping the spine fixed. 

Point being, know your habits and check yourself so you are purposefully practicing with them in mind. 

Lastly, enjoy your breath, enjoy your body, your alive and well – embody it!

About

Jane

 I teach a SOULFUL, slow flow alignment based Vinyasa where self inquire is encouraged and joy of being is the pinnacle.Read More..

Master Warrior 2 Pose Virabhadrasana ii

Warrior 2 Pose – Virabhadrasana II, is named after a Hindu Warrior that was said to be an incarnate of Shiva. Virabhadra was depicted with a thousand feet, heads and eyes, wearing a tiger skin cloak with a garland of skulls around his neck and indeed fierce. 

Virabhadrasana is pronounced, Veer-uh-buh-DRAHS-uh-nuh and translates from Sanskrit to English as Vira, means “hero”or “3 warrior” bhadra, means “friend” or “good” and asana, which means “pose” or “seat”. In modern yoga classes is commonly referred to as “warrior pose.”

It’s an all levels standing balance that commonly practiced in Ashtanga, Power and Vinyasa classes, it enhances overall strength, stability, and concentration. 

Warrior 2 Pose Benefits & Precautions

  • It’s a deep hip opener that strengthens the ankles, thighs, buttox and shoulders and stretches the inner groins, chest and abdomen.
  • It tones the arches of the feet, encourages deep breath flow and improves circulation, and builds mental and physical endurance
  • Helps to relieve backaches and stimulates healthy digestion, it naturally creates resilience. 
  • Encourages deep breath flow, improves circulation and builds mental and physical endurance.
  • It’s a beautiful blend of strength and softness.

Precautions include hip, knee, shoulder or neck injuries, those working with high blood pressure.

Warrior 2 – Virabhadrasana II Infographic

Warrior 2 Pose - Virabhadrasana ii Infographic_JC-118-4

Warrior 2 Pose Instructions

  1. Start in Tadasana – Mountain Pose with your feet hips width distance apart and parallel to the outer edges of the mat.
  2. On exhale, turn left and step your feet wide apart (roughly 4-5 feet on average). Keep the toes equal distance to the long edge of the mat. 
  3. Turn your right foot to face forward so it bisects the center of your mat. 
  4. Your back foot pivots slightly, leaving your back foot at roughly 45 degrees. 
  5. Hips are leveled to the earth and squared to the left side of your mat. 
  6. Root down with both heels, keeping your arches lifted and energetically pull your feet towards the center of your mat. 
  7. Raise your arms to shoulder height, palms face down, hands are pretty much over your feet. 
  8. On exhale, bend your front knee to 90 degrees and stack it directly over your ankle, leaving your shin vertical and your front thigh parallel to the earth. Lengthen the stance to accommodate this alignment.
  9. Keep the outer edge of your back foot sealed to the earth with your inner arch actively lifting. 
  10. Shoulders directly over your hips with the sides of your waist equally long. 
  11. Keep broad across your collarbones and soften your shoulders away from your ears.
  12. Gaze straight ahead over your front middle finger, keep your vision soft and onepointed. 
  13. Hold 8-10 breaths or more if you are looking to build heat. 
  14. On exhale, release by straightening your front leg, paralleling your feet to face the long left side of your mat. Now turn your left foot and leg to face the back of your mat and repeating on the Warrior II on the second side with your left foot forward (facing the back of the mat). 

Warrior II - Virabhadrasana II

Modifications – Variations – Alignment

Modification- Keep your hands at your hips if your working with a shoulder injury. 

Variations- Deepen the intensity by lifting the front heel off the earth and dropping the hips a few inches towards the earth. 

Common Misalignment-  It’s super common for the front knee to pass the ankle as a result of a short stance.

Fix- Lengthen your stance, so your front knee is directly over your front ankle and your front thigh bone is leveled to the earth.

You can prepare the body by practicing Bound Angle Pose | Baddha Konasana and/ or Tree Pose | Vrksasana and counterpose with Side Angle Lunge | Utthita Parsvakonasana.

Conclusion

Warrior II – Virabhadrasana II is a deep hip opener that strengthens the ankles, thighs, buttox and shoulders and stretches the inner groins, chest and abdomen. 

  • It tones the arches of the feet, encourages deep breath flow and improves circulation, and builds mental and physical endurance. 
  • It’s named after the Hindu Warrior, Virabhadra who was said to be the embodiment of Shiva himself. 
  • It’s a pose that requires strength and softness and teaches us about resilience. 
  • As a teacher and a student like to hold this for long periods of time as it provokes stamina and the ability to stay when all you want to do is go. 

TIP- It’s common to see students perform this with the back hip higher than the front hip, leaving the spine ascue on the up and down plane in reference to the earth. 

FIX- Bring your hands to your hips and level them in reference to the earth. This should leave the sides of your waistline equally long. With your hand hands to your hips initially, you can build proprioception. Once you feel the sides of your waistline equally long, you can lengthen your arms and set your vision forward. 

Per usual, listen to your inner experience and yield whenever possible. 

I hope you enjoyed today’s pose breakdown, please share what worked for you and your existing challenges below, 

Om.

Want to deepen your strength and balance? Click here to access our full course and master Warrior 2 and other essential poses for a strong, grounded practice.

warrior_2_pose

About

Jane

 I teach a SOULFUL, slow flow alignment based Vinyasa where self inquire is encouraged and joy of being is the pinnacle.Read More..

Master Ardha Matsyendrasana ; Half Lord of the Fishes

Half Lord of the Fishes – Ardha Matsyendrasana is a seated twist suited for all levels.

It’s commonly practiced in Ashtanga, Vinyasa and Iyengar yoga. 

Ardha Matsyendrasana is pronounced ARE-dah-see-en-DRAHS-anna and translates to Half Lord of the Fishes Pose.

Ardha = half and Matsyendrasana is the Hindu sage in which the pose is named after. He is said to be one of the original founders of Hatha Yoga.

It’s said that he was rejected and abandoned by his parents and thrown into a river to die. I imagine this was the root of his suffering and what made him such an influential yogi. His story can remind us to be grateful for the challenges of life as they are ultimately the grit the produces the pearl.

Ardha Matsyendrasana Benefits & Precautions

Half Lord of the Fishes actively stretches the chest, shoulders, neck and strengthens the entire spinal column. It stimulates digestion and elimination, counters fatigue and insomnia and brings suppleness to the spine.

Precautions include any disk, spine, neck or shoulder injuries and pregnancy. 

Introduction

Matsyendrasana is considered kitchen sink pose for stretching the hips, spine, shoulders and neck. It stimulates the digestive fire and is said to cause hunger.  It’s highly therapeutic for fighting fatigue, relieving sciatica and insomnia. 

I will share alignment principles to keep you safe in the pose as well as modifications in case you are working with any physical challenges. Naturally i’ll include variations for those students who need more physicalness to stay engaged. 

Keep in mind that modifications and variations are specific to whos doing the pose in the moment they are doing it, the choice to vary up or down should be born from the moment unless you are working with an injury.

I like to always include Common Misalignments, great for teacher to keep watch for, as well as the Fix It- to bring the body back into integrity.

Ardha Matsyendrasana Infographic

Ardha Matsyendrasana Infographic

Half Lord Of The Fishes – Ardha Matsyendrasana Step by Step Instructions

Begin in Dandasana- Staff Pose, with your legs extended straight out in front of you. Bend your right knee and take your foot to the outside of your left thigh. Try and flatten your foot down to the earth.

  1. Bend your left knee and draw your left heel towards your right buttox.
  2. Place your right hand on the earth behind you and externally rotate the shoulder to open your chest.
  3. Inhale left arm up to the sky and exhale hook your left elbow past the outer edge of your right thigh.
  4. Root down evenly through both sitting bones and rebound back up through the crown of your head. Reclaim any length you may have lost during the entrance into the pose.
  5. Rest your vision over your right shoulder with gaze landing last. So in essence your twisting from below to above as a progression.
  6. Take 5-10 breaths. Smooth and steady, consistent breaths. 
  7. Release back to Dandasana for a few breaths and then repeat on your left side.

Half Lord of the Fishes - Ardha Matsyendrasana

Ardha Matsyendrasana Modifications & Variations

Modifications #1- You can take the corner of a folded blanket underneath both of your sitting bones to create levelness in the pelvis and evenness in both sides of the spine. 

Modifications #2- You can keep the side your twisting to’s opposite leg straight. So if you’re twisting the upper body to the right your, left leg remains straight. This is effective if you have any challenges with your knees.

Variations #1- You can add more challenge by creating a bind, releasing your left arm and take it in between your legs and clasp both of your hands behind your back. This is great for leveraging more rotation.

Variations #2- You can release your left arm straight and with your peace fingers take hold of your big toe. Draw your left shoulder blade into your back body and roll your left shoulder back against that, creating leverage and rotation.

Misalignment

Common Misalignment- It’s quite common to lose length in the side of the body your twisting too, this is commonly accompanied with opposite sitting bone lifting off the ground.

The Fix It- If the imbalance is dramatic stick the corner of a blanket underneath both sitting bones prior to entering the pose. To avoid compression, create length in the spine before you enter, then twist from below to above, do your best to keep your sitting bones evenly grounded. 

Featured Video:Master Ardha Matsyendrasana – Half Lord of the Fishes Pose

A great way to prepare the body is with Cow Face Pose – Gomukhasana, as it foreshadows some of the key actions in Ardha Matsyendrasana. Counter posing with Heros Pose – Virasana is recommended as it brings the body back into an anatomical neutral.

Conclusion

Half Lord of the Fishes – Ardha Matsyendrasana is a great antidote for those of us who sit throughout the day, which lets be honest, it’s most of us.  This repeated action (or non action) of sitting shortens the hip flexors which attach to the deep internal layers of the lower spine. As they lock short and tight it pulls on the lumbar spine and ultimately makes us age prematurally.

Ardha Matsyendrasana is an all levels Seated Twist and antidotal to sitting, there are  many adaptations that make it approachable for all levels and all bodies.

It actively that stretches the chest, shoulders and neck and strengthens the spinal column. It stimulates digestive fire (agni) and provolks elimination, counters fatigue, insomnia and brings alertness to the entire mind- body.

Practice this pose after a long day of sitting and let us know your experience. Did it relieve stress? Did it enliven you? Do you feel relieved?

About

Jane

 I teach a SOULFUL, slow flow alignment based Vinyasa where self inquire is encouraged and joy of being is the pinnacle. Read More..

ardha-matsyendrasana

Master Malasana Pose

Todays Pose Break Down features Malasana Pose or Garland pose. Mala = Garland, also translated as Rosary or Necklace and Asana = Pose or Seat. Pronounced MAA-LAA-sa-na and also called Upavesasana. 

It’s an all levels squat that opens the feet, inner groins and front body. It’s highly beneficial for those who spend time sitting regularly as it opens the hips and causes overall mobility in the body. You can find this pose practiced regularly in Hatha, Ashtanga, Vinyasa, Power, Iyengar and Pre-Natal yoga classes. 

It’s also referred to as Birth Pose as it’s an ideal position for pregnant women to give birth as it opens the  birth canal and allows the mother to push with the help of gravity. This is super useful as there is no wasted energy expended. 

It’s also highly recommended for those who travel often and become irregular with elimination as a result. It encourages the down and outward flow of Prana (Apana-Vayu) and stimulates Manipura | Root Chakra and is highly grounding. 

I will guide you into the pose with attention to proper alignment and include a few modifications for different bodies and challenges within the pose.

I’ll also include some more “advanced” variations for those of you who are naturally more bendy or are inclined to take on more challenges. 

Please understand that “advanced” variations are less about what you can do or can’t do and more about being a keen student of yourself and understanding when to add on and when to subtract, to keep things honest and engaging. 

Lastly I’ll share Common Misalignments and how to fix them. This section is great for teachers as it helps you build confidence in reading bodies and gives you a tool box to work with a variety of students.

Malasana Benefits & Pose Preperation

It’s a deep hip opener that stretches the groins and lower back, for some it’s a generous stretches for the Achilles tendon. It strengthens your back body and stimulates digestion which encourages regular bowel movements.

Great for Vata Dosha or those with a Vata imbalance.  It’s a “go to” pose for travelers, Vata imbalances and pregnant women. 

You can prepare for Garland Pose | Malasana with Baddha Konasana | Bound Angle and or Upavistha Konasana | Wide Angle Seated Forward Bend. Counter posing with Uttanasana | Standing Forward Bend and Bhujangasana | Cobra Pose. 

Take precaution or refrain if you are working with low back or knee injuries. 

Malasana Pose Infographic

Malasana pose infographic_JC-118-17

Step- By- Step Pose Breakdown of How To Do Garland Pose – Malasana

  1. With your feet wider than hips width distance and slightly turned out, bend your knees and sit your hips back and down in a squat position.

  2. Your hands come to Prayer Mudra – Namaskar, leaving your forearms parallel to the earth. 

  3. Push your elbows actively into your inner thighs and equal measure clamp your inner thighs back into the elbows. 

  4. Soften your shoulders away from your ears and accessed through the crown of your head.

  5. Use the push- pull action of the upper arms and inner thighs to claim as much length in your  spine as possible. Lengthen north to south by drawing your sternum away from your navel and broaden east to west across the collarbones. 

  6. Gaze to one fixed point and practice merging with your experience as opposed to “doing” the shape.

Malasana - Garland Pose

Featured Video: Malasana Pose – Garland Pose

Malasana Pose Modifications & Variations

Modification #1- Place a blanket underneath your heels to ground them.  This is especially good for those who have chronic tightness in their Achilies tendons. 

Modification #2- Sit your tush onto a block or two. This is super helpful if you are either injured or need some support as you are developing endurance in the pose. 

Variation #1- Bind by taking both arms in front of your shins, then bend your elbows and reach behind your back and clasp your hands.

Variation #2- Take a Half Bind Variation, by taking your right arm in front of your shin, your left arm wraps behind you and you clasp both hands. This version is a chest opener, look up over your left shoulder. 

Variation #3- Take a Half Bind Standing Variation, start by taking your right arm in front of your shin, your left arm wraps behind you and you clasp both hands. Ground through your right foot, engage your belly and slowly raise your self up to standing with your bind.

Common Misalignment

Common Misalignment #2- Allowing the knees to track in. This puts a lot of pressure on the inner knee and over time can compromise the ligaments that keep the knee in tact.

Keep in mind that the knee is a hinge joint and really only likes flexion and extension. Lateral movement is very very limited and should be avoided at all costs. 

How to FIX IT- Think Tree Pose, lengthen from the inner groin to the inner knee and traction back from the outer knee to the outer glute. Push your elbows into your inner thighs and clamp your inner thighs back into centerline.

This will help you leverage the ascending action. You will notice it’s much more of an active expression than passive. 

Conclusion

Malasana – Garland Pose! The name comes from the Sanskrit root Mala, meaning “Garland” which also translates as “Rosary.” In some schools, this is said to be a mistranslation. When pronounced with a long A sound, mala means Garland, but when pronounced with a short A, it actually translates to “excrement” which makes a lot of sense given the shape of the pose and its benefits. 

This pose is a wonderful hip opener that stretches the lower back, stimulates ManipuraRoot Chakra and is highly grounding. It encourages the downward flow of Pranic energy called Apana- Vayu (channel). Apana- Vayu is one of the five expressions of Prana and necessary for regular elimination.

No surprise Malasana is also referred to as Birth Pose, it is phenomenal for pregnant women to practice prior to giving birth and highly recommended during the actual birth process. It actively opens the birth canal and allows the momma to push with the assistance without the resistance of gravity and therefore helps her conserve energy. 

It’s also highly recommended for those who travel often and become irregular and are challenged with constipation and elimination. Travel often over stimulates Vata energies and influences all doshas (not just Vata dosha). Add this to your Vata balancing travel routine and let us know your experience! 

Keep in mind, you don’t need to be pregnant, live a sedentary lifestyle or suffer from constipated to enjoy the variety of benefits Garland Pose has to offer!

About

Jane

 I teach a SOULFUL, slow flow alignment based Vinyasa where self inquire is encouraged and joy of being is the pinnacle.Read More..

Master Extended Puppy Pose; Uttana Shishosana

Today’s featured pose is Extended Puppy Pose – Uttana Shishosana. It’s a hybrid pose that marries the upper body- chest opening of Balasana and the lower body- inversion quality of Downward Facing Dog.

Uttana Shishosana is pronounced- OO-ta-NAH she-SHO-sahna, Uttana = Intense or Extended, Shisho =  Puppy and Asana translates to Pose or Seat.

You commonly see puppies and dogs take this upon awakening from a nap. It is a prone (belly facing down) backbend commonly practiced in Hatha, Vinyasa, Yin Prenatal Yoga traditions. It’s approachable for all levels and all bodies. 

Extended Puppy Pose  Benefits & Precautions

It actively stretches the abdomen, chest, shoulders, upper back and spine. Strengthens the entire back body and calms the mind.  It stimulates Manipura – Navel Chakra and creates heart opening.

Please be cautious if you are working with a spinal, chest, shoulder or neck injury.

Uttana Shishosana Pose Breakdown

I will share purposeful alignment on how to get into the pose and what to focus on once you are there. Included will be a number of variations so all bodies are included. I’ll also share a few variations to consider if you want to level up sensation and challenge.

Generally speaking sensation should not exceed a level 7. Asanas need not be extreme, get to know the concept of perfect measure in your body. It changes and should be specific to the moment and whos doing the doing.

For the teachers, I’ll also share common misalignments and how to fix them. This is a great way to familiarise yourself with where the pose tends to lose integrity, how to assess different bodies with your eyes and really see your students. Trust me they will feel it and appreciate you for it.

Lastly, included is A TIP to enhance the shape and bring it to life,  you’ll need to stay tuned for this one!

Extended Puppy Pose – Uttana Shishosana Infographic

Extended Puppy Pose - Uttana Shishosana infographic

Uttana Shishosana Instructions

  1. From Tabletop set up for Puppy Pose- Uttana Shishosana! Walk your arms out long and forward keeping them shoulder distance apart with palms facing down
  2. Keep your hips over your knees and find an anterior tilt in the pelvis so your sitting bones action up towards the sky and the natural curve in your lower spine increases.
  3. From here allow your upper thoracic spine to sink through the gateway of your shoulders. Your spine is linked to a swing bridge that is hanging from the two bookends of your spine, your hips and shoulders.
  4. You can rest your forehead on the earth. 

Extended Puppy Pose - Uttana Shishosana

Extended Puppy Pose Modifications

Modification #1- You can rest your forehead on a block (lowest height) instead of the earth.

Modification #2- You can create the same shape in the upper back, chest and shoulders up against a wall. In this modification gravity doesn’t impact the shape as much, so you can fine tune to just the right amount of mobility necessary for your body.

Uttana Shishosana Variations

Variations #1- If you have the mobility in your neck you can rest your chin on the earth, Just make sure it truly feels like a fit and you are not creating suffering.

Variations #2- You can narrow the elbows to touch, then bend them so your hands come to touch and point upwards towards the sky. Now dig down and traction the arm bones back so you feel a coiling action in your upper back. 

Uttana Shishosana Alignment

Common Misalignment- Students who are tight in the chest, shoulders or upper back or are naturally forward benders often miss the opportunity to access deep thoracic backbending here.

The Fix It- Take a block underneath each of your palms and straighten the elbows so the forearms lift from the earth. You may also need additional support underneath the head in this variation. This can help you find more articulation in the upper thoracic spine, chest and shoulders.

A TIP-  You can amplify the descending of your upper spine by coming onto the crown of your fingertips. Crawl your fingertips forward as far as possible without losing the length in the side body. Now traction both arm bones back as you energetically draw your chest forward. This is an isometric stretch, you will likely feel a strong coiling of the upper back.

Featured Video:Uttana Shishosana – Extended Puppy Pose

Prepatory & Counter Poses

You can prepare for Garland Pose | Malasana with Baddha Konasana | Bound Angle and or Upavistha Konasana | Wide Angle Seated Forward Bend. Counter posing with Uttanasana | Standing Forward Bend and Bhujangasana | Cobra Pose.

Conclusion

I don’t know anyone who doesn’t enjoy Extended Puppy Pose including my Cat!

One Last TIP: Pregnant women often slump forward in the upper body as a result of carrying the extra weight of the baby. Since the shoulders and chest are often an area of tension and congestion for this a wonderful shape to include during your prenatal asana routine.

As your belly grows, you can adjust the pose and take your knees wider, and add a block underneath your forehead.

Continue to practice this once you have delivered as now you are likely breastfeeding and experiencing the same tension, perhaps even more amplified. Uttana Shishosana is one of only a few asanas that’s antadotal to this rounding action. 

Daily practice of Extended Puppy Pose yields best results! Asana is cumulative so i’d rather see you practice 6days a week for 20min rather than twice a week for two hours each. 

It’s great to practice it first thing in the morning as the body’s been dormant and the spine is ripe for a good stretch! Practice on an empty stomach and stay curious as we learn through direct experience.

For those of you who are “with child” (aka pregnant) add it to your daily morning routine and let us know your experience. 

About

Jane

 I teach a SOULFUL, slow flow alignment based Vinyasa where self inquire is encouraged and joy of being is the pinnacle. Read More..

extended-puppy-pose

Eagle Pose Garudasana

Eagle Pose – Garudasana, pronounced – gah-rue-DAHS-anna is a Standing Balancing pose that requires mobility of your shoulders and hips, balance and focus.

Garudasana comes from the sanskrit root Garud, which means “Eagle” and Asana = Pose or Seat.

It’s said that this mythical king bird was protector of humanity and preserver of creation and a vehicle of Lord Vishnu’s. He attained the elixir of immortality known as “Soma” and saved his mother from enslavement.

Garudasana Pose Benefits & Precautions

It is an all levels asana that’s traditionally practiced in Hatha, Bikram, Ashtanga, Vinyasa, Power and Iyengar Yoga classes.

Eagle Pose stretches your hips, shoulder and upper back and strengthen your ankles, calves and legs. It also benefits joint mobility, coordination, balance, focus and flushes the lymphatic system. Like all standing poses leaning into your breath (ujjayi) and vision (drishti) can bring great concentration and deep peace.

Precautions include any ankle, shoulder, knee or hip injuries.

Eagle Pose – Garudasana Breakdown

Eagle Pose stretches your hips, shoulder and upper back and strengthen your ankles, calves and legs. It benefits joint mobility, coordination, balance, focus and flushes your lymphatic system. If you struggle with balance this is a great pose to practice daily. 

Below is a Step- By- Step Pose Breakdown on how to get into Eagle Pose. I will guide you in with specific attention to alignment. I’ll include different modifications for beginners or those who struggle with balance, or have chronic tightness in the shoulders. Different body types and physical challenges will require different approaches.

I’ll also include options to up level and variations that add challenge. Just keep clear that each day is fresh and will likely require something slightly different. A keen student accounts for this and practices truly listening for the bodies needs instead of asserting wants or recreating a memory of what was. 

Please prepare your body with Cow Face Pose | Gomukhasana and Chair Pose | Utkatasana and you can counter pose with Bridge Pose | Setu Bandhasana when you are finished.  Keep a block handy!

Eagle Pose Infographic

Eagle Pose Garudasana infographic_JC-118-16

Eagle Pose Instructions

  1. Begin standing at the front of your mat in Tadasana, arms alongside you, palms facing forward.
  2. Bend both knees and and cross your left thigh over your right thigh. Cross as close to the pelvis as possible.
  3. Extend your arms alongside you shoulder height and criss cross your left arm under your right. Cross as close to the shoulder joint as possible.
  4. Bend both elbows and lift them leveled to the earth. 
  5. Palms together, lift your elbows up, draw your forearms forward and reach your fingertips toward the sky. 
  6. Keep your shoulder blades softening down your back, toward your waistline and your upper back embedded (as opposed to rounding and exiting). 
  7. Square your hips and chest to the front of your mat and level them in relation to the earth. Belly draws in and up.
  8. Gaze at one point out in front of you. 
  9. Hold for 8-10 breaths, focusing on smoothing out any inconsistencies in the breathing.
  10. Exhale, back to Tadasana and repeat on the opposite side.

Eagle Pose - Garudasana

Featured Video: Garudasana – Eagle Pose For Beginners

Eagle Pose Modifications

Modification #1– Beginners can omit the foot hook and cross the leg over the top of the standing leg, instead, resting the toes gently on the floor or a block. 

Modification #2- If your palms don’t touch, press the backs of your hands together or take opposite hand to shoulder. 

Modification #3- You can do this against a wall for support balancing. This also provides great feedback for where squared hips actually are.

Eagle Pose Variations

Variation #1– Hook the top of your left foot behind your right calf if it happened naturally but resist the temptation to unsquare your hips to get there. This can tweek the knee once you square the hips.

Variation #2- You can hinge forward at the hip crease and try to touch you elbows to your knees. Stay a few breaths and return to the classical variation

Preparatory & Counter Poses

You can prepare your body with Cow Face Pose | Gomukhasana and Chair Pose | Utkatasana and counter pose with Bridge Pose | Setu Bandhasana.

Conclusion

Eagle Pose -Garudasana! It mobilizes the upper back, shoulders and hips and builds coordination, balance and massive focus!  Learning to awaken the upper back and shoulders is essential for more challenging inversions like Handstand | Adho Mukha Vrksasana and Headstand | Sirsasana.  

If you struggle with balance this is a great pose to practice on a regularly, especially as we age and balance becomes less taken for granted and more of a necessary practice.

LAST TIP: Practice this twice on each side and do the first one with either your back to the ground or with your back against a wall. Feel for your back body embedding (drawing into your body) instead of rounding and exiting your body.

The shoulders and hips should both be touching the earth or the wall, so the front body is long and broad. You want to feel the natural curve in your low spine (lumbar) just that, natural (so not flattened) and similarly with the natural curve in the neck spine (cervical), present and natural.

Then, when you practice the second round standing you will have muscle memory from the less challenging version while you were using the earth or wall for feedback. Give this tip a whirl and please let us know if practicing it twice with the considerations above helped inform your standing expression!

Don’t worry about your upper foot wrapping around your calf, it’s not necessary. Don’t even worry about falling as the ground, is right there. The one requirement is to be open and stay curious!

Ready to take your healing further? Click here to access yoga courses for beginners and start your journey toward lasting wellness today.

About

Jane

 I teach a SOULFUL, slow flow alignment based Vinyasa where self inquire is encouraged and joy of being is the pinnacle.Read More..

eagle_pose

Balasana Pose

Today’s feature Pose is Extended Child’s Pose – Utthita Balasana! It’s the ultimate relaxation pose! It’s a great starting point or ending point to any sequence and a great spot to rest and reconnect to your inner experience. For such a juicy welcoming posture that provides so much comfort and ease it’s not so easy for student to honor the call. 

Let’s keep in mind that the practice of Yoga is ultimately a homecoming, and it encourages choices based on direct experience in the moment. So when Utthita Balasana calls, come running with open arms!

Utthita Balasana is pronunciation is, bah-LAHS-anna, the translation from sanskrit to english is: Utthita = Extended, Bala = Child and Asana = Pose or Seat.

It’s al all levels Asana from the Seated Forward Bend FamilyThe extended (utthita) version is slightly different than traditional Child’s Pose in that your knees are splayed wide rather than together and touching. The extended version allows the ribcage to sink between the inner thighs and enhance the stretch in the spine.

Balasana Benefits & Precautions

Extended Child’s Pose stretches the entire spine, hips, groins and feet and releases fatigue, stress, insomnia and brings ease to the mind-body. It strengthens our ability to take rest and turn within.  You will find it in many traditions including Hatha, Vinyasa, Yin, Restorative and Prenatal Yoga. 

Please refrain or vary the shape to suit your needs if you are working with spine, shoulder, neck or knee injuries. 

Extended Childs Pose Introduction

In the following article learn Step- By- Step on How To enter Extended Child’s Pose and how to spend your time once you’ve arrived. 

Per usual, detailed alignment on how best to stay safe.  Plenty of different perspectives will be offered for all bodies, so everyone is included. Modifications and variations will be given so you can personalize your experience and make it just right for your body in the moment!

Keep in mind that if your a Teacher, you want to experience all the modifications and variations so you have a plethora of tools in your toolbox and you can serve all your students. Remember, yoga is a practice of direct experience and you must experience in order to really teach others.

I’ll also incldue the most Common Misalignments and how to best Fix It as well as precautions and who this pose is not for. 

Lastly there is a final TIP, that can employ to assist you in getting the most out of your time in Balasana! 

Please keep two blocks handy!

Extended Child’s Pose – Utthita Balasana Infographic

Balasana extended childs pose infographic_JC-118-6

Balasana Pose Instructions

  1. Balasana- Extended Child’s Pose. Start on all four in Table Top. Bring your big toes to touch and display your knees comfortably toward the outer edges of your mat.

  2. Extend your hips back and down toward your heels and rest your upper body between your inner thighs. Feel your spine drop into your body.

  3. Arms extend long and forward towards the front edge of your mat.

  4. Forehead rests to the earth.

Here’s the hard part, receive. Receive the peace and relief that Balasana offers. Stay as long as you like and revisit as often as you please!

Balasana Pose Modifications & Variations 

Modification #1 Take your forehead to a block (flattest height for most) if that feels more comforting for your neck. 

Modification #2Take a blanket behind the backs of the knees if your knees if you feel restrictions when taking your hips back.

Modification #3Bring your inner thigh bones together and take your arm bones back along your side body, palms facing up. This is a great modification for anyone working with shoulder challenges.

Variation #1- Take a block underneath each of your palms and straighten the elbows so the forearms lift from the earth. This can help you find more articulation in the upper thoracic spine, chest and shoulders.

Variation #2-  Take a bolster underneath your torso and an additional blanket under your skull. In this Restorative Variation you will turn your head to one side and stay 3-5 minutes and then turn your head in the opposite direction and enjoy another 3-5 minutes.

Common Misalignment

Common MisalignmentA super common place this pose goes south is students either take their knees too far apart (the bendie bodies) or they keep them too close (tighter bodies) and don’t benefit from the spine sinking into the back body. 

The FIX – Take the knees a little closer (a few inches) so there’s no pressure on knees or explore taking the knees wider so your spine can drop down in between your thighs. 

A TIP-  You can assist the process of lengthening your spine by coming onto the crown of your fingertips. Crawl your fingertips forward on your inhales (your hips will naturally lift) and without losing ground gained with hands moving forward traction your hips back towards your heels on your exhales.

Featured Video: Extended Child’s Pose Stretch – Balasana

Conclusion

Extended Child’s Pose – Utthita Balasana is a quintessential yoga pose in any style of yoga. Its restorative in nature but can be used as a precursor or post pose to and asana sequence. It’s also a beautiful place to pause and reconnect to the life happening within you. Although it’s known as a resting posture I find that the ability to take it when needed is only for the mature. It’s always in your back pocket and never more than a choice away!

Utthita Balasana stretches the entire spine, hips, groins, the tops of the feet and releases fatigue. It brings ease to the mind-body and strengthens our ability to take rest and turn within. It’s considered an introverted pose and can be taken by anyone at anytime without any limitations on how long you stay. 

One Last TIP: If your pregnant there’s a good chance that at some point during your pregnancy you will start to slump forward in the upper body. This is common and is a result of carrying the extra weight of the unborn baby.

The shoulders and chest are an area of tension and Extended Child’s Pose is an anecdotal shape for both pre and post natal asana. As your belly grows, you can simply adjust the pose by widening your knees and add perhaps adding a block underneath your forehead

This is a pose that newbies often resist and over time embrace. Let us know what your favorite variation or modification is and how you benefited from it. 

About

Jane

 I teach a SOULFUL, slow flow alignment based Vinyasa where self inquire is encouraged and joy of being is the pinnacle.Read More..


balasana_pose