How Do You Start Yoga At Home: Easy Routines for Every Fitness Level

I remember when I was a beginner and first started out on my yoga journey,”by myself” and this was before it began to dominate the online realm. I had heard great things, but had no clue what I was doing. I would spend an embarrassing few minutes trying and failing to get into the splits, feel defeated and call it quits

How Do You Start Yoga

How do you start yoga when you’re completely new and unsure where to begin? This question shaped my own early journey with yoga. I remember being a beginner, navigating it all by myself before yoga exploded into the online world. I had heard all the benefits, but honestly, I had no idea what I was doing. I’d attempt a few stretches (usually the splits), fail miserably, feel defeated, and call it a day. I resigned myself to thinking maybe I just wasn’t made for yoga.

Eventually, I found a studio I liked, and that provided more structure and insight. I still couldn’t master advanced poses, but the guidance of a teacher kept me going. Most importantly, being part of a class kept me accountable. Practicing on my own often ended with me quitting halfway through, no matter how good my intentions were.

Discovering the Power of Consistent Practice

As time went on, I began to experience the benefits—my body grew more flexible, and my mind became noticeably calmer. This progress made me prioritize my practice. I didn’t want to feel good only when the studio schedule allowed. I wanted that peace and clarity every day. That’s when I decided to start practicing at home. If you’re wondering how do you start yoga by yourself, know this: consistency is the key. Once you commit, momentum builds and you naturally keep going—even if you take a break, you’ll always come back to it.

Make It Work for You—Start Small

When I committed to home practice, I discovered that it didn’t need to be long. Not even an hour. Just fifteen minutes a day created profound shifts in my life. If I couldn’t get to a class, I didn’t feel off-track because I could always squeeze in 10–15 minutes to move, breathe, and reconnect with the present moment. The impact? Incredible.

This beginner’s guide on how to start yoga by yourself is here to help you take the first step from home with confidence, ease, and joy.


What Is the Best Way to Start Yoga?

The best way to start yoga is simple: just begin. All you need is yourself and an open mind. Don’t have a yoga mat? A towel or sarong works just fine. No props like blocks or straps? Use books, belts, or cushions for support. Search online for yoga videos that match your level and goals. Once you start, committing becomes easier over time.

There’s no finish line in yoga—it’s a lifelong journey meant to be savored. Be patient and respect where your body is. With time and dedication, your physical and mental capacity will expand naturally.

The true benefits of yoga often appear off the mat—in your relationships, mood, and inner peace. The quiet, mindful awareness you cultivate in practice begins to influence every part of your life. So if you’re asking yourself how do you start yoga, remember that the most important step is simply to start and keep showing up.


What You’ll Need to Start a Home Yoga Practice

Just You and an Open Mind

To begin your yoga practice at home, all you need is yourself and a willingness to try. Ideally, a yoga mat helps, but it’s not essential. A towel or blanket can be a great substitute.

DIY Props

Yoga props are helpful but not required. Be resourceful—books can replace blocks, a belt can act as a strap, and a rolled-up blanket can be your bolster. It’s more important to get started than to have perfect equipment.

Create a Dedicated Space

Design a space that’s quiet, clean, and free of distractions. A tidy area reflects the mental clarity yoga cultivates. An inviting space makes it easier to commit to your practice regularly.

Use Online Resources

If you’re not confident leading your own session, turn to online yoga videos. There’s an abundance of free and paid content from instructors of all levels. Spend some time exploring different styles and teachers until you find one that resonates.

Make It a Habit: Schedule Your Practice

The real challenge in starting yoga is not finding a class or video—it’s following through. To ensure consistency, schedule your practice like any other important appointment. Look at your weekly calendar and block off a minimum of 15 minutes for yoga. This short amount of time is manageable and can lead to long-term commitment.

The flexibility of home practice is a double-edged sword—it’s convenient, but easy to skip. Stay accountable by treating it as a non-negotiable part of your day. If you’re still asking how do you start yoga, the answer is: plan it, schedule it, and start small.


TRAINING TYPE: FLOW SEQUENCE

CATEGORY:YOGA

SUBCATEGORY:BEGINNER YOGA

PLANNED TIME:10-15 MIN

LEVEL:BEGINNER  

PROPS:NONE

What Is The Best Way to Start Yoga?

​ 

The best way to begin yoga, is to just start! All you really need is yourself and an open mind.  If you don’t have a mat, roll out a towel or sarong. If you don’t have props like blocks and straps, find things around the home like books and a belt. Use cushions for support and jump online to find yoga videos that you can connect with and suit the level you are at. Once the ball is rolling, it’s much easier to commit to practicing. Over time you can work on getting all the right equipment and creating a space that invites you in every day.

There is no end goal with yoga, the journey is life long and every step should be enjoyed. It’s always important to listen to your body and respect where it’s at and trust in the process. Over time and with commitment the body and the mind will expand and grow.

It doesn’t take long until you’ll start to notice the benefits across all aspects of your life. The best rewards from yoga are actually those you reap out in the world and in your relationships with others and with yourself. That quiet, calm mind that you cultivate on the mat, will start coming with you to other places. You’ll find yourself more content in the moment and less triggered or caught up in the stories of the mind. All of this and more is yours when you start practicing yoga regularly, so what are you waiting for?

What will you need to start a good at home Yoga Practice?

All you really need is yourself and an open mind. Also, preferably a yoga mat, but if you don’t have one right now, even just a sarong or towel will suffice! When it comes to props, they are not essential, but there are so many things lying around the house you’ll be surprised you can use. Instead of a block you can use books. Grab a belt in the place of a strap and instead of a bolster grab yourself a blanket and roll it up.

Create the Space

Creating a space that is inviting and conducive to stillness can really help motivate you onto your mat and into your practice. You know what they say about a clean room being the key to a clear mind, well it’s definitely true. We want to create a space that is a reflection of the state of mind we are trying to cultivate – quiet, clear and free from distraction! This will help set the tone and drop you into the zone a little easier.

Jump Online

If there isn’t the confidence there yet to lead yourself through a practice, there is still absolutely no reason to not practice at home! There are so many teachers and yoga videos online to offer you support and guidance, you might just have to flick through a few videos to find one that resonates.

The great thing about the online yoga realm, is that there is an abundance of options out there. You can really get specific with what you are after, what parts of the body you want to target and how long you want to practice for.

Schedule a Time

If you’ve gone through all of these steps, then you’re pretty much ready to go. All that’s left is to get on your mat! However, we all know It’s one thing to plan and create the space to do yoga at home, but actually committing to your practice, that’s another thing entirely. In order to make sure you see it through, it’s recommended to schedule a time in advance.

Yoga is only going to be effective if you are persistent and show up regularly! One of the benefits of a home practice is that you aren’t restricted to a specific class schedule or length of class. This can also be your downfall as there is no teacher or time frame to keep you accountable. So with that in mind, I recommend looking at your week ahead and scheduling a time in advance to practice and treat it like a non-negotiable appointment. Aim for a minimum of 15 minutes, it’s short enough that it’s not overwhelming, but still long enough that it will encourage a steady habit.

Yoga Practice at Home Sequence

We will break down the steps needed to be taken to set up a successful home yoga practice for beginners. It goes over what is needed, the type of space you want to create, the importance of scheduling a time and finding a videos online that can provide guidance until there is more confidence in practicing alone.

When you are practicing at home without support it is important that you listen to your body and take modifications when needed. Never be afraid to simply rest in Child’s Pose and don’t push yourself past your limits, as the body takes time to open up. The real benefits of yoga are the transformations you start to see off of the mat, and they will come with consistent practice. Trust the process and enjoy the ride.

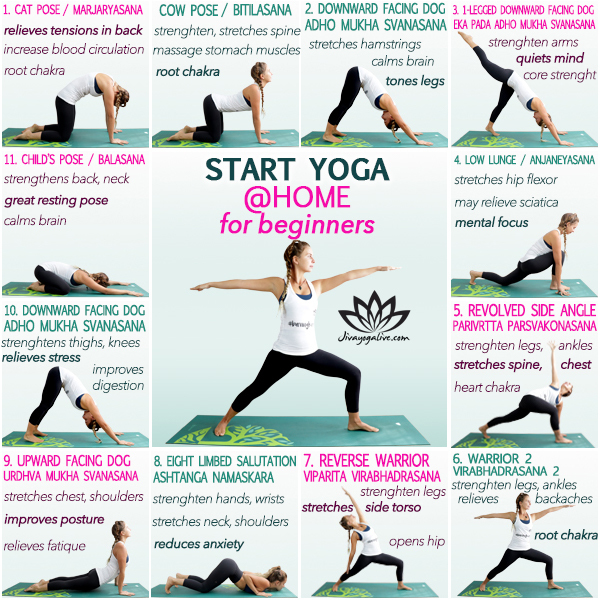
Start Yoga at Home For Beginners ​Infographic 

how to start yoga at home for beginners infographic         how do you start yoga

Cat-Cow – Marjaryasana-Bitilasana 

Coming into a Table Top position, making sure that the wrists are in line with the shoulders and that the knees are in line with the hips. Spine is neutral, head and neck in one line, and the gaze is slightly down and towards the top edge of the mat. Inhale, drop the belly down, take the heart forward, arching the back, coming into Cow.

Exhale and move into Cat Pose by pushing into the palms, rounding the upper back, bringing the belly button back towards the spine and dropping the chin to the chest. Inhale, again coming forward, opening the chest. Exhale, pushing back, rounding the spine. It’s good to work through a few rounds of these Cat-Cow movements in order to warm up the spine and let it know we’re going to move into it.

This pose mobilises the spine, shoulders and the neck and is the perfect warm up for all levels of yogi. It is a gentle way of preparing the body and the spine for deeper stretches and is a safe way of relieving tension from the back.

cat-cow

Downward Facing Dog – Adho Mukha Svanasana

Tuck the toes and push into the palms and take the hips up into Downward Facing Dog. Start by pedalling out the legs and bending the knees. Pushing down into the palms, fingers are spread wide and allow the head and neck to drop.

Downward Facing Dog is an opportunity to catch you breath and balance before moving onto the other side of the body during your flow.

downward facing dog pose           how do you start yoga

One Legged Downward Facing Dog – Eka Pada Adho Mukha Svanasana

Rise the right leg back and up, coming into a One Legged Downward Facing Dog.

It is very common to dump the weight of the body into the left shoulder here, but try to keep the shoulders square by pressing evenly into both hands.

one legged downward facing dog             how do you start yoga

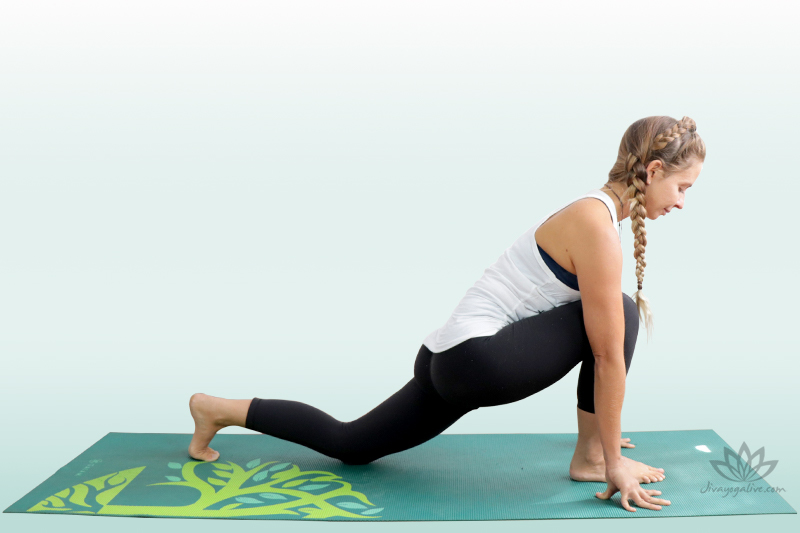
Low Lunge – Anjaneyasana

Bend the right knee and come forward, transferring the weight into the hands and step in between the palms, coming into Low Lunge. Hands will frame either side of the front foot and you can use the fingertips for support. There is the option to rise the back knee or you can take it down for more support. Make sure that the neck and head are in line with the spine.

In Low Lunge you can start to work into the flexibility of the back hip flexor by squeezing the gluteus muscles. Try to keep the hips square, by sending the back hip forward.
low lunge 2

Revolved Side Angle – Parivrtta Parsvakonasana 

Take the left palm and press it flat down into the earth and take the right arm. Spinning the chest open coming into an Revolved Side Angle. Gaze is up to the top hand. Really pressing down into the left palm and the ball of the back left foot. Take a breath, and open the chest more.

This pose strengthens and stretches legs, groin, hamstrings and at the same time opens the chest, the shoulders and the spine.

revolved side angle pose - twist

Warrior 2 – Virabhadrasana II  

Spin the back foot down and cartwheel the arms, coming into a Warrior Two. The front toes are facing forward, and the back foot is in on an angle. Press down firmly into the outer blade of the back foot. Arms are extending long to the sides and as you exhale, drop a little deeper, staying low in the legs.

Warrior 2 is working deep into the strength of the legs and is particularly powerful if you energetically hug the legs together. This turns on the underside of the thighs and requires strength, determination and concentration. All of this is going on, while you are cultivating balance and groundedness.

warrior 2

Reverse Warrior – Viparita Virabhadrasana   

Inhale and lean the torso forward and flip the front palm. Lean back, stretching the front hand up and back, coming into a Reverse Warrior. Stay low in the legs and find strength by hugging the feet to the midline, activating the underside of the thighs.

The key in Reverse Warrior is to stay low in the legs. It might seem like a reprieve and a moment to take rest after a strong Warrior 2, but keep in mind that the mind will often bow out before the body is ready, so see if you can stay low for a couple more breaths!

reverse warrior pose           how do you start yoga

Eight Limbed Salutation – Ashtanga Namaskara    

Cartwheel the arms down to the ground and push back into a Downward Facing Dog momentarily. Take a deep breath here and then move into Eight Limbed Salutation, also known as Knees-Chest-Chin Pose. Drop the knees directly down, take the chest down in between the palms and have the weight is in the hands. Hips and tailbone are staying up to the sky. Hugging the elbows in towards the body, with the chin slightly resting on the earth.

Knees-Chest-Chin Pose pose can seem tricky at first, but the key is to have the weight in the hands and to be drawing the elbows in towards the body. Everything else is relatively light and the chin is only gently resting on the mat.

Eight limbed salutation - ashtanga namaskara

Upward Facing Dog – Urdhva Mukha Svanasana    

Come down onto the belly and then slide forward into Upward Facing Dog. Make sure the shoulders are down away from the ears and draw the shoulder blades back and together. Exhale, and bend the elbows and lower the torso and forehead back down to the earth.

Here you are stretching and strengthening the spine and shoulders, toning the abdomen and opening the chest and lungs. The key is to really lift the chest and squeeze the shoulder blades back and together. There should be ample room between the shoulders and ears.

upward facing dog              how do you start yoga

Downward Facing Dog – Adho Mukha Svanasana  

Push back into a Downward Facing Dog and then preparing to move into the other side of the body. Notice the difference between your first Downward Facing Dog of your practice and your last. When the body is stiff this pose can feel like a full workout, but as the body warms and opens, it gets easier and easier to hang out here.

downward facing dog pose

Extended Child’s Pose – Balasana

After finishing up the other side of the body, drop the knees down as wide as the mat and settle back into a Extended Child’s Pose. Dropping the forehead down to the earth, allow the belly to be soft in between the thighs and take rest.

This is the perfect pose to take rest in, both during and after your practice. It’s an opportunity to bring everything back into balance, to find your breath and to elongate the spine.  

Downward Facing Dog – Adho Mukha Svanasana   

extended child pose             how do you start yoga

Featured Video How to Start Yoga at Home for Beginners

Yoga Poses for Beginners

If you are still feeling a little lost on your mat, its ok, because Ive got your back :). I want to share with you some very beginner friendly poses that lay the foundations for most of the yoga flows you will be introduced to in a class. It also means if you don’t have access to the internet and an online tutorial. You can simply move through these simple poses two or three times, spend some time is Savasana (laying flat on your back) at the end and bam, you’ve got yourself a solid yoga practice. If you can get comfortable with these poses, and even better their Sanskrit names, you’ll be ahead of the game when you finally do make it into a class.

Cat-Cow – Marjaryasana-Bitilasana

Moving through a few rounds of Cat-Cow is extremely juicy and therapeutic for the whole back and neck. The opposing movements allow you to both stretch and compress the spine, inviting more space and increasing mobilisation. Really be dramatic with the postures by pulling the shoulder blades apart when you’re imitating an angry cat and sucking the belly button right back to the spine in Cow. Spend a few extra minutes working into some intuitive free movement, moving the spine back and forth, the hips from side to side and taking some body rolls – anything that feels good in YOUR body in order to warm up the spine.

 Downward Facing Dog – Adho Mukha Svanasan

Downward Dog is one of those poses that in the beginning it simply sucks! Your heels refuse to reach the floor, the shoulders and arms are quick to tire and it feels like your instructor is making you hang out there for hours. You’d rather drop the knees and take a Child’s Pose. However, over time, and once you have the proper alignment down, Downward Dog starts to become your home base. It becomes a pose you can relax into and it provides a reset and full body stretch between flows and the more difficult poses. The key is getting the foundations of the pose down right from the get go. I encourage you to get an instructor to guide you into the pose in class or find a tutorial online!  

Low Lunge – Anjaneyasana

Get the alignment of the legs and feet right in a simple Low Lunge and you already have the the foundational base ready to jump into other standing poses, such as the Warriors! Here you have the option to work into both your strength and flexibility; and there is always the option to take a modification and drop the back knee down to the earth. This makes this pose very accessible and beginner friendly, yet you will still be working to stretch, strengthen and simultaneously improve balance and focus. Revolved Side Angle – Parivrtta ParsvakonasanaThe trick to finding some ease in the perceived effort of this pose, is to hug the feet towards the midline. This goes for all the standing poses in order to find strength and activate the underside of the legs. This will tap into your power reserves and you’ll be surprised at the strength you have. Remember, the mind will always want to quit before the body does, so when you feel like coming out of a pose, firm into the legs and see if you can find just two more breaths!

Warrior 2 – Virabhadrasana

I invite you to stand in your strength in this pose, as an incarnation of a fierce warrior, Shiva. When that front leg starts to tire, keep in mind that zen archers would practice holding a bow for two years in this position before they were allowed to shoot their first arrow. Find some ease in the effort by energetically drawing the feet towards the midline, as though you want to bunch up your mat at the middle. The aim is to stand firm and strong, yet at the same time relaxed and at ease.

Cobra – Bhujangasana

An energizing back bend to open the chest and heart. Bhujang means ‘serpent’, and this pose is an essential component of the Surya Namaska – the Sun Salutations. It is a powerful chest opener and at the same time, it is extremely therapeutic for the spine. It also works to stretch and tone the abdominal muscles and organs and stimulate the digestive fires.

Is Doing Yoga at Home Effective?

The more consistent you are with your yoga practice at home, the more effective it is going to become. The same with anything, consistency is the key, but this doesn’t mean that you have to practice for an hour, seven days a week! Spending twenty minutes each day on your mat, to stretch the mind and the body is going to have profound effects on your life across the board. If there are days you don’t feel up to yoga, give some meditation or Pranayama a go.

Meditation

If you are new to meditation, then the chances are that sitting in silence trying to quiet the mind is going to lead to a whole lot of frustration and very little stillness. Meditating in this way is actually very advanced, as you’ll find out quickly that it can be very challenging to quiet down the stories of the mind. A better option in the beginning is to find some guided meditations that resonate.

Pranayama Breathing is something we do so naturally, that it requires no conscious effort. It is an involuntary action that is happening whether we are awake or sleeping. To breathe, is to live. Pranayama is the practice of controlling the breath, with Prana meaning ‘life force’ and yama meaning extending or stretching in Sanskrit. Controlled breathing can decreases the effects of stress, instil focus and mental clarity and can energize and detox the body.

One simple Pranayama technique, is known as the Cooling Breath Pranayama / Sitali Pranayama. Find a comfortable easy seat. Curl the tongue into a U shape and project it out of the mouth slightly. If you can’t curl the tongue it is fine to make an O shape with the mouth. Take the chin to the chest and then begin to inhale through the mouth, taking the chin up and dropping the neck back as far as is comfortable. Close the mouth and exhale through the nose as you drop the chin back down to the chest.

Repeat for eight to twelve breaths. Any time spent on your mat, is time well spent and over time there is an accumulative effect that takes place and the benefits start to ripple out and have a domino effect across so many aspects of your life.

How do you Start Yoga When Overweight

Going into a yoga studio can seem a little daunting if you don’t think you fit the typical yogi image, but yoga can (and should!!), be practiced by everyone. At all ages and stages of life, and by all shapes and sizes. We all start somewhere and there are so many styles of yoga and variations of the poses, that make them accessible to all. If there is some doubt and anxiety in the mind though, there is the perfect opportunity here to start practicing at home.

Jessamyn Stanley is a great role model to check out! She is using yoga to promote positive body image and breaking down mental and emotional barriers to practicing. She emphasizes how you FEEL, as opposed to how you look and she celebrates her students bodies in all the shapes and sizes that they come in. She has a top selling book on Amazon called, Every Body Yoga: Let Go of Fear, Get on the Mat, Love Your Body, and I HIGHLY recommend checking that out!

Yoga is a mindset that cultivates self love and body confidence. Love your body where it is at and show it some kindness by taking this time for self care. With consistency your body will open and start to change, so enjoy the journey and allow the transformation to unfold.

Conclusion: How do you start yoga?

A few things to keep in mind before you jump in! Firstly, always make sure to listen to your body. You know it best and are the only one that can hear its subtle cues. Never force your body into a pose and don’t be scared to take modifications or rest in Child’s Pose when needed. Trust that over time and with consistency your body will open up along with your flexibility. You have the necessary steps in mind now to really get your at home practice going. I promise that the hardest part is just making it onto your mat. Make the time, prioritise this self care and watch yourself blossom and grow.

This article has provided the necessary steps to establishing an at home yoga practice. Grab the essentials, create the space, find some videos online that resonate and schedule the time like a non-negotiable appointment! Prioritise taking care of yourself and loving yourself just as much, if not MORE than you love others. This is not selfish, this is KEY to being the best version of who you already are, for yourself and for others. You have to fill your cup first and yoga is a great tool to do just that.

About

Charlie Hanna

Charlie is a Yoga Alliance certified Hatha, Yin Yoga & Meditation teacher with a psychology degree in her back pocket. She is currently on a mission chasing sun and Read More..

Ready to begin your own yoga journey from home? Click here to access our full beginner-friendly yoga course and start building a daily practice that transforms your body and mind from the inside out.
Yoga to Help You Fart: Relieve Bloating Fast with These Simple Poses

This article will provide a sequence of poses that are beginner friendly and are perfect for practicing first thing in the morning. Essentially it will be a break down of the Sun Salutation, going through each pose in depth, cuing proper alignment. Once each step has been broken down, the student will have the 12 poses of Surya Namaska A to practice in isolation, or in a Sun Salutation style of flow.

Finding Relief: Why You Need Yoga to Help You Fart and Support Digestion

Yoga to help you fart might sound silly at first, but if you’ve ever struggled with gas, bloating, or general digestive discomfort, this simple solution could become your best friend. Digestive issues are not only uncomfortable and embarrassing—they can also be a sign of deeper systemic imbalances. Millions silently suffer, and the root often lies in how far we’ve drifted from our natural, species-specific diets. Combine that with modern stress and poor posture, and it’s no surprise our digestion suffers.

Being open about these issues is the first step to healing. If you’re uncomfortable discussing gas or bloating, know that these are common concerns. Getting comfortable with the uncomfortable opens doors to real solutions. Yoga to help you fart is one such solution—an empowering, accessible practice that supports natural digestive movement and offers real-time relief.

My Digestive Health Journey: A Personal Struggle

I’ve personally lived through a digestive nightmare. From the outside, I looked healthy, but inside I was bloated, gassy, and miserable. Over the years, I’ve tried hundreds of diets, spent thousands of dollars on supplements and lab testing, and encountered numerous practitioners who simply labeled me with IBS—a vague diagnosis that offers little direction. The harsh truth is that many health professionals don’t fully understand the digestive system when it comes to functional wellness.

The turning point came when I discovered a high-carbohydrate, low-fat, fruit-based lifestyle paired with yoga. Not just any yoga—yoga to help you fart. These targeted poses stimulated movement in my gut, relieving pressure, and supporting smoother digestion. When I felt bloated or backed up, a few minutes on the mat would often bring instant results.

How Yoga Promotes Digestive Flow and Gas Relief

Yoga to help you fart isn’t about advanced headstands or impossible backbends. It’s about gentle movements that massage the intestines, stimulate the vagus nerve, and promote peristalsis (the muscular action that moves food through the digestive tract).

yoga to help you fart

TRAINING TYPE:  FLOW SEQUENCE

CATEGORY:YOGA

SUBCATEGORY: MEDICINAL YOGA

PLANNED TIME:10-15 MINUTES

LEVEL:ALL LEVELS  

PROPS:NONE

Yoga to Help You Fart: Positions to Release Gas from Stomach

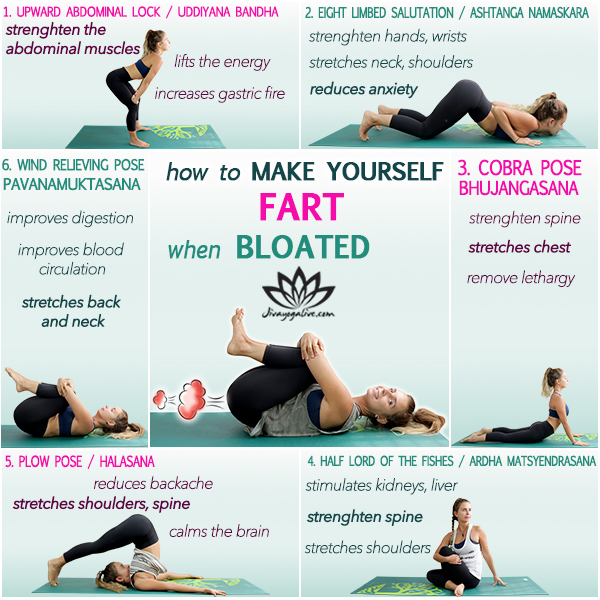
You will be introduced to six poses. These can be used to support digestive functioning and work to encourage the body to release trapped gas that is causing bloating and discomfort. There will be a demonstration of each pose with an explanation of how each asana works to support your digestion.

  • The Abdominal Lock
  • Eight Limbed Salutation
  • Cobra Pose
  • Half Lord of the Fishes
  • Plow Pose
  • The wind relieving Pose

Unwanted gas and bloating can be more than just an uncomfortable topic. It also leaves you with an uncomfortable feeling in the body. I want to get comfortable with the uncomfortable with you; to explore a series of yoga poses that can work to support digestion, and to encourage any trapped gas to leave the body. At the same time this should also help reduce some of your bloating. Excessive gas can also be a sign that diet needs to be looked at, and it might benefit the body to explore the idea of a short detox. Whether that means adding in more fruits to your diet or jumping on a juice feast; these poses will help to support your protocol to better gut health.

INFROGRAPHIC: Yoga to help you fart when bloated

how to make yourself fart when bloated infographic        yoga to help you fart

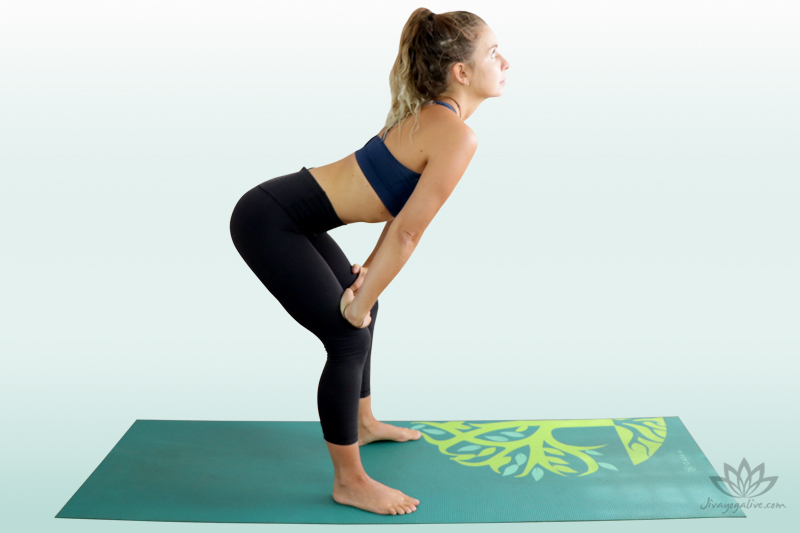
The Abdominal Lock – Uddiyana Bandha 

Come to standing, inhale deeply and then bend the knees and come down to the floor with the hands. Suck in the stomach while remaining in the breath void and come up halfway, resting the hands on the knees for support. Hold for as long as is comfortable and then release the belly first and then breathe in. Come back up to standing. 

This pose involves the contraction of the belly up and into the rib cage, so it is important to only practice this on an empty stomach. It is a great tool to have when dealing with excess gas in the body as the idea is pump the abdomen which encourage any stagnant energies to get moving.

1 Uddiyana Bandha        yoga to help you fart

Eight Limbed Salutation – Ashtanga Namaskara 

From a Downward Facing Dog drop the knees-chest-chin down to the mat. The weight is supported in the hands, chin is resting slightly on the earth and hips are up.

 This pose is lengthening and stretching the abdomen while encouraging any build of gas in the body to move on out of the body. It is providing an internal massage and helps in the purification process of the digestive system.

Eight limbed salutation - ashtanga namaskara

Cobra Pose – Bhujangasana

Sliding down onto the belly and push through the palms to straighten the arms and come up into Cobra Pose. Drop the shoulders away from the ears, open the chest and the collarbones and squeeze the shoulder blades back together. Cobra Pose is stimulating the abdominal organs which is great for digestion and any unwanted gas. At the same time it is stretching and opening the lungs, while toning the shoulders and bum.

cobra pose

Half Lord of the Fishes – Ardha Matsyendrasana 

Extend the left leg down along the mat and bend the right knee up. Take the sole of the foot across the left leg and to the floor. There is the option to bend the bottom leg and have the knees stacked or you can keep that bottom leg straight. Place the right hand at the base of the spine and use the left elbow to wrap around the right knee. Turn and twist over to the right.

Twisting the abdomen is great for digestion and cleansing the internal organs. Half Lord of the Fishes Pose stimulates the liver and the kidney, both of which are essential organs when it comes to the purifying the body.

.


4 half lord of the fishes pose 2

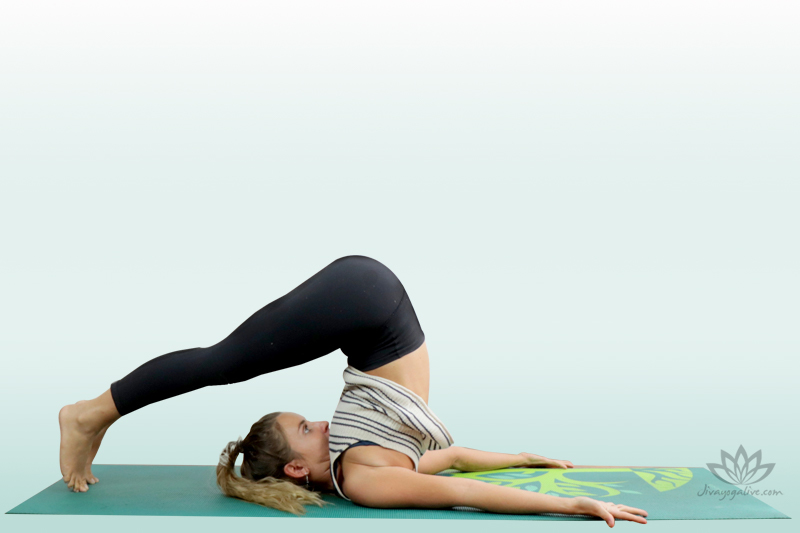
Plow Pose – Halasana 

Come to lying on your back and then send the hips up, coming up onto the shoulders. The legs and feet are extending behind the head and toes are aiming to touch the floor. If the feet do not reach the ground, keep the lower back supported with the hands. If the toes rest comfortably behind you, there is the option to release the back and have the arms resting down, palms facing up.

Plow Pose stimulates the abdominal organs and the thyroid gland, while stretching the shoulders and the spine.


5 plow pose          yoga to help you fart

Wind Relieving Pose – Pavana Muktasana  

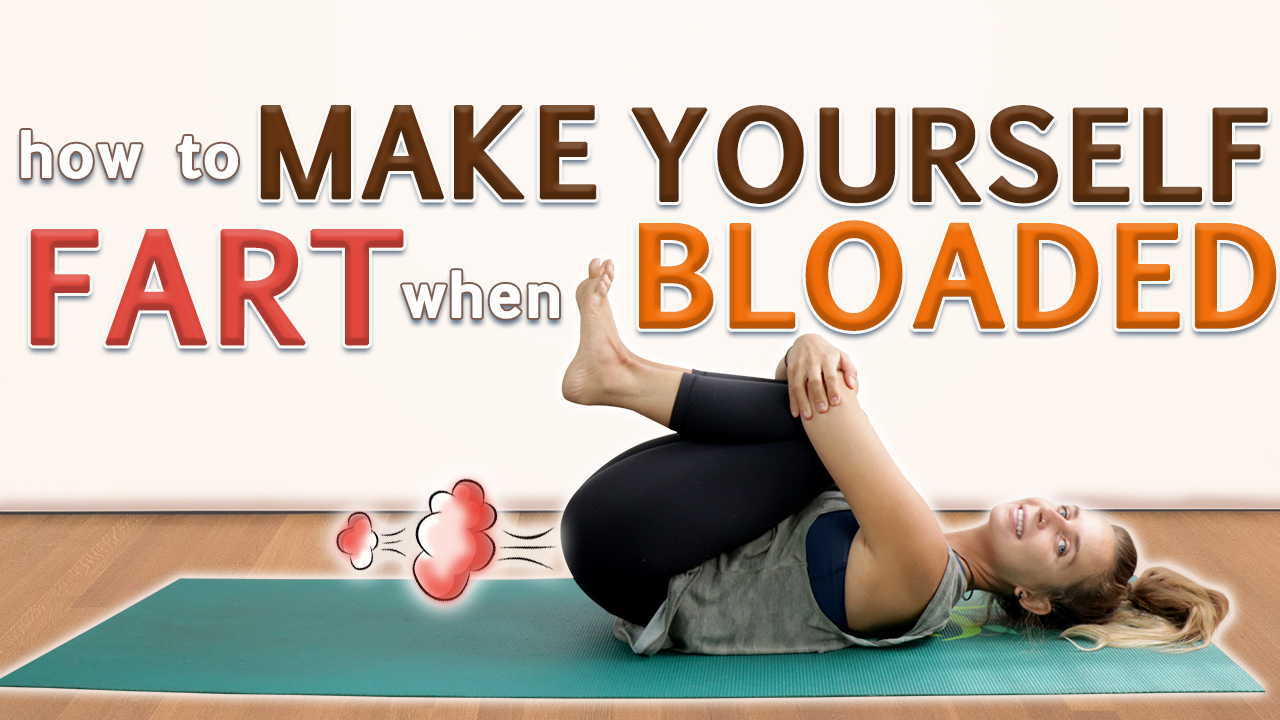
Bring the knees in to the chest and start by lifting the shoulders, neck and head up off the earth so you can wrap the arms around the knees. Grab for opposite elbows, forearms or wrists and then relax the shoulders, neck and head back down and have a chin slightly tuck towards the chest.

As the name suggests, this pose is the king when it comes to encouraging excess gas out of the body. Compressing the abdomen in this way, sends an internal massage down into the digestive organs, especially when there is a focus on sending the breath down into the belly.

6 wind relieving pose    yoga to help you fart

Yoga to Help you Fart: How To Make Yourself Fart When Bloated Video

how to make yourself fart when bloated

Gas in the stomach can be a sign of many things; from poor food combining to constipation, even parasites. Whatever the cause, it is a red flag to have a look at your dietary and lifestyle choices. Come back to basics and find joy in simple foods like fruits and leafy greens. Bring in some yoga to support not only your digestion but your mental state as well. Your gut is strongly linked to your brain, so high stress can also cause excess gas in the body! These poses are very simple and can be done in the privacy of your own home. So now you can really focus on letting that gas and whatever is not serving you, out of your body!

TEACHERS INSIGHTS

yoga to help you fart

Incorporating twists and compression of the belly is a great way to get things moving. They can provide relief from excess gas by forcing it out of the body, but when dealing with digestive issues it is so important to get to the root cause of the issue. Detoxing the body with fruit, juices and periods of fasting is recommended to really heal the body at a deep cellular level.

CONCLUSION: Yoga to Help You Fart

Excess gas can be a sign of something more going on in the belly. It is important that we keep the digestive energies moving. We can do this by including twists that pump fresh blood into the area. We also want to work with folds in order to compress the belly and encourage gas to work its way out. These yoga poses are great to support digestion. However, it is important to look at the bigger picture and also ensure that you are eating easily digestible foods, and keeping stress levels low. The gut is your second brain, so it reacts to your mental state!

Ready to unlock more digestive secrets and long-lasting relief? Click here to access our full courses and learn the full range of yoga and lifestyle tools that can transform your gut health for good.

Basic Beginners Yoga Poses: Top 10 Everyday Poses You Can Do at Home

This article will provide a sequence of poses that are beginner friendly and are perfect for practicing first thing in the morning. Essentially it will be a break down of the Sun Salutation, going through each pose in depth, cuing proper alignment. Once each step has been broken down, the student will have the 12 poses of Surya Namaska A to practice in isolation, or in a Sun Salutation style of flow.

Back to Basics: Why Basic Beginners Yoga Poses Matter More Than You Think

When I first began my yoga journey, I had one goal: the splits. Front splits, side splits—any splits! I also dreamed of floating into handstands and bending into poses that seemed straight out of a circus. But I quickly learned that for many of us, especially those not coming from a gymnastics or strength-training background, these big goals don’t come overnight.

The truth? What really moved me forward wasn’t pushing harder or chasing advanced poses—it was going back to the basics. Basic beginners yoga poses became my foundation. These seemingly simple postures activated muscles I didn’t even know I had and taught me how to build strength and flexibility from the ground up.

If you’re just starting out or feel stuck in your practice, this is your reminder: progress begins with the basics. Don’t underestimate the power of foundational poses like Downward Dog, Mountain Pose, and Cat-Cow. These movements work the entire body and prepare you for more complex transitions later on.

So instead of rushing to invert yourself, slow down. Enjoy the journey. Get comfortable with your beginner poses—and watch how your practice evolves in strength, grace, and confidence.

basic beginners yoga poses

TRAINING TYPE:  FLOW SEQUENCE

CATEGORY:YOGA

SUBCATEGORY: BASIC BEGINNERS YOGA POSESEGINNER YOGA

PLANNED TIME:15-20 MIN

LEVEL:BEGINNER  

PROPS:BLOCKS

INTRODUCTION: Basic Beginners Yoga Poses

This article will introduce you to ten of the top beginner friendly yoga poses that are easily accessible by those even in the early stages of their practice. They are essential foundational poses that will lay the building blocks and build strength for greater flexibility for more advanced poses down the track. It is important that you learn to listen to the subtle cues of the body and not push it past its limits. Consistency is key when it comes to opening the body. There is the option to series these ten poses together to create a flow that you can work through two or three times and voila, you have yourself a solid practice!

When starting out on our yoga journey it is essential that you move with respect to where you are at. It is easy to get over excited and ahead of yourself trying to jump into aesthetically pleasing advanced poses, but if you don’t nail the foundations in the beginning, you are likely to run into injury over time. Make sure that you are moving with correct alignment even in the more simple poses, as this is going to set you up for success and let your practice evolve in a way that is safe. 

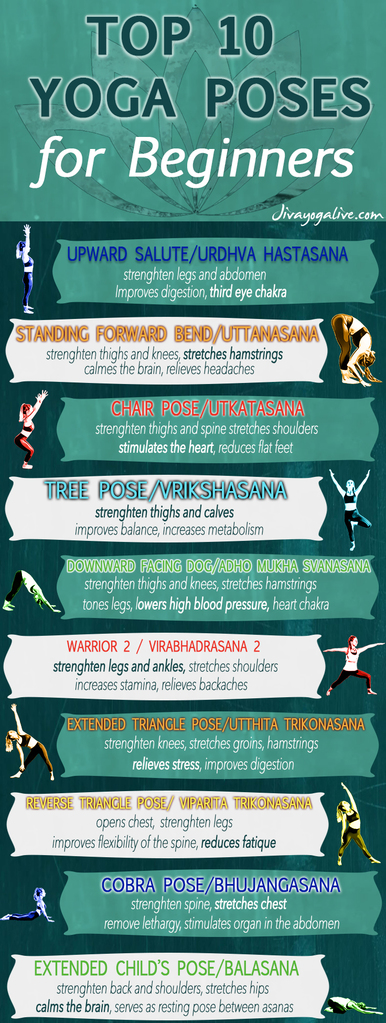
INFROGRAPHIC: Top 10 basic beginners yoga poses 

Top 10 yoga poses for beginners     basic beginners yoga poses

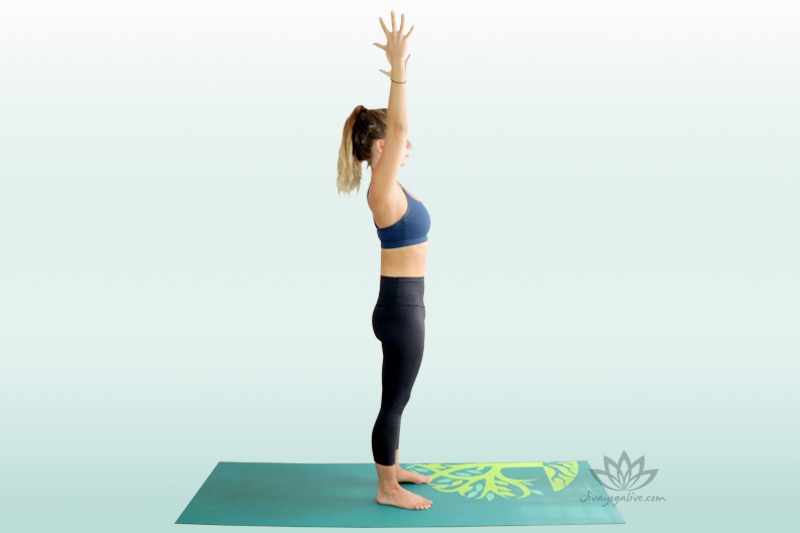
Upward Salute – Urdhva Hastasana 

Inhale the arms up overhead, keeping the arms shoulder width apart, the palms facing one another. Drop the shoulders down away from the ears. Root down through all four corners of the feet, slight tuck of the tailbone. Spine is straight with the head and neck in line.  This pose is the perfect starting point to create space and length in the body. It stretches the sides, the spine, the shoulders and the abdomen and opens the chest and the lungs.

1 upward salute        basic beginners yoga poses

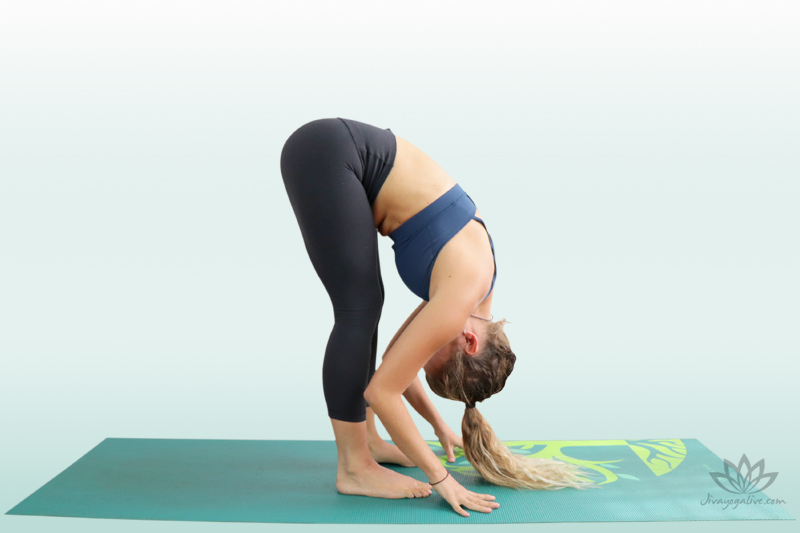
Standing Forward Bend – Uttanasana 

Hinging at the hips start to come down, keeping the arms extending forward and the spine straight with the head and neck in line. Allow the torso to hang heavy. Hands can come down onto your block or can be resting on the floor. A slight bend to the knees is fine.

As the legs open, the spine is lengthening, and the abdomen is being deeply compressed, so there is a lot going on in the body here, even though it feels as though you are just hanging out. Spending upto five minutes here will really let the hamstrings soften and release.

2 Standing forward Bend

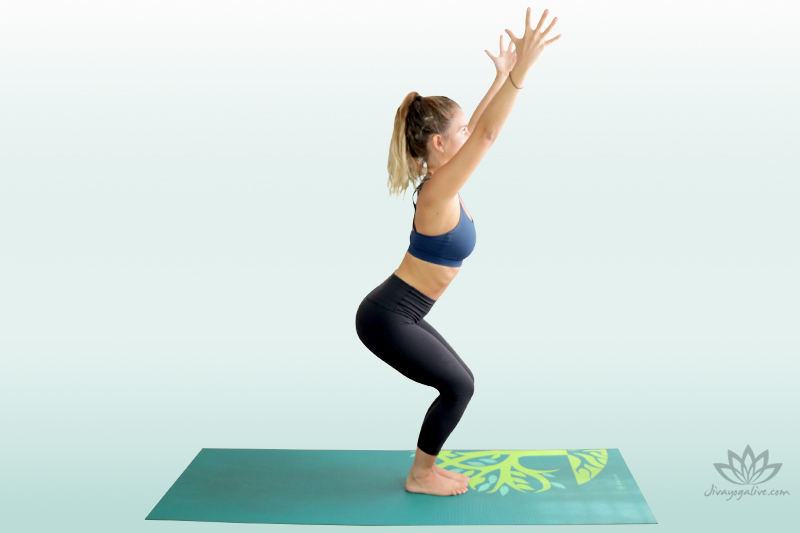
Chair Pose – Utkatasana

Bring the big toes to touch with the heels slightly apart. Bend into your knees and sit the hips down into an imaginary chair. Extend the arms forward and up. Squeeze the knees together. Tailbone is slightly tucked. There is the option to bring the hands into Prayer at the center of the chest.

Chair Pose can get the body and mind heated very quickly! It is a strong workout for the thighs and the trick is to really squeeze the knees together to find strength. Just as the mind wants to give up, try and sit down a little deeper!

3 chair pose        basic beginners yoga poses

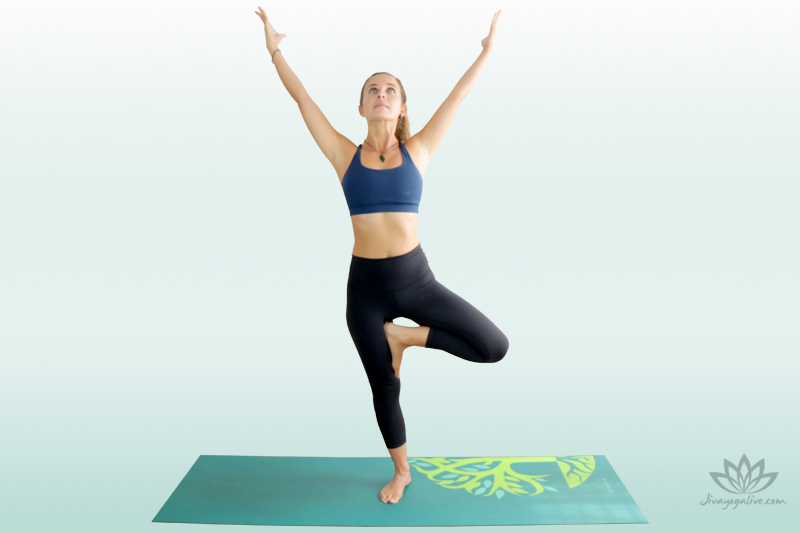
Tree Pose – Vrikshasana  

Ground down into the right foot to find stability. Bring the sole of the right foot to the left ankle, toes can be down to the mat. Or bring the right foot to the left calf or thigh. Not on the knee. Hands are in Prayer at the center of the chest or there is the option to extend the arms up overhead opening them up like the branches of a tree. Gaze is up, and there is option to close the eyes to challenge your balance.

Tree Pose looks fairly simple to the outside observer, but there actually a lot going on as you try to find that point of balance in both body and mind. When we practice these poses and start to find more balance on the mat, chances are we will start to find it easier to find that same balance off of the yoga mat.


4 Tree pose       basic beginners yoga poses

Downward Facing Dog – Adho Mukha Svanasana 

From all fours, tuck the toes and press down into the palms, fingers spread wide and send the hips up to the sky. Pedal out the legs, bending the knees left and right. If there is tightness in the back of the legs, a slight bend to the knees if fine. This is a pose you are going to have to become familiar with and as a beginner I know that at first it can feel like an intense workout. Over time it will start to feel more like a home base and a place of rest and the perfect opportunity to come back into balance, while receiving a full body stretch.

downward facing dog pose

Warrior 2 – Virabhadrasana II 

Turn the front foot to face forward, the back foot is off on an angle with the arch in line with the heel of the front foot. Bend into the front knee and drop the hips down. Firm down into the feet and hug them in towards the midline to activate the inner thighs. Extend the arms wide and turn the gaze out over the front middle finger. This strong posture helps to build stamina as you find the strength to stay low. Staying connected to the breath will help to find some ease in the perceived effort and develop concentration and focus.


warrior 2          basic beginners yoga poses

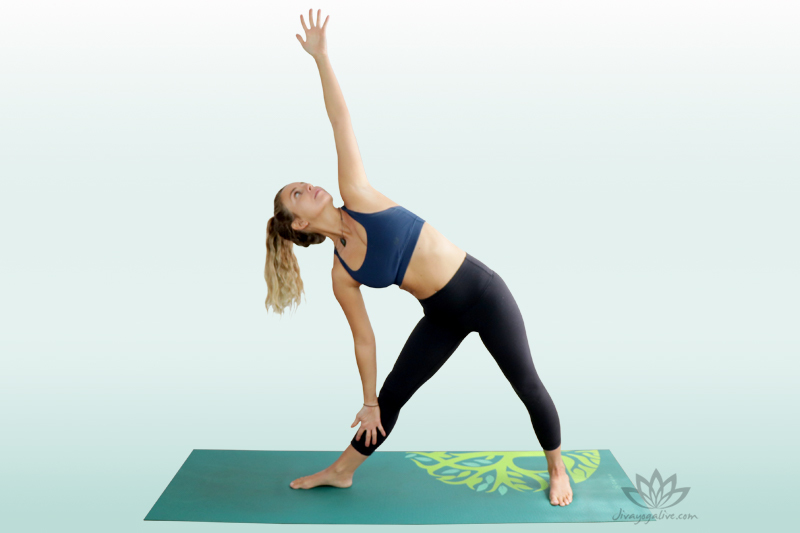
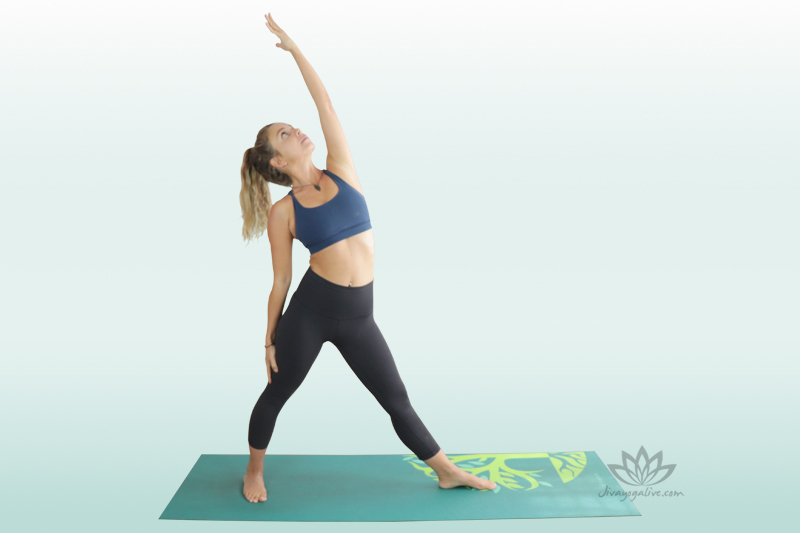
Extended Triangle Pose – Utthita Trikonasana  

Straighten the front leg and walk that back foot in a step. Send the hips to the left and lean the torso forward. Start to tip from the hips and bring the right hand down. Option to take the right hand to a block. Extend the left arm up to the sky.

In Sanskrit, “utthita” means extended and “trikona” means three angle or triangle  and as is suggested, you can see several triangles in this pose if the alignment is correct. Extended Triangle is going to increase the flexibility and strength in the legs, ankles, knees, and hips, all while opening the shoulders and chest.

7 Triangle pose

Reverse Triangle Pose – Viparita Trikonasana    

Take the left hand down onto the back thigh and extend the right arm up, stretching the side body. Gaze is up to the top hand. Reverse Triangle Pose is the perfect counter stretch to Extended Triangle. It opens up the side of the body and creates space between the ribs. Firm down into the feet to keep the legs fired up and activated.

8 Reverse Triangle pose

Cobra – Bhujangasana  

Bring the hands underneath the shoulders and push into the palms to straighten the arms. Come up, opening the chest and the collar bones. Draw the shoulders down away from the ears and squeeze the shoulder blades together. Cobra Pose stretches muscles in the shoulders, chest and abdominals, while relieving tension in the back.

cobra pose          basic beginners yoga poses

Extended Child’s Pose – Balasana  

Come down to the knees, taking them as wide as the mat. Forehead rests into the earth, with the arms extended forward, palms pressing down. Allow the belly to be soft and relaxed in between the thighs, and as you breathe, send the breath into the back of the body. With the arms extending forward, the shoulders are being stretched and opened which can be deeply satisfying at the end of your practice. Allow the body to be heavy and take rest.

extended child pose

Top 10 Yoga Poses For Beginners Video

This video is designed to set you up with some essential beginner poses that you can series together into a flow. Practice a few rounds and you have yourself a sequence that will open the body and start to build strength so you can advance into deeper poses over time.

top 10 yoga poses for beginners_CH1030

Yoga Poses Names

Each yoga asana typically has an English name that has been translated from a language of ancient India known as Sanskrit, which dates back around 3,500 years. It is the language of the Vedas, India’s ancient religious texts, which gave birth to the practice of yoga. According to present knowledge, this is the first traces of yoga throughout history! Many words and mantras are still commonly used today and it is likely that you will hear a couple of Sanskrit terms thrown around your yoga class. This can be quite confusing initially, especially if you’re only just becoming familiar with the English names! Most teachers will provide the English translation with the Sanskrit, but learning some of the more commonly used names will deepen your understanding of the meaning behind this beautiful ancient language.

Upward Salute – Urdhva Hastasana

Urdhva, means “upward,” hasta, means “hands,” and asana, meaning “posture.” This pose is usually performed as part of the Sun Salutation and is traditionally performed outside and facing the East as the sun rises. Standing Forward Bend – UttanasanaUttana, means “intense stretch” and asana means “a seat” or “posture.”This pose is thought to be one of surrender, humility and acceptance.

Chair Pose – Utkatasana

Utkata, means “intense” or “powerful,” and asana, means “posture.”You might also hear it called fierce pose, powerful pose or awkward pose and is associated with creativity and determination.

Tree Pose – Vrikshasana

Vriksa, means “tree,” and asana, meaning “pose.” This pose integrates the body, mind and breath and invokes qualities like strength, endurance, grace and balance – the qualities of a tree.

Downward Facing Dog – Adho Mukha Shvanasana

Adho, means “down,” mukha, means “face,” svana, means “dog,” and asana, meaning “pose.”Over time this pose starts to become a home base, even though it might not feel like it at first. It is a great counter pose to many backbends and hip openers. Get familiar with these terms and be ahead of the game!

Yoga Poses for Two

It’s so refreshing to catch up with a friend over something other than food or a drink! Don’t get me wrong, food dates are the best, but sometimes it’s good to find something a little more active and connecting! Partner yoga can be a lot of fun, but it also has the added benefit of helping you to deepen and stabilise.

Seated Cat-Cow

Sit cross-legged facing one another and hold onto each others forearms. Both partners move through Cat and Cow simultaneously. So both arching the back opening the chest to come into Cow and then rounding back together, dropping the chin down to the chest Double Tree Pose Standing side by side, take your original tree stance with the legs, and then take your arms around each others waist. Bring your outer arms in to meet each others palm. Creating Prayer Pose together. A very simple way to practice balance with support. Double Boat Pose Come into Boat Pose facing one another and bring the soles of the feet to touch. Extend the arms and grab hands! This is a great way to provide a deep stretch to the hamstrings with some extra support to help keep the spine straight.

Camel Pose

Come to a knee-standing position facing the opposite way to your away to your partner. Place one of your feet in between your partners and have all four feet in line. your right heel halfway between hers, so all four heels are in a line. Support the lower back with the hands and slowly lean back to place your head on your partner’s right shoulder. Hands can release down to the feet.

Advanced Yoga Poses

It really is essential that we get some of the more simple poses down before we jump into some more serious asana. You want to make sure you are working with the correct alignment from the get-go, in order to prevent injury over time, BUT, if you have been practicing for a while and have those foundational poses in the bag, maybe it’s time to up your game and your practice!

Bound Angle Pose in Headstand – Baddha Konasana in Sirsasana

If you are feeling comfortable in the headstand pose, getting a little more fancy with the legs might be something you can try out! It isn’t a big stretch from the original, but it definitely makes an aesthetically pleasing pic for ye old social media!

One Legged Wheel Pose – Eka Pada Urdvha Dhanurasana

If you have Wheel Pose in the bag, maybe it’s time to give this one legged variation a try! As you extend one leg high to the sky, really press into the palms and shine the chest and heart open. There is the option to drop down onto the forearms. This is an extremely energising pose that works to improve balance and focus.Firefly Pose – TittibhasanaHere we have an advanced arm balance to try out if you’re looking to move on from the more intermediate arm balances like trusty old Crow Pose. Firefly is going to work the strength of your core and requires some solid flexibility in the hip flexors and hamstrings.

TEACHERS INSIGHTS

Take your time! The aim of yoga is to not only open the body, but to come into the beauty of the present moment and enjoy where you are at. Allowing everything to be, just as it is. This is the key to enjoying life both on and off the yoga mat!

Conclusion: Basic Beginners Yoga Poses

You now have ten of the top basic beginners yoga poses to explore. Whether you choose to hold each pose for a few minutes to gently open the body or flow through them with your breath, these foundational movements are the perfect starting point.

Remember, props and modifications are your friends—use them to support your body as it grows stronger and more flexible. By honoring your current limits and practicing with patience, you’re setting yourself up for long-term success. Getting the alignment right from the start is key to avoiding injury and building a safe, sustainable yoga practice.

PDF DOWNLOAD

top 10 yoga poses for beginners pdf_CH1030

By the time you are finished reading this article you will have a series of beginner friendly poses to add into your practice with confidence. They are accessible by those starting out on their yoga journey and are important foundational asanas which lay the groundwork for strength and flexibility.  Included in this Free Yoga PDF Download:

  • Yoga asanas names with pictures and benefits
  • Printable Sequence Infographic
  • Teacher Tips
  • Resource Links

Ready to start building your foundation? Check out our courses for basic beginners yoga poses to explore the essential postures that will support and strengthen your practice from the ground up.

Post Run Yoga Sequence to Cool Down, Stretch Out and Stay Injury Free

This article will provide a sequence of poses that are beginner friendly and are perfect for practicing first thing in the morning. Essentially it will be a break down of the Sun Salutation, going through each pose in depth, cuing proper alignment. Once each step has been broken down, the student will have the 12 poses of Surya Namaska A to practice in isolation, or in a Sun Salutation style of flow.

Post Run Yoga Sequence: The Perfect Cool Down for Runners

My favourite part about going for a run? The cool down at the end. There’s something so rewarding about moving your body with power and speed—then slowing it all down to honour what it just accomplished. Our bodies are capable of amazing things, and it only feels right to show them some love afterward.

A post run yoga sequence is the perfect way to unwind both physically and mentally. Not only do they help lengthen the muscles you’ve just worked hard, but they also shift the body out of “go mode” and into recovery.

For runners, yoga offers more than just a stretch. The repetitive nature of running can create muscular imbalances—overusing some muscles while neglecting others. Over time, this can lead to stiffness, pain, and even injury. Yoga helps correct these imbalances by encouraging both flexibility and strength. It activates underused muscles, supports better posture, and promotes recovery.

As one article on The Benefits and Effects of Yoga for Runners highlights, running without balance can increase the risk of biomechanical issues. Yoga helps restore symmetry by stretching tight areas and strengthening those that are underutilized—ultimately improving running performance and longevity.

So next time you finish a run, take a few moments to breathe, stretch, and give your body what it needs with these post run yoga poses. It’s not just recovery—it’s an investment in your next great run.

TRAINING TYPE:  FLOW SEQUENCE

CATEGORY:YOGA

SUBCATEGORY:YOGA FOR ATHLETES: POST RUN YOGA SEQUENCE

PLANNED TIME:30 MIN

LEVEL:ALL LEVELS  

PROPS:STRAPS

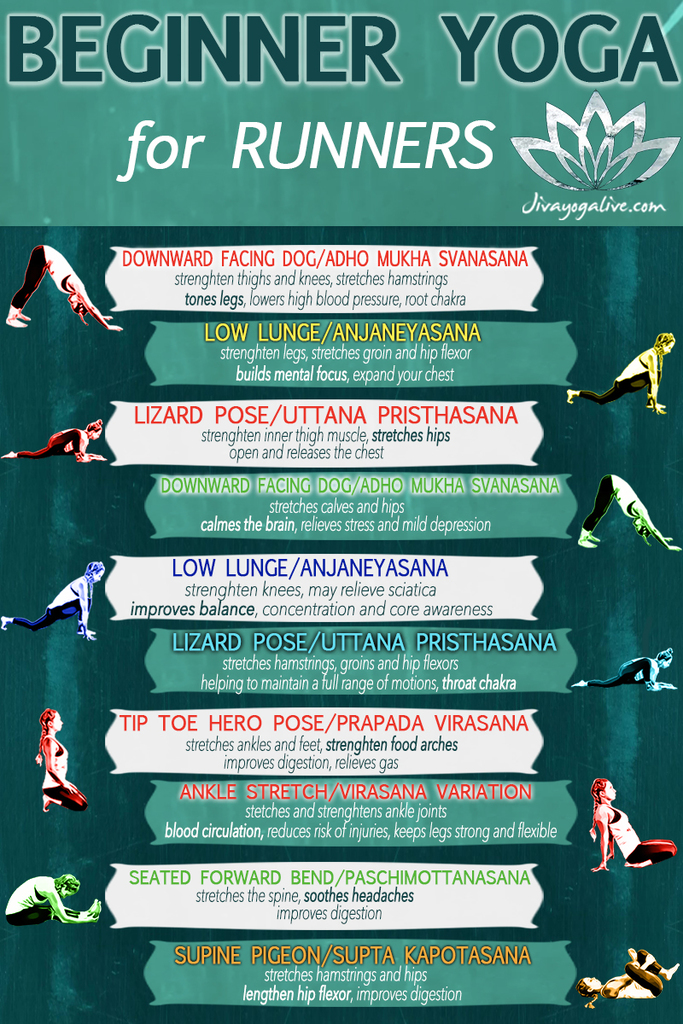
INFROGRAPHIC: Post Run Yoga Sequence

beginner yoga for runners infographic CH1025     post run yoga sequence

HOW TO DO INSTRUCTIONS 

Downward Facing Dog – Adho Mukha Svanasana 

Pressing the palms down into the earth, tuck the toes and send the hips up high, coming into Downward Facing Dog. You can pedal out the legs, bending one knee and then the other, warming up into the hamstrings, the calve and the back of the ankles.

downward facing dog pose

Low Lunge – Anjaneyasana  

Open the right leg back and up and then step it forward in between the palms coming into a Low Lunge. There is the option to have the back knee on or off the earth. Squeezing the glutes to activate the hip flexors. Press down into the heel of the front foot, to activate the underside of the front leg.

low lunge 2        post run yoga sequence


Lizard Pose – Uttana Pristhasana


Drop the back knee down and take the hands to the inside of the front foot. Work the right foot out to the left to come into a Lizards Pose. The right foot can turn out and toes can be lifted to support the knee. Allow the knee to fall open to the side.

lizard pose low 2

Downward Facing Dog – Adho Mukha Svanasana 

Walk the hands back either side of the front foot, press the palms down and send the hips high, coming back into Downward Facing Dog.


downward facing dog pose

Low Lunge – Anjaneyasana

Step the left foot forward in between the palms, coming into Low Lunge. There is the option to drop the knee down to the earth. Keep the spine straight with the head and neck in line. Gaze can be just slightly forward. Squeezing the glute muscles to turn on the front of the hip flexor.

low lunge 2

Lizard Pose – Uttana Pristhasana 

Place the left hand inside of the front foot. Walk the front foot out to the left. Turning out the toes, coming into Lizard’s Pose here. There is the option to come down onto the forearms to intensify the stretch.

lizard pose low 2

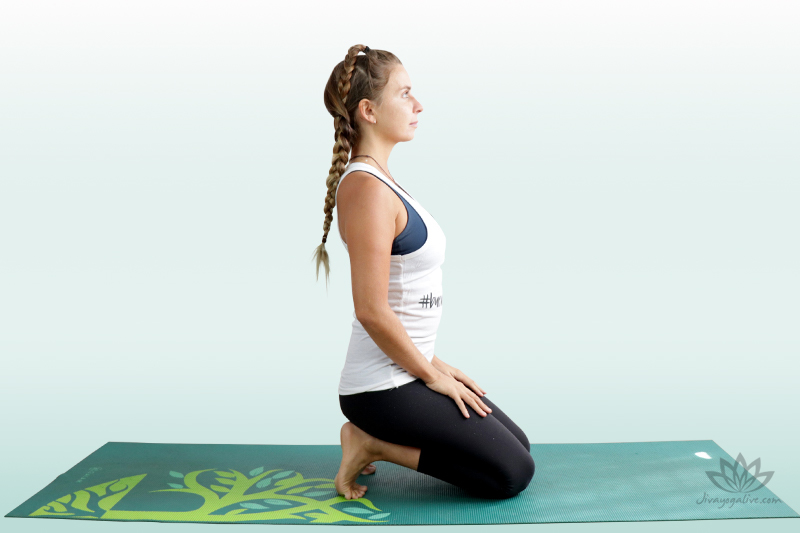
Tip Toe Hero Pose – Prapada Virasana  

Come onto all fours and tuck the toes underneath. Send the hips back to sit on the feet, coming into Tip Toe Hero Pose (also known as Toe Squat). If the pose becomes too intense come forward onto the fingertips to release the pressure and then go back in.

tiptoe hero pose toe squat

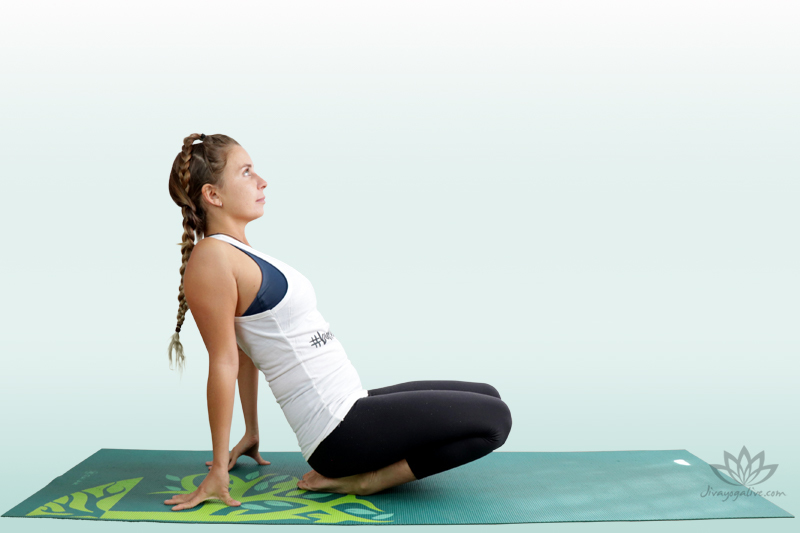
Ankle Stretch    

Moving into Ankle Stretch by taking the hands behind you and lifting the knees so as to apply pressure to the front sides of the feet.

ankle stretch        post run yoga sequence

 Seated Forward Bend – Paschimottanasana   

Transition to sitting and extend the legs out in front. Remove the flesh from underneath the sit bones and elongate the spine. Inhale and raise the arms overhead. Exhale and slowly bend forward from the hips, reaching the hands towards the toes. Inhale, peel the body back up and bring the arms back up over head. With an exhale bend forward and come into Seated Forward Bend. Settle into the pose.

seated forward bend       post run yoga sequence

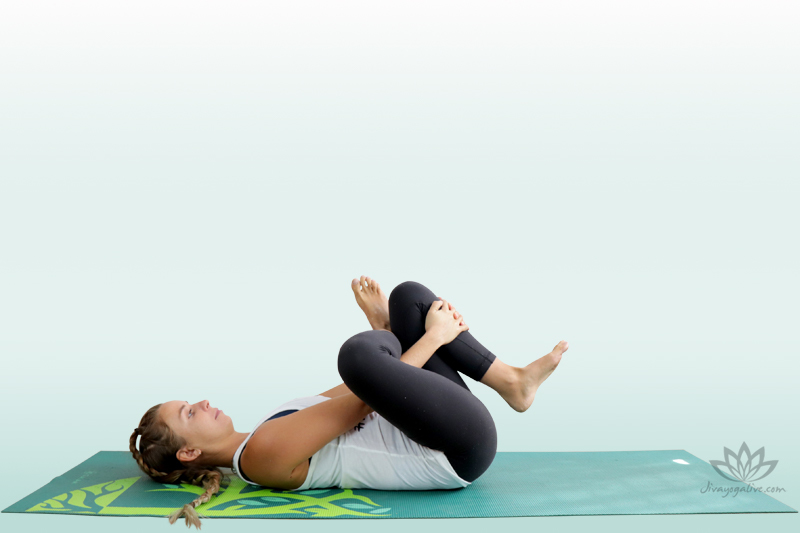
Supine Pigeon Pose – Supta Kapotasana  

Lie down on your back and bring the soles of the feet to the earth. Bring the right knee in to the chest and place the ankle onto the left thigh creating a figure four shape. Bend the left knee up and reach the hands through to interlace the fingers, either around the shin, or behind the thigh. Pull the left leg towards the body and allow the right knee to open. Repeat on the other side.

supine pigeon pose       post run yoga sequence

Beginner Yoga For Runners Video – Post Run Yoga Poses

beginner yoga for runnersv2CH1025    post run yoga poses

Strength Yoga for Runners

Yoga is more than a means of opening the body and working on flexibility, as it is also an opportunity to work into our strength! Yoga is going to keep the body light and open. At the same time it will allow you to develop the kind of strength that is going to make your performance during other intense workouts more explosive. You want to target the whole body, building strength from head to toe. In particularly you want to build into the muscles of the legs. Any standing pose where there is the opportunity to hug and draw everything to the midline, is going to really activate these particular muscle groups and get them firing and strong.

Here are five of the best poses to build strength in the whole body.

Plank Pose – Utthita Chaturanga Dandasana

Plank Pose is the number one when it comes to firing up the core, as it activates all four muscle groups in the stomach. However, not only is it an effective means of firing up the abdomen, it also works into the shoulders, chest, legs and back. Spending a few minutes here (if you can!) encourages the body to manifest stability which will improve balance and coordination. This is going to have profound effects on your running practice. Do a few rounds, holding at first for 30 seconds, then a minute, maybe a minute and a half… Each time try and better yourself!

High Lunge – Alanasana

High Lunge is going to challenge your strength and flexibility. Over time it will teach you how to stabilize the legs and will improve overall balance. Use this opportunity to ground down into the feet and energetically draw them together to activate and work into the underside of the legs.

Humble Warrior – Baddha Virabhadrasana

As the names suggests, we have the perfect opportunity to practice humility in this pose. It requires strength and stamina from the front leg, as well as the lower back and core. At the same time you’re also maintaining balance as you vulnerably offer yourself forward. True power lies in the ability to be vulnerable. This pose is the perfect encapsulation of the strong, yet vulnerable and humble warrior.

Warrior Two – Virabhadrasana II

Warrior Two is a legendary strength building pose, as you stand your ground like a mighty warrior. The weight is balanced between both hips as the torso rises up straight and strong. True strength lies in the ability to remain focused and balanced no matter what life serves up. Warrior Two provides the perfect opportunity to stand in your own strength. Find some ease in the perceived effort and to relax into a fierce incarnation of Shiva the warrior – empowered and ready to face any challenge presented.  

Boat Pose – Paripurna Navasana

Boat Pose requires the coordination of all four limbs and your torso, whilst strengthening up through the spine, and maintaining breath awareness! This can teach you a lot about yourself and the quality of your mind; as the effort of the pose begins to draw out thoughts and stories of perceived effort. Committing to the breath and drawing everything to the center will be your saviour. You will find a power you didn’t know you have, as you integrate the strength of the whole body to support you.

Post Run Yoga Sequence for Recovery

No one will deny that stretching after a run is a wise move. However, knowing and doing are two very different things – especially when you’ve come back from a long, hard run and you’re scraping the bottom of the motivation barrel. Make things easier on yourself and have the mat ready and rolled out for you, so all you have to do is crawl / fall onto it. Even if you have only five minutes in mind, once you’re down there you’ll be surprised how easy it suddenly becomes to spend fifteen to twenty minutes cooling down the body – and that’s simply because it just feels so damn good!

Cooling down the body is an important part of any athletic workout. Yoga provides the perfect opportunity for the body and mind to rest and recover. Here are three of the more restorative poses you can take when the body is needing some extra love and some time to recuperate!

Extended Child’s Pose – Balasana

Here we have the best excuse to really just melt into the floor and say we are doing yoga! Which we are! There is zero physical effort required, as the spine stretches from the tailbone right through to the crown of the head. The belly is allowed to be soft and to fall between the thighs; the extension of the arms releases into the shoulders (AND you can even take the forehead left and right and give yourself a little massage). So even when energy is in the gutter, there is no excuse to not settle into this simple pose and find some stillness.  

Supported Bridge Pose – Setu Bandhasana variation

Setu is translated from Sanskrit as bridge, and this is the shape we are aiming for with the arch of the spine. In this variation however, we are taking out all means of physical effort, by relaxing our hips down onto a block. This is going to provide a juicy stretch to the front of the hip flexors. When we engage our strength without the block, this pose has an energizing effect on the body. When we support ourselves in this way there is the opportunity to just let gravity melt you down either side; this can be luxuriously therapeutic.

One-Legged King Pigeon Pose, forward bend variation – Eka Pada Raja Kapotasana

Here we have a deep hip opener which is going to support the kind of range of motion that running requires. We’re targeting both legs simultaneously, creating space and releasing tension post run. This pose is great for any piriformis issues, but it might be a little uncomfortable if you are tight in this area. Ease into the pose and use any blankets to prop the hips up if that’s more comfortable.

TEACHERS INSIGHTS

post run yoga poses

It is important to spend time stretching and opening the body both before and after a run. This decrease the likelihood of injury, and simultaneously boosts performance.

CONCLUSION: Post Run Yoga Sequence 

It is not essential to include all of these poses in your warm up and cool downs. Just choose two or three to really spend some time with and this will really compliment your running practice and performance. When the body is warm and open, you are taking precautions to prevent future injury.  Increased flexibility is going to bring more mobility into the legs, hips and back and literally add strides to your performance. Yoga is so complimentary to many dynamic forms of exercise, but especially to running. So spend some time cultivating stillness of the body and mind, so that you can really leave anything that is not serving you at the door.

Ready to take your yoga practice further? Click here to access yoga courses and start your journey toward lasting wellness today.