Yoga for Period Cramps (Fast Relief)

Today´s article is all about yoga poses to improve fertility.  Have you been trying to start a family but have had trouble conceiving?  Maybe you thought trying to have a baby would be easy. But you’ve come to find that it’s not as simple as you once thought.  Are you wondering if there are natural ways to improve fertility to increase your chances of becoming pregnant?  I want you to know that you aren’t alone.  

In fact, this experience is more common than we’ve been led to believe.  The CDC states that, “About 6% of married women aged 15 to 44 years in the United States are unable to get pregnant after one year of trying (infertility). Also, about 12% of women aged 15 to 44 years in the United States have difficulty getting pregnant or carrying a pregnancy to term (impaired fecundity).”

7 Yoga Poses To Improve Fertility Infographic
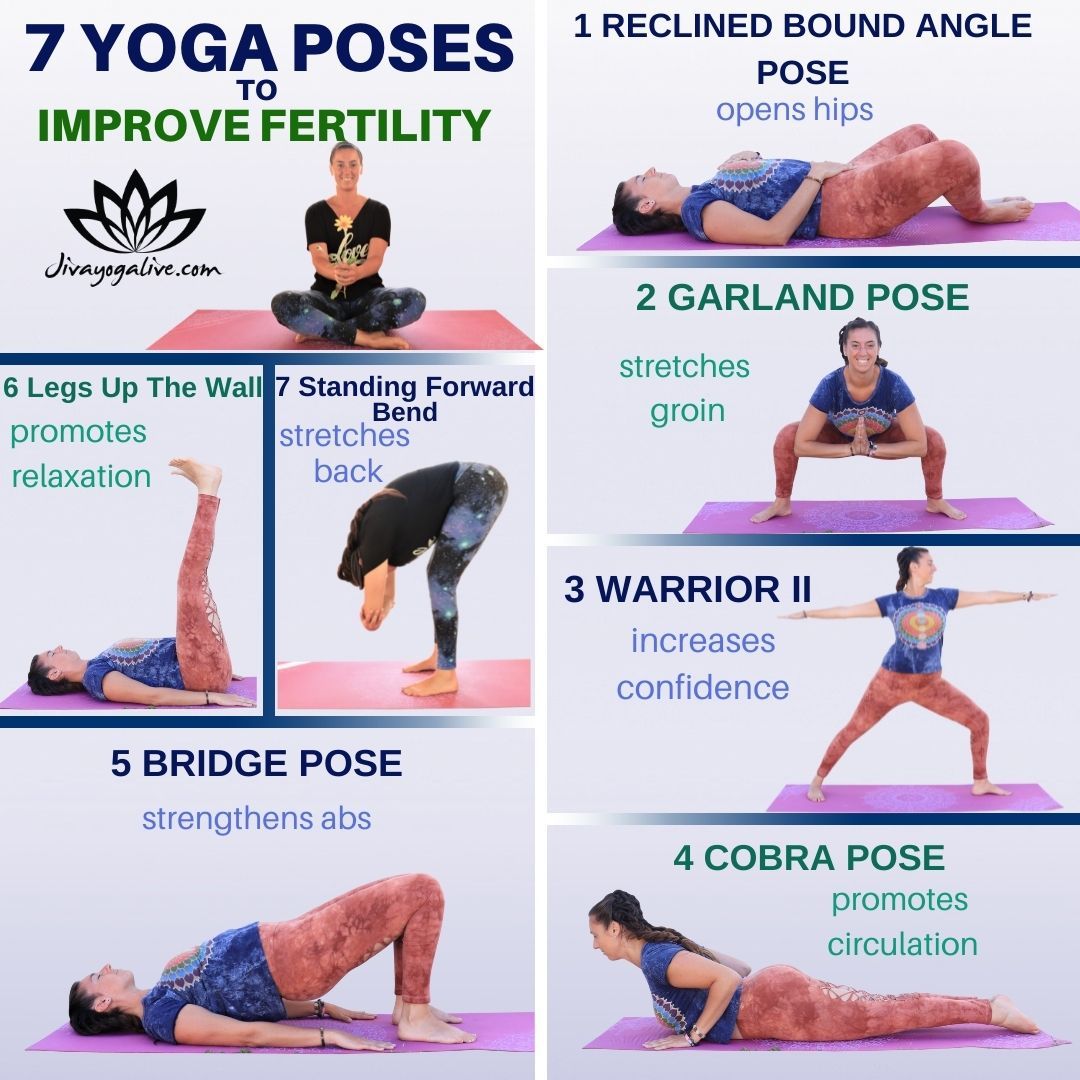
Yoga Poses To Improve Fertility

What is fertility yoga for women?

Many women are looking for natural alternatives to help them become pregnant.  Yoga can work in combination with other holistic treatments to improve fertility.  Certain yoga postures can help a woman’s body to prepare for conception in 3 major ways:

  • Reducing stress while stimulating the relaxation response
  • Strengthening the muscles of the pelvis while increasing flexibility
  • Stimulating blood flow to the reproductive organs and sacral chakra

The menstrual cycle requires proper levels of over 10 different hormones for ovulation to occur.  Ovulation, or the release of an egg from the ovaries, must happen for a woman to become pregnant.  Chronic stress can cause low levels of hormones and missed ovulation.  Yoga can help reduce stress, balance hormonal levels, and improve fertility.

Also, certain yoga postures strengthen and stretch the muscles of the pelvic region.  This prepares the body for all stages of reproduction, from pregnancy to child birth.

And finally, other yoga poses work to increase blood flow to the reproductive organs.  This works both on a physical and energetic level to improve chances of conception.  In the pelvis lies a large group of nerves that come together in the area of the lower abdomen.  This center of the body, known as the sacral chakra, houses a person’s sexual and creative energy. By bringing attention to this area of the body, you can naturally improve your fertility.

Grab a thin blanket for comfort and join me as I review the top 7 yoga poses to improve fertility!  In this article you’ll learn why the poses work and how to start practicing yoga on your own at home to improve your fertility!

7 Effective Yoga Poses To Improve Fertility In Women

1. Reclining Bound Angle Pose – Supta Baddha Konasana

Reclined bound angle pose helps to bring about a feeling of balance while stretching the muscles of the groin and inner thighs.  Remember to take deep breaths in and out through your nose to help the body relax while improving fertility.

1) Lie on your back with the soles of your feet touching and your knees splayed out towards the sides.  It might feel good to place a thin blanket under your hips for extra support.  

2) Close your eyes and place one hand on your heart and one hand on your lower abdominal region.  

3) As you exhale, feel the breath flow from your heart to your pelvis.  

4) On your inhale, allow the breath to travel back up from the pelvis to your heart.  Do this for as long as you wish.

reclining bound angle pose

2. Legs Up The Wall Pose – Viparita Karani

Legs up the wall posture is a passive inversion that has a calming effect on the nervous system.  It stretches the lower back and hamstrings while reversing the blood flow in the legs.  This improves fertility by allowing for fresh energy to enter the space of the pelvis and reproductive organs.

1) Place a thin blanket at the base of a wall.  Sit on the blanket with the side of your hips next to the wall and both legs facing one side.  

2) Slowly begin to lower down onto your back as you lift both legs into the air.  

3) Rest your legs on the wall, being sure to find a comfortable position in which you can rest you back on the ground.  

4) Close your eyes and try the same breathing technique described above for as long as you wish.  

5) To come out of the posture, bend your knees and turn to one side. Rest in the fetal position for several breaths before rising up to a seated position.

Legs Up the Wall Pose

3. Garland Pose – Malasana

Garland pose is a deep squat that can help to stretch and strengthen the muscles of the pelvis and inner thighs at the same time.  If you find these muscles to be very tight, ease into the posture and stay for only a few moments.  Over time, you’ll find more space in the muscles of your groin, which can improve circulation during all stages of reproduction.

1) Facing the long edge of your mat, stand with your feet wide apart and your toes pointed slightly outwards.  

2) On the inhale, bring your hands to meet in a prayer position in front of your heart.  

3) On the exhale, bend your knees, moving into a deep squat.  Squat as low as you can go comfortably while maintaining a straight spine.  

4) Keep the entire base of your feet planted into the mat.  You may even use your elbows to press into your knees, creating more space in the lower extremities. 

5) To come out, begin to straighten your knees, rising back up into a standing position. Rest your arms down to your sides and step your feet back together. 

garland pose

4. Warrior 2 Pose – Virabhadrasana 2

Warrior 2 pose is a “go to” for improving both confidence and fertility.  It strengthens the muscles of the legs and abdomen while stretching the muscles of the inner thighs.

1) Stand facing the long edge of your mat, spreading your legs 3-4 feet wide with your feet parallel to one another.  

2) Turn the toes of your right foot towards the short edge of the mat. Make sure that your right heel is in line with the arch of your back foot.  Keep your hips open to the wide edge of your mat.

3) On your inhale, raise both arms up and out towards your sides like the letter “T” while bending deep into your right leg.  Aim to have a 90 degree angle between your right calf and thigh.  

4) Keeping the outer edge of your left foot planted into the mat, turn your head to look out over your right arm.  

5) Breathe here while pressing down through your legs and stretching the crown of your head up towards the sky. Reach your arms in equal and opposite directions.

6) To come out of the pose, straighten your right leg and lower your arms down towards your sides.  Rest your hands on your hips.  Turn the right toes back to the long edge of the mat, so that your feet are once again parallel.  

7) Rest and breathe before repeating the same motions towards the opposite side.

Warrior 2 Pose

5. Cobra Pose – Bhujangasana

Cobra pose increases energy flow to the pelvis by stretching the muscles of the lower abdomen, improving fertility.  This posture is a back bending posture, which compresses the vertebrae of the lower spine. This gentle compression allows for fresh blood to rush back into the area of the sacral chakra after the pose is complete.

1) Lay on your stomach while placing your hands flat on the mat with your thumbs resting next to your armpits. Keep your elbows tucked in tight near the sides of your body.  

2) Press the tops of your feet into the mat as you squeeze your inner thighs together. Engage your abdominal muscles while pressing your pelvis into the mat.  

3) On your inhale, lift your head, neck, and chest off of the mat while keeping your lower body in contact with the ground beneath you.  

4) Continue breathing deep in and out through your nose while lifting the crown of your head high and using the muscles of your upper back to hold you up.  Little to no weight should be in your hands.  

5) When you’re ready to come out, exhale while lowering your upper body back down onto the mat.  Stack your forearms in front of your body and rest your forehead on top of your forearms for as long as you need to.  

6) Bend your knees, lift your feet towards the sky, and rock them back and forth in a windshield wiper like motion.  This releases any tension that may have accumulated in the lower back.

Cobra Pose

6. Bridge Pose – Setu Bandhasana

Bridge pose is a gentle inversion in which the pelvis is lifted above the heart.  It increases blood flow to the reproductive organs and improves fertility. Bridge pose also stretches and strengthens the muscles of the groin and upper thighs.

1) Lay on your back with your knees bent.  Place your feet hip width distance apart.  

2) Roll your shoulders underneath your back to form a stable base. Reach your arms down towards your feet and plant your palms into the mat.

3) On your inhale, press into your heels to lift your hips towards the sky.  Continue to breathe in and out through your nose as you relax your glutes. Use the muscles of the abdomen and quadriceps to hold you up.  

4) Be sure to keep your thighs and knees hip width distance apart.  If it feels comfortable for you, you can clasp your hands together underneath your body.

5) To come out of the pose, release your hands, moving them out from underneath your body. Plant your palms into the mat as your arms extend down towards your feet.  

6) On the exhale, begin to lower your pelvis back down towards the Earth, one vertebrae at a time.  Once your entire back rests on the mat, take a moment to pause and breathe.  

7) You can rock your knees side to side in a windshield wiper like motion to release any tension in the thighs and abdomen.  You may even find comfort while hugging your knees inward towards your chest.

bridge pose

7. Standing Forward Bend – Uttanasana

Standing forward bends stretch the lower back and hamstrings, allowing for fresh energy to stimulate the sacral chakra.  Forward folds are calming to the nervous system. They increase feelings of relaxation while balancing hormones and improving fertility.

1) Stand at the front of your mat with your feet hip width distance apart. Keep a slight bend in your knees.  

2) Root down through all 4 corners of your feet as you inhale, stretching your arms out to the sides and up overhead.  

3) On the exhale, begin to swan dive forward with a flat back, lowering your arms down to the Earth.  Rest your lower abdomen into your upper thighs as the crown of your head points down towards the ground.

4) Rest here for as long as you feel comfortable. Relax your arms as you stretch your upper body down towards the Earth.  

5) With each round of breath, begin to straighten your legs, feeling the stretch in your hamstrings and lower back.  

6) To come out, bend your knees, and press into your feet to lift your upper body out of the forward fold.  On the inhale, rise up and lift your arms overhead. 

7) Exhale as you lower your arms back down towards your sides.  Rest and breathe.

standing forward bend

Featured Video: Seven Yoga Poses To Improve Fertility

Yoga Poses To Improve Fertility FAQ

Question: Is meditation or yoga helpful for fertility issues?

Answer: Consult your healthcare provider before beginning any kind of new exercise routine.  The yoga poses to improve fertility shared in this article can improve your health and bring about great benefits for your body and mind. However, they are not substitutes for medical treatment. Yoga alone is not guaranteed to treat or cure infertility.  Rather, the practice of these yoga poses to improve fertility can be a great compliment to other healthy habits.

Conclusion

So what are the benefits of fertility yoga?

In conclusion, yoga can help to improve fertility in 3 major ways:  

  • Reducing stress
  • Increasing strength and flexibility
  • Stimulating blood and energy flow to the reproductive organs

Practicing these 7 yoga poses to improve fertility can help you reduce stress.  This can help to balance hormone levels and increase the chances of conception.  

Yoga also helps to stretch and strengthen the muscles of the pelvis and abdomen.  Improving the body’s levels of strength and flexibility can be helpful during all stages of reproduction.  

And finally, yoga stimulates blood and energy flow to the reproductive organs and sacral chakra.  Focusing on this area of the body increases both your creative and sexual potential.  Thank you for reading.  Now it’s time for you to get busy practicing these 7 yoga poses to improve fertility! 😉

About

Clementine

Clementine is a multi-style prenatal yoga teacher, world traveler and animal lover. She started yoga back in 2015 and fell in love with this beautiful ancient practice. Read More..
Pregnancy Stretches For Back Pain Top 7 Stretches

Pregnancy Stretches for Back Pain: Relieve Tension and Support Your Body

Pregnancy stretches for back pain are a safe, effective way to relieve the tension many women experience as their bodies change. During pregnancy, your body undergoes dramatic physical and hormonal shifts that can lead to discomfort, particularly in the lower and upper back. Incorporating targeted pregnancy stretches for back pain helps reduce this discomfort and supports overall well-being for both mom and baby.

Understanding Common Causes of Back Pain During Pregnancy

Pregnancy stretches for back pain target specific sources of discomfort caused by the changes happening in your body. Let’s take a closer look:

Hormonal Changes and Joint Instability
A key hormone, relaxin, increases during pregnancy to soften ligaments and prepare your pelvis for childbirth. While necessary, this change can create joint instability and lead to lower back pain.

Shift in Weight and Posture
As your baby grows, the increased belly weight pulls your center of gravity forward. This shift places strain on your lower back. In addition, larger breasts add weight to the upper body, contributing to upper back discomfort.

Emotional Stress and Muscle Tension
Stress is another contributor. Emotional tension can manifest physically, leading to tightness along the spine that becomes painful if left unchecked.

Effective Pregnancy Stretches for Back Pain Relief

The good news? Pregnancy stretches for back pain can reduce, and in many cases, eliminate this discomfort. By releasing tight muscles and lightly engaging your core, you’re actively preventing and relieving pain.

Stretching Deep Back Muscles and Hips
Stretching allows deep back and hip muscles to relax. This encourages spinal alignment and eases pressure around the lower back.

Building Gentle Core Strength
Strengthening your core improves posture and stabilizes your lower back. A strong core minimizes future pain and supports your changing body.

Creating Space and Feeling Good
This simple stretch sequence aims to create space in your body—particularly the lower back—helping you feel energized, comfortable, and ready for your day.

Consistent Practice for Maximum Benefit

The more consistently you perform pregnancy stretches for back pain, the greater the benefits. Regular stretching sessions reduce muscle tightness, improve mobility, and foster a stronger mind-body connection.

When you feel good, your baby benefits too. Prioritizing self-care through mindful stretching is one of the best ways to support both of you throughout your pregnancy journey.

7 Pregnancy Stretches For Back Pain Infographic

pregnancy stretches for back pain infographic

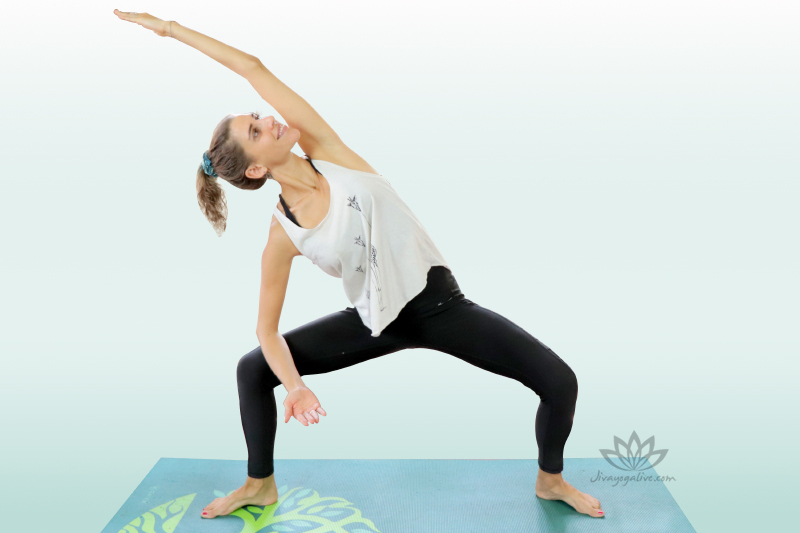
1. Goddess Pose with side stretch – Utkata Konasana

Open your legs wide with the feet opening outward and bend the knees to let your hips sink towards the floor. Breathe deeply in this posture for a few moments.

 Then place your right elbow on your right side and extend your left arm over your head, turning your heart towards the sky. Here again breathe deeply and slowly, feeling the stretch on your left side. Repeat on the second side. 

This posture is a good pregnant stretch for back pain! It will help to create space in your pelvis and to strengthen your core muscles.

Goddess Pose Variation - Utkata Konasana - pregnancy stretches for back pain

2. Wide-Legged Forward Bend – Prasarita Padottanasana

Open your legs as wide as you can with your feet parallel to each other. Stand tall while you inhale and as you exhale bend from the hips, place your hands on the floor (or a block if it’s more comfortable) and let the top of your head get closer to the ground. Lengthen your spine as you breathe deeply. Stay in this posture for 5 to 10 breaths.

This is a good posture to release tensions in the lower back and stretch your hamstrings.

Wide-Legged Forward Bend - Prasarita Padottanasana A

3. Garland Pose – Malasana

Open your feet as wide as your mat with your feet pointing outward. From here lower down your hips into a deep squat, your hips hovering above the floor. If the posture is unstable, you can place a blanket underneath your heels or sit on the block. Press your elbows against your chins, hands in prayer to open your chest. Lengthen your back with each breath.

This is a great posture to open your hips and relieve pressure from your lower and upper back.

Garland Pose - Malasana

4. One-Legged King Pigeon Pose – Eka Pada Raja Kapotasana

From a downward dog position, place your right knee close to your right wrist and extend your left leg making sure it is in line with your left hip. Place your hands on the side of your front leg and let your hips sink. You can fold forward if it feels good. To make this posture more comfortable and to level your hips, you can place a blanket underneath your right hip. Breath deeply for 5 to 10 breaths and repeat on the second side.

This pose stretches the hip flexors deeply,  can alleviate sciatica and piriformis syndrome.

One-Legged King Pigeon Pose - Eka Pada Raja Kapotasana

5. Wide-Angle Seated Forward Bend Pose – Upavishta Konasana

Sit with the legs extended and as wide apart as possible. Tilt your pelvis forward to allow your spine to be straight. Place your hands in front of you and gently start walking them away as far as you can, bending from the hips. Make sure to keep your spine long. Take long deep breaths in this pose.

Wide-Angle Seated Forward Bend Pose - Upavishta Konasana

6. Bound Angle Pose – Baddha Konasana

Sitting down, bring the soles of your feet together and close to your hips. Allow your knees to open up towards the ground. Interlace your fingers around your toes and use this as an anchor to extend your back. Slightly bend your chin towards your chest to feel the stretch in the back of the neck. Breathe here for a minute or two.

7. Extended Child’s Pose – Balasana

From a kneeling position, open your knees wide and let your hips rest on your ankles. Extend your arms in front of you or by your side and rest your forehead on the ground. You can also place a pillow or blanket under your chest for extra comfort. Close your eyes and let your body relax deeply with long deep breaths. Stay in this posture as long as you want to. 

You should feel a pleasant stretch in your lower back as you rest here.

Extended Child's Pose - Balasana

Featured Video:Seven Pregnancy Exercises For Back Pain

Conclusion

Pregnancy is a crazy thing! Miraculous, yes but still crazy! A baby is growing inside of you! Your body is not just yours anymore. For nine months it is the actual home of your unborn child! Cray cray! 

You can’t pour from an empty jar and if you want to give everything you can to your family and this baby, you need to give to yourself first.

Self care is not selfish and now more than ever is the time to tend to your body and its pains and complaints. Because you, Mama, deserve to feel good and happy, just because you are you, and also because for goodness sake, there is a baby growing in your belly!

About

Clementine

Clementine is a multi-style prenatal yoga teacher, world traveler and animal lover. She started yoga back in 2015 and fell in love with this beautiful ancient practice. Read More..

Yoga Ball Pregnancy Exercises

Yoga Birth ball is the little loving name we give to exercise balls when they are used during pregnancy and labour. You know, those big rubber balls filled with air that you can bounce on and use to do exercise in a fun way! 

When you are expecting, buying a yoga ball (or borrowing one) is a smart thing to consider as this fun object will also prove itself to be of great help when the time of birth arrives.

There are plenty of exercises that can be done with it to work on your hips’ mobility and flexibility and you can also use it in your everyday life to replace a chair in many situation, like for example if you are working on the computer, watching a movie or even at the table when you eat.

Sitting on the ball with your legs apart and feet open is an amazing way to work on your core muscles, improve your posture and gently open your hips. After a few times using it, you will naturally hold yourself straighter and your pelvis will be more stable thanks to the support of the ball. This can help relieve or prevent back pain which is common discomfort in pregnancy.

How does a yoga ball help pregnancy?

The sooner you start using a yoga ball during your pregnancy the better, but it is never too late. When the labour starts, using one can be a very useful tool to support you during all the phases of birth, lessening the pain of the contractions and shortening the length of the first stage.

With a birth ball, you can help your baby turn around if he is not head first during the last weeks of pregnancy. You can help your cervix to open or the head of your baby to engage down the birth canal by making circles with your hips on the ball.

You can lean on it during the pushing phase, this will help support your upper body while freeing your hips, giving you more space to move and find the right posture to help your baby out. 

 I will present to you a few fun ways to use it safely during your pregnancy.

Ready, set, lets bounce!

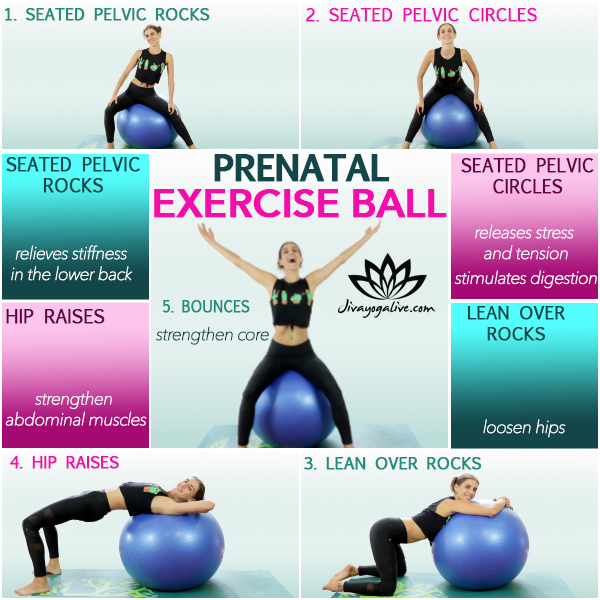
Yoga Ball Pregnancy Exercises Infographic

Yoga Ball Pregnancy Exercises infographic

Seated Pelvic Rocks

Sitting on the ball, legs apart and feet flat on the floor, let your hips rock gently from side to side. Your spine should naturally be straight.

Find your rhythm and rock on for as long as you wish.

Seated Pelvic Rocks on yoga Ball

Yoga Ball Seated Pelvic Circles

Still sitting in the same position, start making circles with your hips. Draw small circles in the beginning and let them grow wider and wider. Move in both directions and let your body guide you.

This should feel good and relaxing.

seated pelvic circles on yoga Ball

Lean Over Rocks On Ball

Kneel in front of your ball and rest your upper chest completely on it, resting your head too. From this relaxing posture, let your hips rock from side to side, finding their own rhythm and shake away any tension.

Lean Over Rocks on Ball

Hip Raises

Start by sitting on the ball and gently start to walk your feet away until the ball has rolled below your shoulders and your hips are hanging. Go slowly to control the motion. From here do some hip raises, pushing your hips up as high as you can and letting them sink back down.

Keep your feet firmly planted on the floor to maintain your stability. You can do little sets of 10 or 20 hip thrusts.

Hip Raises on Ball

Yoga Ball Birthing Bounce

Play your favorite music and start bouncing and dancing on your ball. Free movements, just enjoy and have fun!! For your safety, keep your feet on the floor to avoid falling down!

Bounces on yoga ball

Featured Video: 5 Yoga Ball Pregnancy Exercises (Birth Ball)

Conclusion

I hope this article sparked yoga ball fever in you! It is fun, it is useful and it will bring you so many benefits! The best part is you can include it in your everyday life without much effort, just by switching your regular chair for your new bouncy best friend.

Birth balls are available in all colors, different materials and different sizes.

  • Choose one that allows your hips to be higher than your knees when you sit.
  • Choose one that has a decent grip to avoid flying off!

Then you are ready set to bounce through your pregnancy and labour!

About

Clementine

Clementine is a multi-style prenatal yoga teacher, world traveler and animal lover. She started yoga back in 2015 and fell in love with this beautiful ancient practice. Read More..

https://www.jivasoul.com/prenatal-yoga-for-healthy-pregnancy

Safe Core Exercises for Pregnancy: 6 Easy Moves to Strengthen Without Strain

When we think about core muscles, the first image that comes to mind is usually a sculpted six-pack. But your core is so much more than just the rectus abdominis. It includes a wide network of muscles that work together to support your posture, stabilize your thorax and pelvis, and generate internal pressure to support everyday functions like breathing, bowel movements—and yes, childbirth. That’s why safe core exercises for pregnancy are essential for supporting both your changing body and your baby throughout each trimester.

What Muscles Make Up the Core?

Your core muscles include:

  • Pelvic floor muscles

  • Transversus abdominis (TVA)

  • Internal and external obliques

  • Rectus abdominis

  • Erector spinae (back extensors)

  • Diaphragm

Together, these muscles create a strong, supportive unit essential during pregnancy.

Why Strong Core Muscles Matter During Pregnancy

Maintaining strong core muscles during pregnancy helps:

  • Align the pelvis, ribs, and spine

  • Support upright posture and body balance

  • Provide continence (your ability to hold in urine or bowel movements)

  • Prepare the body for labour and delivery, especially in the pushing phase

A well-functioning core supports your growing belly and helps manage increased pressure on your spine and pelvic floor. But, not all core exercises are safe during pregnancy—especially as your body changes.

Exercises to Avoid

As your belly grows, traditional crunches and sit-ups become uncomfortable and potentially harmful. Movements that compress your abdomen or require lying flat on your back for extended periods should be avoided after the first trimester.

Why?

  • They can place excess pressure on the abdominal wall

  • They may contribute to diastasis recti (separation of the abdominal muscles)

  • They may reduce blood flow by compressing the vena cava

Instead, opt for safe core exercises using a birthing ball, side-lying positions, or all-fours (quadruped) positions that support your alignment and comfort. Always listen to your body—if something doesn’t feel right, it probably isn’t.

Meet the Transversus Abdominis: Your “Baby Blanket”

The transversus abdominis (TVA) is the deepest layer of abdominal muscle. It wraps around your torso like a corset, connecting your spine, ribs, and hips. During pregnancy, it plays a vital role by supporting your expanding uterus—hence the nickname “baby blanket.”

And during labour, the TVA works with the uterus to generate pressure from the inside to help push the baby out. Think of it like preparing for a very important (and much bigger) bowel movement!

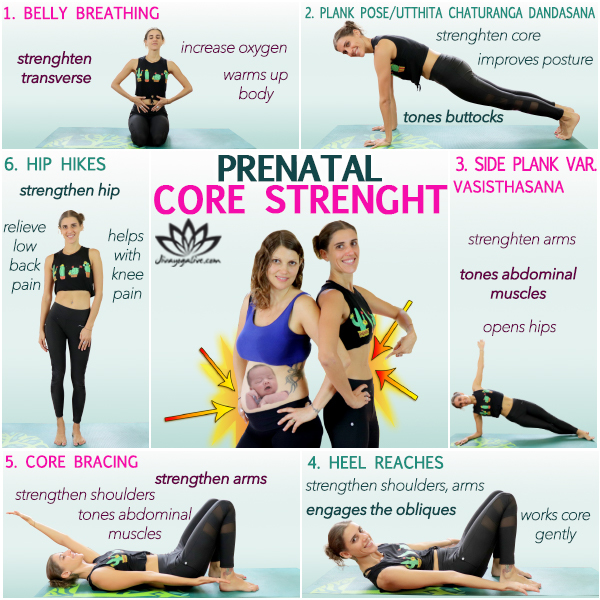
6 Easy Safe Core Exercises For Pregnancy Infographic

Core Exercises For Pregnancy

Belly Breathing

Sit in a comfortable position with your back straight and place your hands on your belly. With every inhalation, let your breath go down into your abdomen, allowing it to expand.

With every exhalation, draw your belly button in towards your spine, sucking up everything as much as you can. Repeat this for 10 to 20 breaths.

This gentle exercise will help to strengthen your transverse.

Heel Reaches -core exercise for pregnancy

Plank Pose – Utthita Chaturanga Dandasana

From a Table Top position, with the wrists aligned with your shoulders, extend your feet back, lifting your body off the ground in a straight line.

Make sure your hips stay in alignment. If this is too uncomfortable for your wrists, you can do this exercise by placing your forearms on the floor instead. Breathe deeply in this posture for 30 seconds to 1 minute.

This will engage your back muscles, your shoulders, as well as your transverse.

Plank Pose - Utthita Chaturanga Dandasana

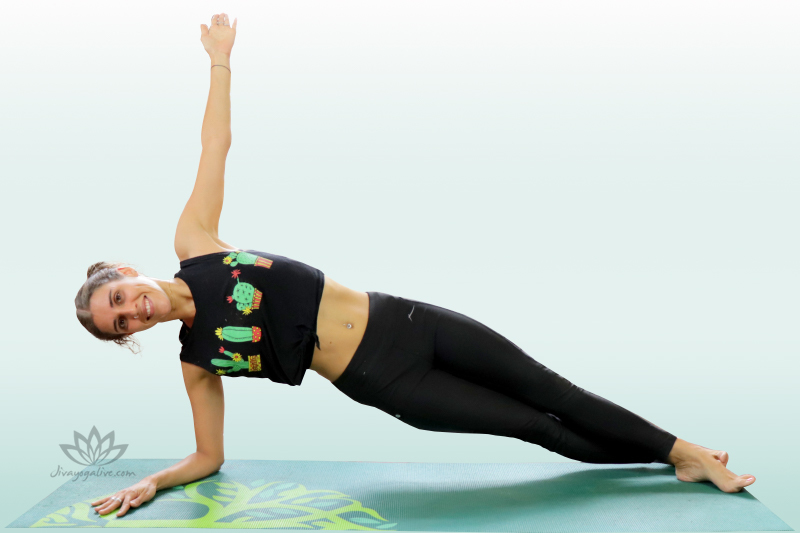
Side Plank Pose Variation on elbows

Place your right forearm on the floor and extend your legs back, feet separated or stacked one on top of the other. Extend your left arm to the sky and  keep your body in a lateral line. If this is too difficult, you can place your right knee on the floor to get more support.

Stay in this posture for 30 seconds up to 1 minute, breathing deeply. Then repeat on the other side.

Side Plank Pose Var - Vasisthasana

Heel Reaches

Lay down on your back with your feet close to your hips and the knees pointing up. Raise your head and shoulders slightly off the ground and extend your arms by your sides, palms facing up. Reach towards your feet with your hands, alternating between each side. Reaching out on both side counts for one rep. Do 20 reps and take a break. Then repeat another 20 reps. 

This exercise will engage your transverse and your obliques.

Heel Reaches

Core Bracing

Still laying down on the floor with the feet close to the hips, extend one arm by your side and one arm overhead. Brace your abdomen muscles by pushing the floor with your back and pulling your belly button in. Coordinate your respiration with the arm mouvement, keeping the arms extended.

Inhale switch the arms, the one by your side goes up, the one up comes down by your side. Exhale switch again. This is one rep. Do 20 reps.

Core Bracing

Hip Hikes

Stand up with your feet hips-width apart. Without moving anything else, raise one hip up, trying to shorten as much as possible the space between your hip and your ribs.

Come back down and do the same motion on the other side. Perform 20 repetitions of this movement.

Hips Hikes

Featured Video: Safe Core Exercises For Pregnancy – prenatal core workout

Conclusion

Static holds, deep breathing and bracing  will be the top safe core exercises for pregnancy.  

This short workout works best when it is done frequently. You don’t need to workout one hour every day to make a difference.

Try to include in your schedule little 10, 15, 20 minute workouts to perform throughout your week. The ideal is to move everyday even if it is only for 10 minutes. With time, it will become a habit and you will be able to enjoy the benefits of an active lifestyle

About

Clementine

Clementine is a multi-style prenatal yoga teacher, world traveler and animal lover. She started yoga back in 2015 and fell in love with this beautiful ancient practice. Read More..
safe-core-exercises-for-pregnancy

Pregnancy Arm Workout Yoga Poses: Strengthen and Tone Safely During Every Trimester

With all the changes your body goes through during pregnancy—most of which you have no control over— pregnancy arm workout yoga poses are an amazing way to stay connected to your body. They help you feel empowered, grounded, and stronger through each trimester. Not only will you build strength, but you’ll also support your growing baby and feel more in control of how those changes show up physically.

Of course, staying active is only part of the equation. Exercise is most effective when paired with a nourishing diet. Try to avoid heavily processed foods and focus instead on fresh fruits, vegetables, whole grains, and healthy fats. When your nutrition is on track, your movement practice will amplify the benefits—reducing pregnancy-related discomfort like back pain and improving your overall mood and energy.

A well-rounded workout routine during pregnancy can also help prevent excessive weight gain and reduce the likelihood of your baby growing too large, which may ease the delivery process.


What’s the Best Way to Work Out Your Arms While Pregnant?

In this article, I’ll guide you through a simple and effective pregnancy arm workout yoga poses that are gentle to stretch and strengthen. These exercises are designed to:

  • Build upper body strength

  • Improve posture and balance

  • Engage your core safely

  • Boost circulation and energy levels

No equipment is needed, and you can do it from the comfort of your home.

Pregnancy Arm Workout Yoga Poses  No Weights Infographic

prenatal arm workout no weight infographic

Arms Circles and Pulses

Start standing up, feet hip-width apart and the back straight. Extend your arms by your side and start moving them in small circles. 30 seconds in one direction and 30 seconds in the other. Then start making a pulsing motion thumbs up for 30 seconds and thumbs down for 30 seconds.

This will warm up your arms and target your deltoids.

Arm Circles and Pulses

Four Limbed Staff Pose – Chaturanga Dandasana

Start in a plank position or a plank position with your knees down. Keep your body in line, hips leveled with the rest of the body and core engaged. Do a set of 10 push-ups. If you place your hands close to your body.

You will be working out the triceps. If the hands are placed wider, it will workout the pectorals.

Four Limbed Staff Pose Modification - Chaturanga Dandasana

Plank Pose Utthita – Chaturanga Dandasana

Place your body in a high plank position. If your wrists are painful place your forearms on the floor.

Hold the position between 30 seconds and one minute, breathing deeply and keeping the hips leveled.

Plank Pose - Utthita Chaturanga Dandasana

Dolphin Plank Pose – Makara Adho Mukha Svanasana

Do a plank position with your forearms on the floor. Let your body tilt forward and backward to build strength in your shoulders. Hold the position between 30 seconds and one minute moving back and forth, breathing deeply and keeping the hips leveled.

Dolphin Plank - Makara Adho Mukha Svanasana

Side Plank Pose Variation – Vasisthasana on forearms

From the forearm plank position, let both feet fall to their right side, maybe stacking them one on top of the other or keeping them separate if it helps your balance. Raise your left arm in the air. Opening your chest to the side and raising your hips high.

Stay for 30 seconds and repeat on the other side.

Side Plank Pose Var - Vasisthasana

Downward Facing Dog Pose – Adho Mukha Svanasana

From a table top position, tuck your toes and raise your hips up and back into a downward facing dog. Extend your legs and firmly press the hands on the floor, opening your chest and your shoulders. Breathe deeply in this posture for 5 to 10 breaths.

After this exercise, start over from the top to perform the second set, taking the time you need to rest. When it’s done move on to the arm stretches.

Downward Facing Dog - Adho Mukha Svanasana

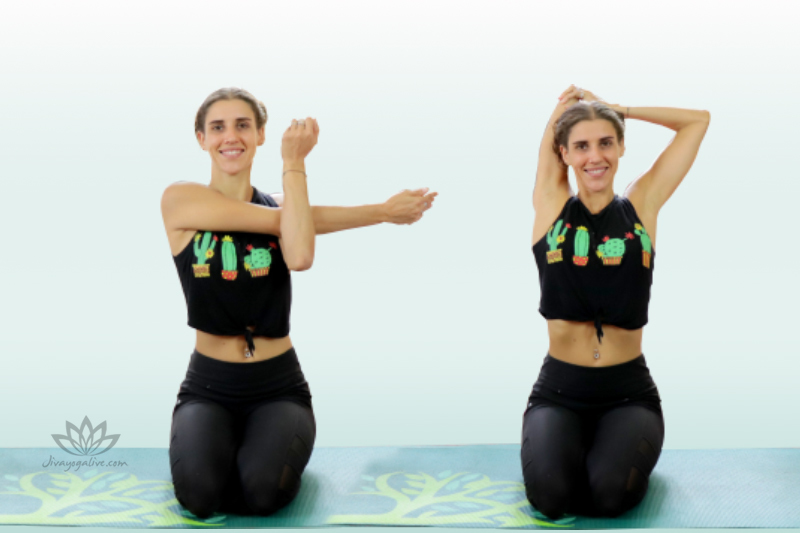
Arms Stretches

Taking a comfortable seated position, stretch your right arm across your chest and hook it with your left elbow, pulling your arm close to your body. Then raise your right arm up and bend your elbow to rest your right hand on the back of your neck or between your shoulder blades.

With your left hand, gently pull your right elbow towards the left. Take a couple of slow deep breaths in each position and then change side.

Arm Stretches

Featured Video: Killer Prenatal Arm Workout No Weights

Conclusion on Pregnancy Arm Workout Yoga Poses

When it comes to building strength during pregnancy, especially with pregnancy arm workout yoga poses, consistency is more important than intensity. Short, regular workouts will benefit you far more than one long session here and there. Your body thrives on rhythm and routine.

Set realistic goals for how many times a week you want to move—maybe it’s 3 quick sessions to start. Write them down and track your progress. As your energy and strength improve, you can gradually increase the frequency or duration. The most important thing is to listen to your body.

Some days you’ll feel energized and powerful. Other days, not so much—and that’s okay. Adapt the intensity and length of your workouts based on how you’re feeling, but try to keep showing up. That’s how you build a sustainable habit.

And if you need a little extra motivation, find a workout buddy! Moving your body is always more fun with a partner by your side.

If you’re ready to take things further, check out our prenatal course, click the link here to learn more and join us!

About

Clementine

Clementine is a multi-style prenatal yoga teacher, world traveler and animal lover. She started yoga back in 2015 and fell in love with this beautiful ancient practice. Read More..

pregnancy_arm_workout_yoga_poses

Pregnancy Stretches To Prepare For Birth: Strengthen Your Body for a Smoother Delivery

Your water just broke! Time to rush to the hospital because your baby is going to pop out any second! Or… maybe not. While this dramatic scenario plays out in every Hollywood movie, real-life labor is usually a little more drawn out—and much more manageable, especially when you’re incorporating pregnancy stretches to prepare for birth into your routine.

prepared.

Understanding Labor: It’s Not What You Think

For starters, labor doesn’t usually begin with your water breaking. In fact, it often happens much later—or not at all until you’re well into active labor. And if you’re a first-time mama, you can expect labor to last around 18 hours or more. But no, that’s not 18 hours of screaming and pushing.

One of the biggest barriers to a calm and empowered birth is fear—fear that our bodies aren’t capable. But here’s the truth: your body was made to birth. The female body has been doing this since the beginning of time, and it knows what to do—if we let it.


The Three Stages of Labor (And How to Support Each One)

1. Dilation (Early and Active Labor)
This is the longest stage of labor, beginning with your first contractions and ending when your cervix is fully dilated (10 cm). This is where pregnancy stretches and yoga exercises can be incredibly helpful.

What to do during dilation:

  • Rest or sleep to conserve energy

  • Eat light, energizing foods (like dates!)

  • Go for gentle walks

  • Take a warm bath

  • Practice pregnancy stretches to prepare for birth

  • Use breathing techniques to stay calm and help your body open

Pregnancy stretches like hip circles, cat-cow, child’s pose, butterfly stretch, and deep squats (if comfortable) can ease tension, create space in the pelvis, and encourage your baby into a good position for birth.

2. Pushing (Active Labor)
Once you’re fully dilated, your baby will start moving down the birth canal. You’ll feel a natural urge to push—and following that instinct can feel powerful and relieving.

3. Delivery of the Placenta
Usually about 20 minutes after your baby is born, the placenta is delivered. This is the final stage and usually comes with mild, painless contractions.


Natural Ways to Prepare for Labor

If your pregnancy is progressing smoothly and you’re aiming for a natural birth, your support system matters. Surround yourself with people who believe in your body: a trusted midwife or OB, a doula for emotional support, and your partner if desired.

Here are some natural ways to prepare your body for labor:

  • Practice daily pregnancy stretches to increase flexibility and ease pelvic tightness

  • Do prenatal yoga to connect with your breath and build stamina

  • Take gentle walks to encourage baby into the right position

  • Eat nourishing foods like dates (shown to support cervical dilation)

  • Use breathing and relaxation techniques to stay calm during contractions

  • Take warm baths to soothe aches and relax muscles


Why Pregnancy Stretches to Prepare for Birth Matter

In the final weeks of pregnancy, incorporating pregnancy stretches to prepare for birth can make a huge difference. These movements help open the pelvis, release tension, and make space for your baby to move down naturally.

Regular stretching:

  • Helps reduce lower back and hip pain

  • Encourages optimal fetal positioning

  • Promotes relaxation and better sleep

  • Prepares your body for each stage of labor

Pregnancy Stretches To Prepare For Birth Infographic

pregnancy stretches to prepare for labor infographic_CG-11

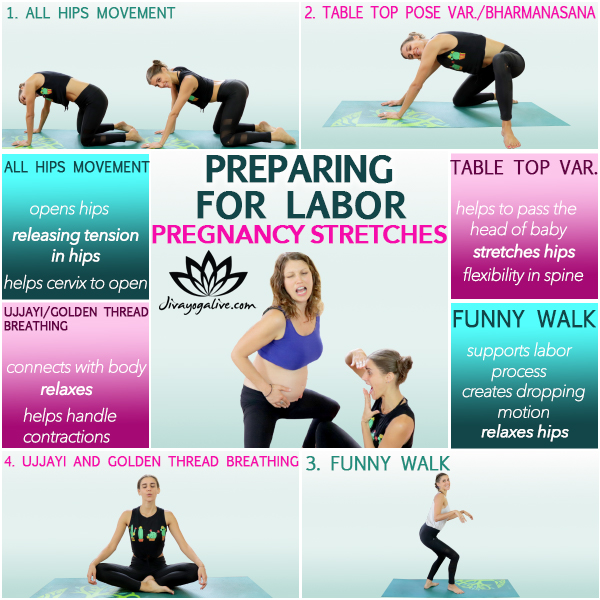
All Hips Movement on all four or against the wall

You can choose to be on all four or standing next to a wall, hands on the wall, depending on what feels better for you. 

The point here is to let the hips move freely to release any tensions and help the cervix to open. Circles, wiggles, rocking side to side, figure-8 shapes. Let your body lead the way and do what feels best for you.

All hips movement

Table Top Pose Variation – one leg to the side

From a Table Top position, open one leg to the side, foot flat on the floor, and let your hips move freely here too. Back and front, circles, side to side. In this posture, the diameter of your pelvis is the widest possible so this posture can be helpful if the head of the baby is having difficulty to pass through the pelvis.

Table Top Pose Variation - Bharmanasana

Funny Walk

Wobble for a couple of breaths, walking with your feet pointing outward. Then on an exhale, bend deeply your knees, creating a dropping motion with your hips to help the baby’s head to lower down and support the labor process. This exercise will help to keep the hips open and relaxed.

Funny Walk

Breathings – Ujjayi and Golden Thread

The first breathing technique is called Ujjayi Breathing. Sitting in a comfortable position, start by deepening your inhalations and exhalations, squeezing your throat a bit so that the air creates an ocean sound with each breath. Let the rest of the body relax and apply this breathing during 10 to 15 cycles. This will help you to connect with your body and stay relaxed.

The second breathing technique is called the Golden thread. Inhale deeply through the nose and exhale slowly through your mouth as if your breath was a delicate golden thread that you are blowing out. This breathing will help you to handle the intensity of the contractions, exhaling slowly every time a contraction comes. 

Breathings - Ujjayi and Golden Thread

Featured Video:Fun Pregnancy Exercise & Stretches To Prepare For Labor

Conclusion

The more you practice those exercises and breathing techniques before the birth, the easier it will be to apply them during your labour. Maybe practice with your partner too, so that he can help you stay focused and offer you to use a particular breathing technique or position when the intensity of the birth will put you in a state close to a trance. 

I also recommend you to read about as many positive birth stories as you can during the last trimester. This will help you to have your mind filled with powerful joyful experiences instead of scary ones. Positive thinking brings positive outcomes. The book A guide to childbirth by Ina May is a great book to read during pregnancy.

About

Clementine

Clementine is a multi-style prenatal yoga teacher, world traveler and animal lover. She started yoga back in 2015 and fell in love with this beautiful ancient practice. Read More..

pregnancy-stretches-to-prepare-for-birthhttps://www.jivasoul.com/prenatal-yoga-for-healthy-pregnancy

Tailbone Pain In Early Pregnancy 4 Stretches

Tailbone pain in early pregnancy is one of the most common aches women experience. Whether you’re in your first, second, or third trimester, tailbone discomfort can strike at any time.

What Is the Tailbone and Why Does It Hurt?

The tailbone, also known as the coccyx, is located at the very bottom of your spine. It’s made up of three to five small bones connected by joints and cartilage. The tailbone supports your body when sitting and serves as a key attachment point for pelvic floor muscles—the muscles that support your expanding uterus, vagina, and eventually your growing baby during pregnancy.

From the moment you conceive, your body begins to release hormones that soften your joints, ligaments, and muscles. This natural process is designed to make space for your baby to grow and prepare your body for childbirth. While this flexibility is helpful for your baby, it can cause tailbone pain and other discomforts for you.

Relaxed ligaments and joints can make the tailbone overly mobile and misaligned, which can lead to radiating lower back pain. As your uterus grows, it also puts increasing pressure on the tailbone, especially as the pregnancy progresses.

Pain During Pregnancy?

There are many easy ways to ease tailbone pain and sometimes make it disappear altogether. In this article, we will focus on a few stretches that create space and relieve pressure on the tailbone area but here are some ideas you can implement in your everyday life:

  1. Sit upright and maybe use a yoga ball instead of a regular chair. This will help you to keep your spine aligned and to gently open your hips.
  2. Sleep on your left side with a pillow between your legs. It will improve your blood circulation and your digestion as well as maintaining your hips aligned during the night.
  3. Move! Walk, swim, dance, pilates, yoga, gym… the choice is yours! Just do it!
  4. Be mindful with the weight gain. Don’t overuse the excuse “I’m pregnant” to indulge in overeating not-so-healthy food all the time. If you put on more than you should for the health of your baby, the extra kilos will come adding to the pressure on your back.
  5. Use heat! Maybe apply a hot pad or take a hot bath. The heat will help to dissolve the tensions and soothe the pain.

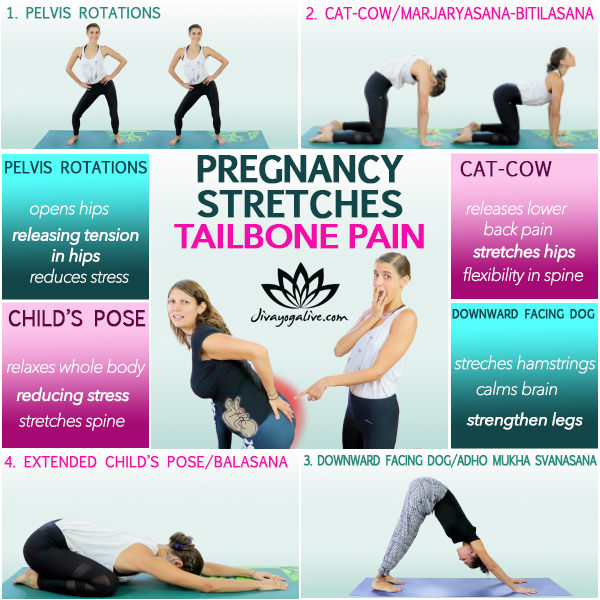
4 Stretches For Tailbone Pain During Early Pregnancy Infographic

tailbone pain during early pregnancy infographic

Pelvis Rotations

Start standing with your feet hips-width apart and bend your knees slightly. Make the motion of tucking and untucking your tailbone, letting the hips “swing” from back to front. Take your time to explore the motion. 

Then let your hips move freely from side to side. And then move them in all directions mindfully, front , right, left, back, making figure-8 motions, letting your hips move as they want, releasing any tension held in this area.

Pelvis Rotations

Cat Pose / Cow Pose – Marjaryasana / Bitilasana

From a table top position with the hands below the shoulders and the knees below the hips, start with an inhale, pressing the hands firmly on the floor, letting the belly drop, opening the chest to the front and looking up.

On the exhale, round your back, trying to press the part in the middle of your shoulder blades towards the ceiling, tucking your tailbone and looking towards your navel. Synchronize your breath with the movement and do 10 or 15 cycles.

Cat-Cow Pose - Marjaryasana-Bitilasana tailbone pain in early pregnancy

Downward Facing Dog Pose – Adho Mukha Svanasana

Still from a Table Top position, start by tucking your toe. Then slowly press your hips up and back until your arms are in line with your shoulders and legs are extended. Here feel free to bicycle your legs, move your hips around a bit. Do what feels good for your body.

This pose will nicely stretch all the main muscles of your back body.

Downward Facing Dog - Adho Mukha Svanasana   tailbone pain in early pregnancy

Extended Child’s Pose – Balasana

From the Table Top position, sit back on your ankles. Open your knees wide enough to create a space for your belly and slowly fold forward, keeping the hips as close to your feet as possible. If you want you can place a rolled-up blanket or pillow underneath your head and chest, or simply rest your forehead on the floor.

Breathe deeply in this posture, relaxing the whole body and allowing the breath to go all the way down into your lower back with every inhalation.

Extended Child's Pose - Balasana   tailbone pain in early pregnancy

Featured Video:4 Easy Stretches For Tailbone Pain During Early Pregnancy

Conclusion

Tailbone pain during early pregnancy can literally be a pain in the *ss! And the drugs you would normally take are not safe for pregnant women. But luckily, a few adjustments in your posture, your sleeping position and targeted stretches can do the trick and relieve partially or completely your pain.

You can also find a good chiropractor that will help you put everything back in place.

About

Clementine

Clementine is a multi-style prenatal yoga teacher, world traveler and animal lover. She started yoga back in 2015 and fell in love with this beautiful ancient practice. Read More..

tailbone_pain_in_early_pregnancyhttps://www.jivasoul.com/prenatal-yoga-for-healthy-pregnancy

Pelvic Floor Yoga for Pregnancy: Strengthen Core Muscles and Prepare for Labor with Four Exercises

The pelvic floor is a group of muscles located at the base of your pelvis, stretching from the pubic bone to the tailbone (coccyx). Practicing pelvic floor yoga for pregnancy helps you strengthen and become aware of this important muscle hammock that supports your womb, bladder, and intestines—key organs that play a big role during pregnancy and birth.
What Is the Pelvic Floor and Why Is It Important?

Your pelvic floor has three main openings: the urethra, through which you urinate, the vagina, through which you will give birth, and the anus, through which you defecate.

These openings are controlled by sphincter muscles—small ring-like muscles that help maintain control.

Beyond simply holding everything in place, the pelvic floor works closely with the deep core and postural muscles that support your spine. This makes pelvic floor strength essential not just for pregnancy and birth, but for your overall posture and well-being.

How to Feel Your Pelvic Floor

Because the pelvic floor is internal and not visible, many people have trouble identifying it. Here’s a simple way to locate yours:

Sit comfortably and place one hand between your legs.

Make a fist with your other hand and place it near your mouth.

Focus your awareness on the area between your legs.

Cough strongly into your fist.

You may feel a slight bulge or movement—that’s your pelvic floor responding.

Why Pelvic Floor Exercises Matter During Pregnancy

During pregnancy, your pelvic floor muscles bear the increasing weight of your growing baby. If these muscles are strong and balanced, they offer essential support and help manage the added pressure. But if they’re weak or over-tight, you may experience:

  1. Lower back or pelvic pain
  2. Poor posture
  3. Stress incontinence (especially when sneezing, laughing, or jumping)
  4. Complications during labor or postnatally

That’s where pelvic floor yoga for pregnancy can be especially beneficial.

How Yoga Supports Your Pelvic Floor

In yoga, the pelvic floor is seen as the energetic root of the body—where grounding, strength, and stability originate. Yoga can help you:

  • Increase awareness of your pelvic floor muscles
  • Build tone to support your organs and spine
  • Release tension, which is vital for labor and delivery
  • Strengthen posture through breath-synchronized movement

Importantly, yoga teaches that it’s just as crucial to relax the pelvic floor as it is to strengthen it—especially as you prepare for birth.

How to Start Practicing Pelvic Floor Yoga During Pregnancy

  1. Pelvic tilts

  2. Cat-cow movements

  3. Deep squats (with support)
  4. Diaphragmatic breathing

  5. Kegel exercises paired with slow, mindful exhales

The best pelvic floor yoga practices during pregnancy are gentle, intentional, and aligned with your breath. These may include:

These movements help tone the pelvic floor and surrounding muscles while promoting circulation and relaxation.


Four pelvic floor exercises before pregnancy

pelvic floor exercises during pregnancy infographic_CG-9   pelvic floor yoga for pregnancy

Easy Pose -Sukhasana

Sit in any comfortable position that allows you to keep your back upright. This exercise will help you to locate your pelvic floor. Start by engaging your anus, contracting it without engaging anything else. Then move on to your urethra, trying to contract it without engaging anything else.

To do so, the action is the same as when you’re peeing and trying to stop the flow midstream. Then put your focus on the part between your anus and your urethra. Try to lift up this part without engaging the rest. In yoga we call this mula bandha.

Take your time exploring the sensations, and if you don’t feel much, don’t worry, it will come with practice.

Easy Pose - Sukhasana  pelvic floor yoga for pregnancy

Funny Walk

This is a silly little exercise to start working on your pelvic floor with the synchronization of the breath. Start at the back of your mat, feet hips-width apart and slightly open. Take a step forward, extend your legs and engage your pelvic floor, lifting everything up inside. On the exhale, bend your knees a little and relax everything.

Take a second step forward on your inhale, engaging the pelvic floor, and repeat this exercise as you walk all the way to the top of your mat and back to where you started.

Funny Walk   pelvic floor yoga for pregnancy

Garland Pose Malasana

Place your feet hips-width apart, the toes turning outward and come down to a deep squat position, maybe placing a block below your butt for more comfort. Place your hands in prayer at your heart center and open the chest by pushing your elbows into your shins.

On every inhale, lift up your pelvic floor, on every exhale, let everything relax. Do 10 to 20 rounds of breathing.

Garland Pose - Malasana

Bridge Pose – Setu Bandhasana

Lie down with your back on the floor and your feet close to your hips, knees pointing towards the ceiling. On every inhalation, lift up your hips and press them away from the floor as much as you can while engaging your pelvic floor muscles.

On every exhalation, bring the hips back down and relax everything. Do 10 to 20 rounds of this movement, synchronizing your breathing and the motion.

Bridge Pose movements- Setu Bandhasana

Featured Video: Easy Pelvic Floor Exercises For Pregnancy

pelvic_floor_yoga_for_pregnancy

Conclusion

I can’t stress enough how much those pelvic floor muscles exercises are important for everybody and even more during pregnancy.

You can practice them during your yoga session but you can also practice them anywhere, anytime as it is an invisible yoga exercise.

When you’re driving, working, waiting in line, cooking, brushing your teeth… Just maintain the synchronization with the breath, lifting everything up on the inhale and relaxing on the exhale. It is better to practice this exercise a little bit at a time but often rather than a big session once a week.

You want ideally to make it become a part of your routine so that you will be doing them without even thinking about it!

About

Clementine

Clementine is a multi-style prenatal yoga teacher, world traveler and animal lover. She started yoga back in 2015 and fell in love with this beautiful ancient practice. Read More..