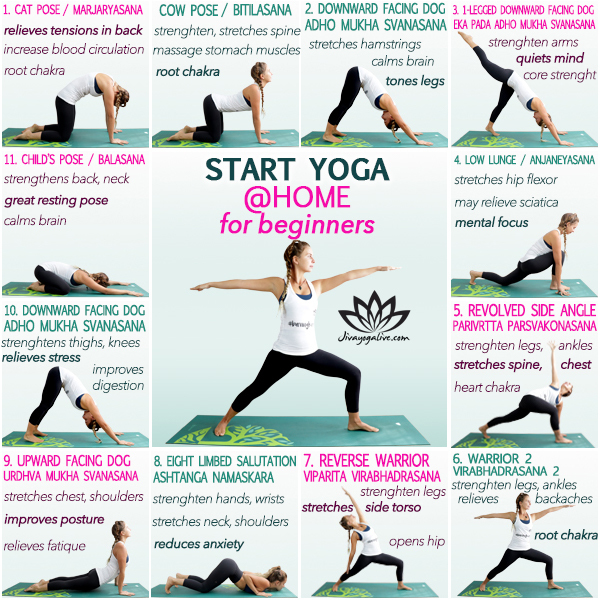
8 Gentle Yoga Poses For IBS & Ulcerative Colitis

This article introduces some gentle, easy poses that are going to help to relieve symptoms of IBS and Ulcerative Colitis.

As is the story for most people, my yoga journey began with hopes of having a more flexible and bendy body. I had images of these intricate poses such as Birds of Paradise and Forearm Stand dancing in my mind; I had no idea of the kind of strength these poses required. As my yoga journey progressed, I let go of attachments to mastering any one pose and began to work on developing strength and flexibility across the whole body. If anything it was my mind that began to really strengthen before anything else. Over time I did start to build some muscle and my movements started to become much more graceful. The stronger and more open my body became, the easier my practice was and the more fluid my movements were. There are so many great poses that target strength, balance and flexibility. I always make sure to incorporate a little bit from each element into my daily practice.
TRAINING TYPE:  FLOW SEQUENCE 

CATEGORY:YOGA

SUBCATEGORY:YOGA FOR FLEXIBILITY 

 PLANNED TIME:15 MINUTES 

LEVEL:BEGINNER  

PROPS:NONE

What Are The Best Yoga Poses for Flexibility and Strength?

​ 

Standing Poses provide a great opportunity to work into both flexibility and strength – so long as we are not being lazy and dumping our weight down into our hips! With seated and supine poses we can often utilise the effects of gravity and the weight of the body to pull us deeper into poses, and there isn’t a need to exert too much effort. However, when we come up to standing, we can engage more effort by firming down into the feet and drawing them energetically in towards the midline. This turns on and activates all the muscles of the legs and allows us to simultaneously becomes stronger and more flexible.

High Lunge – Alanasana

We are tasked to find both strength and balance in this pose. The key is to create that stable base with the feet and legs. Rooting down into the feet will lend you more power so you can go a little deeper into your flexibility and open up the back hip flexor. This is notoriously tight for most people as a result of countless hours of sitting. As this area begins to stretch and open, we are simultaneously strengthening the front thigh, hamstring and glute. Warrior Two – Virabhadrasana II

This pose will strengthen and lengthen you from head to toe and is renowned for being one of the most powerful lower body strength builders. It’s important to build this pose from the ground up; firm down into the feet and activate the legs by hugging them toward the midline. Stand in your strength here and welcome any shaking in the legs, as this is a sign that you are really working into the muscles. This pose is also doing wonders above the belt, as it stretches the back, neck and shoulders. Tap into strength and relaxation and don’t forget to breathe!Reverse warrior – Viparita Virabhadrasana

When moving into this pose, there is a tendency to back off and come up out of the bend in the front knee, as you look for some relief from your Warrior Two Pose. However, the key is to staying low in the legs! If you can get away from your mind and any thoughts of perceived effort and commit to your depth here, you are really encouraging strength to build in that front leg. At the same time you are opening and stretching the side body and solidifying the core.Remember to balance the whole body and take each of these poses to the other side!

Yoga Stretches for Beginners

You will learn beginner friendly sequence that will lay the foundations for deepening into your flexibility. Although the poses are simple, they are great building block asanas to start to open the body in a way that is safe. I invite you to grab some props if you have them available, if you don’t have a block or a bolster, a book and a rolled up blanket or cushion will work great. The poses you will learn will work to open your legs, groins, hips, back, chest and neck. These poses include; Standing Forward Bend, Garland Pose, Seated Forward Bend, Head to Knee Pose, Half Wild Thing Variation, Bound Angle Pose and Half Lord of the Fishes Pose. If this is the very beginning of your yoga journey, expect there to be a little tightness in the body and be ok with that. They body will open over time, but you only if you respect its boundaries and work with where it is at.

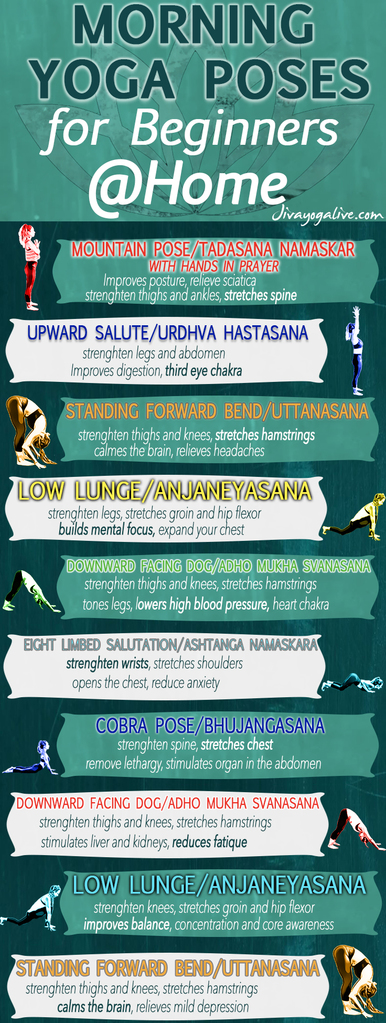
INFROGRAPHIC:#CH1023 Yoga Poses Flexibility Beginners

yoga poses for flexibility beginners_CH1023

Upward Salute – Urdhva Hastasana

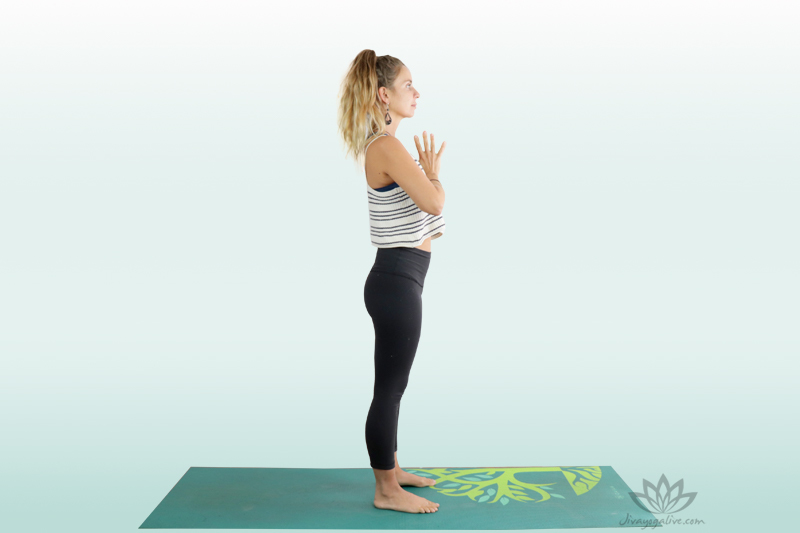
Begin with the hands together at the center of the chest in Prayer and then inhale as you raise them overhead. Take a moment here to move and stretch the arms and body and then settle into Upward Salute, arms raised above, palms facing the midline.

Upward Salute is usually one of the first opportunities you get to create some space in the body. It stretches the sides of the body, spine, shoulders, armpits, and belly.

upward salute

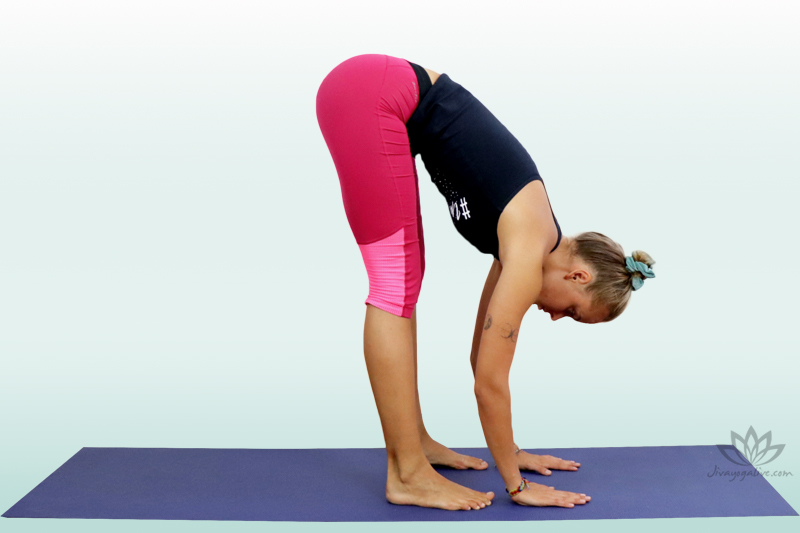
Standing Forward Bend – Uttanasana 

Hinging at the hips, start to fold forward, keeping the spine straight and the neck and head in line. The hands are extending forward as you come down into Standing Forward Bend. Hands can come down to the mat or we use a block to bring the earth a little closer. Inhale and press down into the feet and slowly start to roll up to standing, neck and head coming up last.

This is a great beginner pose for opening up the back of the legs as there is not much physical effort required, as the torso hangs down heavy and gravity does the work of elongating the spine. Especially when starting out, it is perfectly fine to have a slight bend in the knees and to rest the hands down onto the thighs or the shins.
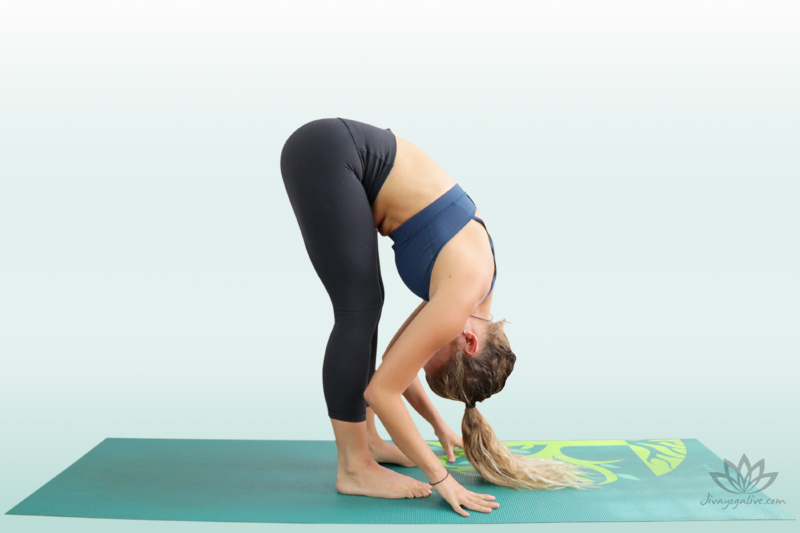
Standing forward Bend

Garland Pose – Malasana

Take the feet slightly wider than hip width and with an inhale raise the arms up, palms come together to touch and then bending the knees, drop down into Garland Pose. Press the palms firmly together and bring the elbows into the thighs to create a resistance and stretch into the inner thighs.

Garland Pose stretches the thighs, groin, hips, ankles, and the torso and is often easier than it looks, especially for beginners. The heels don’t necessarily have to touch the earth, but try to keep the spine straight and the chest open.

garland pose

Seated Forward Bend – Paschimottanasana 

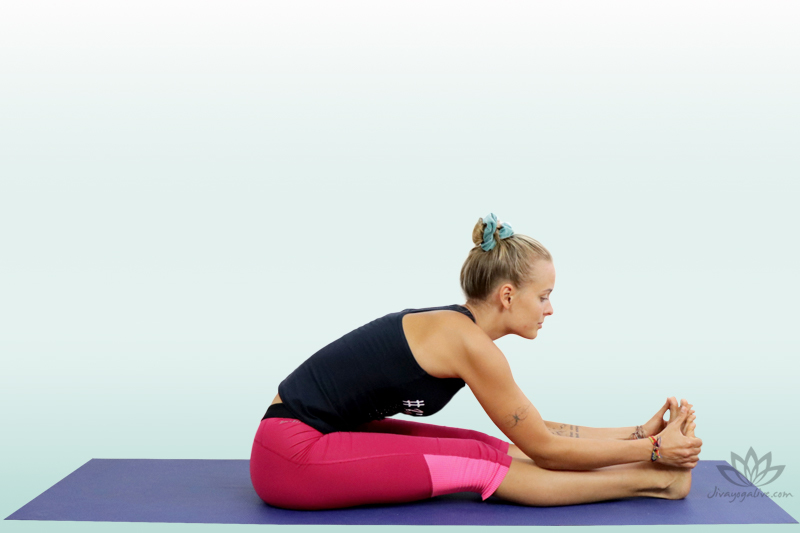
Come down to sitting, legs extended out long in front, making sure your strap is handy. Remove the flesh from underneath the sitting bones and create a long spine through to the crown of the head. Begin to fold down, forehead aiming towards the toes, the heart towards the knees. Looping the strap around the soles of the feet and settle into Seated Forward Bend.

The seated Forward Bend offers a deep stretch for entire back side of body from the heels to the neck and is an opportunity to relax down over yourself. As you go internal with this pose, focusing on the breath and the sensation of stretching, you can calm down the mind and relieve stress

seated forward bend

Head to Knee Pose – Janu sirsasana 

Bring the right leg out on a diagonal and the left sole of the foot in to meet the right thigh. Keep the strap handy and turn the torso to face the extended leg. Inhale the arms up and exhale, folding down. The strap can go around the sole of the foot in order to keep the leg straight.

Head to Knee Pose is going to stretch the spine, shoulders, hamstrings, and groins. It is calming and relaxing, while offering a deep stretch.

head to knee pose - half seated forward bend 4

Wild Thing Variation – Camatkarasana 

Bring the left hand to the base of the lower spine. Press into the palm and into the toes of the front foot. Come up onto the left knee. Sweep the right arm and hand up and behind, coming into Wild Thing Variation. Bring the hips back down to the earth. Take Head to Knee Pose and Wild Thing Variation to the other side.  

This variation of Wild Thing is an more accessible way to open up the shoulders, lungs, and chest. It also opens the hip flexors and the front of the legs. It is one of the juiciest counter stretches out there.
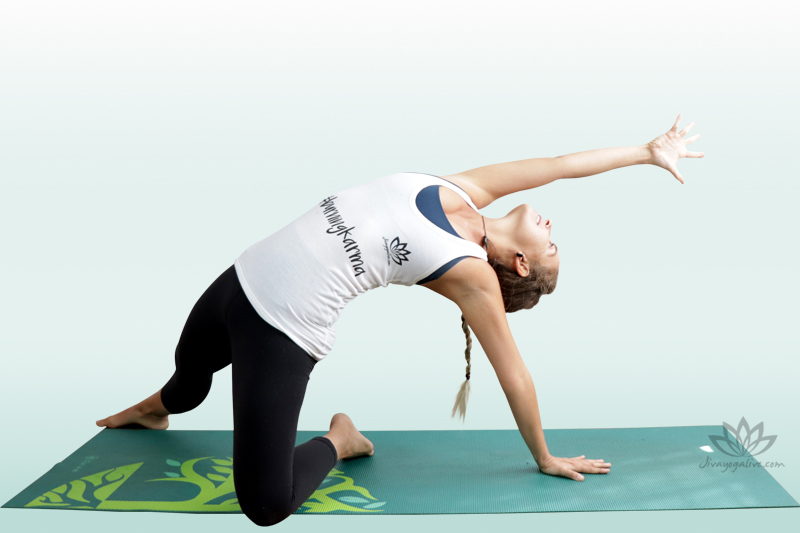
wild thing pose knee to floor variation

Bound Angle Pose – Baddha Konasana  

Bring the soles of the feet together and interlace the fingers around the toes. Walk the groins towards the feet for a more intense stretch. Inhale the spine straight and exhale, start to lean forward. Elbows can come into the calf muscles. Drop the head down, coming into Bound Angle Pose.

This pose is great for beginners because you can take it as deep or as easy as you like. While the hips and inner thighs are receiving a deep opening, the spine is being elongated from the base right through to the crown of the head.

bound angle pose 3

yoga poses for flexibility beginners Video
CH1023 yoga poses for flexibility beginners v1

Yoga for Flexibility and Balance

When practicing balance poses you want to cultivate a lightness of body and mind, and by that I mean to try not take yourself so seriously! When you wobble, it is a sign that the body is building strength. When you fall out of a pose, you simply jump back in. The balance in the body is different from day to day – whether that be the fault of the moon or a reflection of your state of mind, who knows, but even the most advanced yogi can and will have an off day. Another thing to keep in mind, is that you should never expect both sides of the body to feel the same as we are not perfectly symmetrical beings. Here are three poses if practiced daily, you will start to find yourself a little more balance body and mind, both on and off the mat.

Better balance is something we can all benefit from, especially if we are engaged with other sports. A 2017 study on The Effects of Yoga on Flexibility and Balance, found evidence to support that yoga was able to boost athletic performance across a range of activities and that a regular practice could lead to significant improvements in a little as six weeks.  Lord of the Dance Pose – NatarajasanaThis pose is an expression of power, grace and strength. Multiple things are happening in the body as we stretch into the shoulders, chest, thighs, groin and abdomen. Simultaneously you are strengthening the legs and ankles. However, the cherry on top of the mindfulness cake, is the ability of this pose to improve the quality of the mind. You are required to find balance and concentration, yet remain graceful and poised. Frustration will likely come as you fall out of this pose time and again, so your patience and resilience can be tested. Find balance in the body with this pose and you’ll cultivate more balance in the mind.  

Eagle Pose – GarudasanaThis pose requires endurance and unwavering concentration to find the balance. The trick is to squeeze everything to the midline of the body. Squeeze the elbows and knees and try to keep them stacked in one line. This pose really has it all when it comes to flexibility and balance. The challenge really comes from having your Drishti Point (single point of focus) obstructed by the hands. When you come out of this pose and unwind the body there is a beautiful experience of unbinding the mind too.   

Half Moon Pose

This pose relies on the stability of the standing leg and ankle; while you extend the top leg straight and strong, to find that perfect tipping point of balance. In Hatha Yoga, Half Moon is an expression of channeling the lunar energies in order to maintain a sense of body orientation in space. You are building strength in the lower body as you work to firm down into the standing leg – at the same time you are encouraging a dynamic sense of balance in both the body and the mind.  Repeat these poses on the other side to work with both the yin and yang aspects of the body. This balances the masculine and the feminine energies to ensure whole body harmony.

TEACHERS INSIGHTS

Don’t be afraid to use props and take modifications, especially in the beginning. The body wants to open and will become more flexible over time. Moving slowly and taking the options for support are only going to strengthen your practice, and the key is not how far you can push yourself in a single practice, but instead showing up over time and practicing with consistency.

CONCLUSION

These poses are great foundational asanas for a beginner who is looking to work on flexibility across the whole body. Sometimes we can have a specific advanced pose in mind, such as the splits and the focus might be directed on soley trying to open the legs, but you are more likely to reach these poses when we work at opening the whole body, as it is all connected. This is also relevant when it comes to ailments such a low back pain, which is usually the result of tight hips. It’s so important that we see and keep the bigger picture in mind and trust both the process and in the body’s ability to open up.

PDF DOWNLOAD
CH1023 yoga poses for flexibility beginners pdf book cover400

How to Start Yoga at home for beginners  PDF, will guide you through the best way to start yoga at home. Includes a beginner sequences designed to give you the best poses to get started. Easy poses accessible to all ages and levels,  you will find in this  pdf simple poses and their benefits,Images and  tips.  Included in this Free Yoga PDF Download:

  • Yoga asanas names with pictures and benefits
  • Printable Sequence Infographic
  • Teacher Tips
  • Resource Links

Beginner Yoga Sequence For Lower Back Pain

I remember a time when I was backpacking in Cambodia and somehow I had pulled a muscle in my back. I couldn’t even lie down straight in bed, let alone explore the exciting new world I was in, without there being excruciating pain.

I remember a time when I was backpacking in Cambodia and somehow I had pulled a muscle in my back. I couldn’t even lie down straight in bed, let alone explore the exciting new world I was in, without there being excruciating pain. Whenever my back is suffering, I get onto the floor and move through some of the most simple yoga poses out there. I move slowly and feel instant satisfaction and release when on the lucky occasion my back cracks and softly opens up.

Yoga is one of the most effective and natural tools that we have at our disposal for treating and preventing back issues and if you have experienced back pain, you know just how debilitating it can be. It can make even the most simple tasks impossible and will have you reaching for over the counter drugs quite quickly, just so you can manage your everyday life.

A regular yoga practice will allow the back and the spine to become strong and resilient over time, but it can also be used as a tool to provide pain relief in time of crisis if done mindfully. When I couldn’t even find relief in lying in bed, I was so grateful that I had a yoga background to support me.

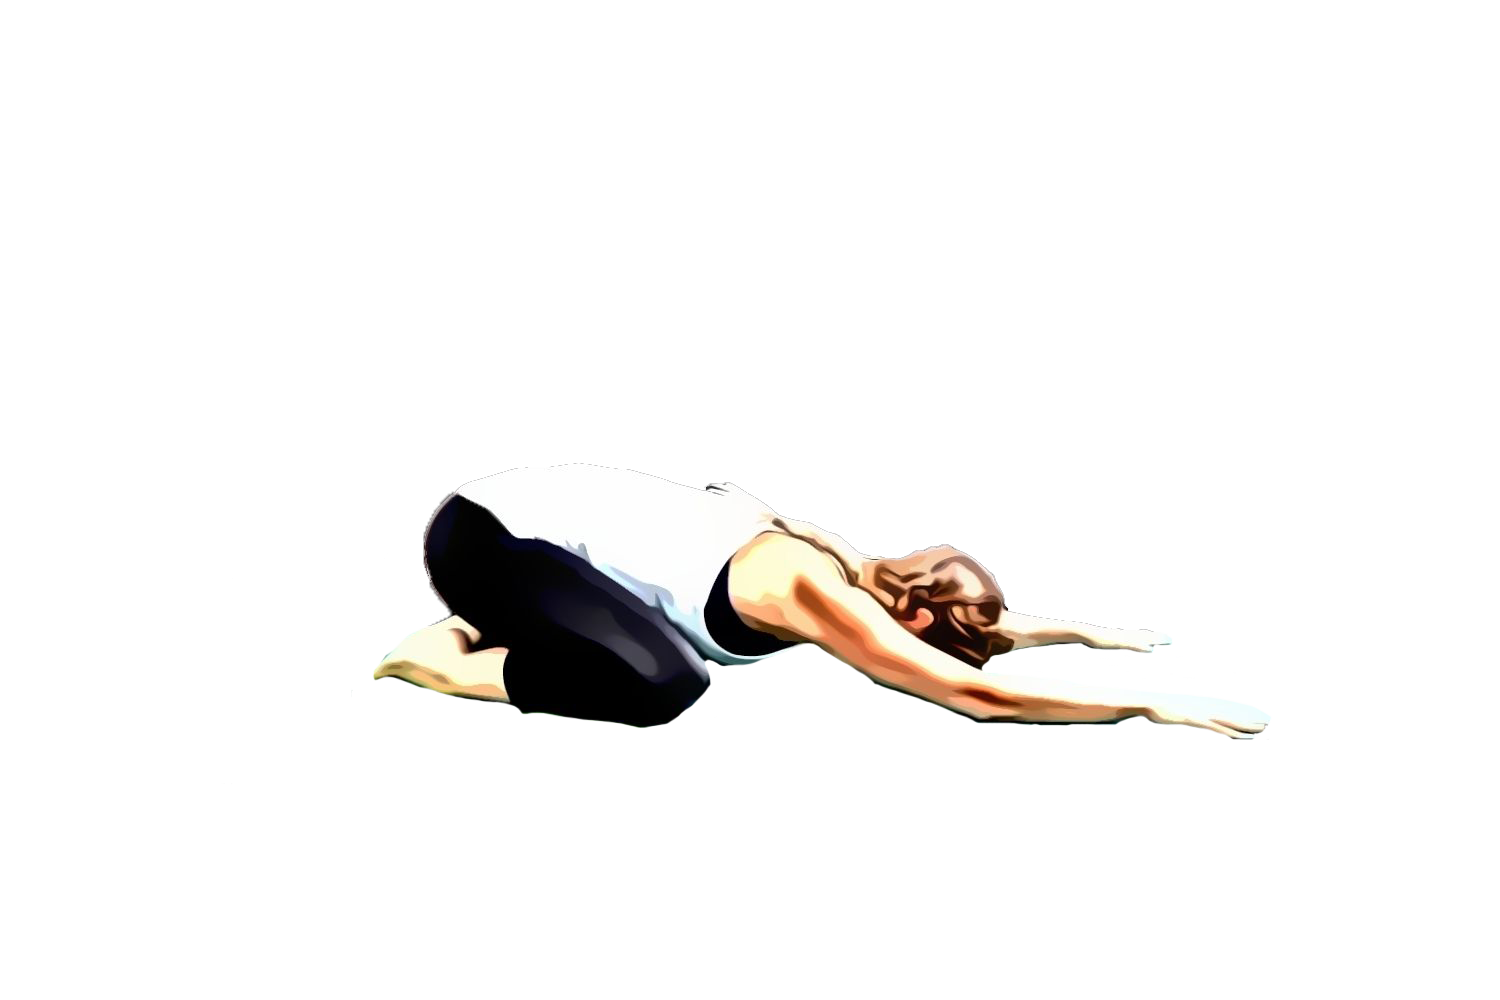
childs pose vector

TRAINING TYPE: FLOW SEQUENCE

CATEGORY:YOGA

SUBCATEGORY:BEGINNER YOGA

 PLANNED TIME:10-15 MINUTES 

LEVEL:BEGINNER  

PROPS:BLOCK

What are the best beginner yoga poses for lower back pain?

​ 

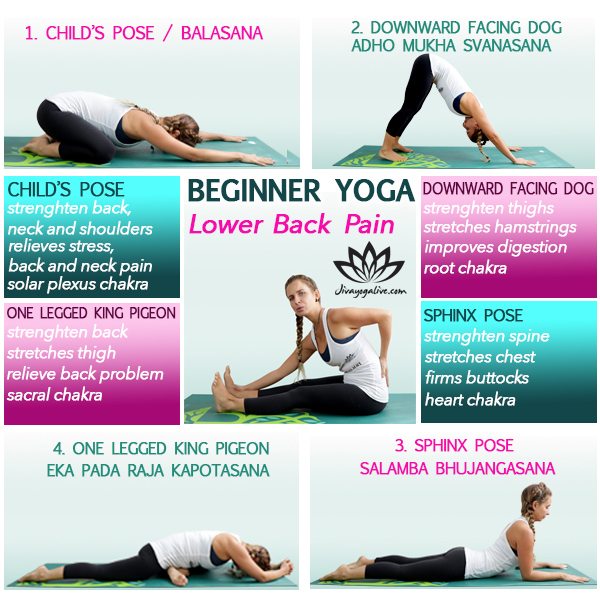
  • Extended Child’s Pose – Balasana
  • Downward Facing Dog – Adho Mukha Svanasana
  • One-Legged King Pigeon Pose forward bend variation – Eka Pada Rajakapotasana
  • Sphinx Pose – Salamba Bhujangasana
  • Easy Beginner Yoga Sequence For Lower Back Pain

    You will be introduced to a beginner yoga sequence for lower back pain. Grab a block or a book if you have one handy so there is the option to take modifications and for a little extra support. Back pain is often caused by tightness in other areas of the body such as the hips, which means it is essential that we work on the whole body, making sure to move with caution and care. Listening to the body when working with back pain is key! 

    Keep in mind this sequence is not about pushing the body, instead we are wanting to move with caution and respect in a way that is therapeutic and conducive to healing. So it’s important that we work to open up and release stagnant energies in the whole body.

    Beginner Yoga For Lower Back Pain Sequence Infographic

    beginner yoga for lower back pain infographic

    Extended Child’s Pose – Balasana

    Take the knees as wide as the mat and come down into an Extended Child’s Pose. A gentle way to elongate the spine, stretching it from tailbone right through to the crown of the head. Allow the forehead to come down to the mat and breathe into the pose, sending the breath into the back of the body, into the kidneys.

    This pose is the perfect place to take rest and is available at all times during your practice. Think of it as your home base. It’s is restorative and relaxing but also offers a gentle stretch to the whole spinal column.

    extended child pose

    Downward Facing Dog – Adho Mukha Svanasana

    Pushing back next into Downward Facing Dog, by tucking the toes and pushing into the palms, sending the hips and tailbone up. Take your time here to pedal out the legs, bending one knee and then the other.

     When you think about inversions, you typically think of the Headstand and Shoulder Stand, but Downward Facing Dog also brings the head below the hips, making it a gentle and more easily available inversion for the body. It strengthens the chest, arms, wrists and core, making it a great preparatory pose for those more advanced balances.  

    downward facing dog pose

    One-Legged King Pigeon Pose forward bend variation – Eka Pada Rajakapotasana

    Take the right knee and place it down behind the right wrist, and walk the back leg down along the mat, top of the foot resting down. Aim to have the right shin parallel with the top edge of the mat, or in towards the groin. Come onto the fingertips and lengthen the spine up. Exhale, bring the torso down, coming to rest on the forearms. To go deeper, bring the forehead down to the earth. There is the option here to slide the block underneath the hips to make the square.

    Use the hands and arms to walk the torso back up, lift the back knee and press into the palms and push back into Downward Facing Dog. Take One-Legged King Pigeon Pose forward bend variation to the other side, making sure the block is handy for support.

     We all hold a lot of tension in the hips, whether that be from other athletic activities, sitting at a desk or as a result of high stress, and this pose provides a powerful release to this area. It can feel extremely intense, but at the same time deeply satisfying. Use the breath to help drop you deeper into this pose over time.

    one legged king pigeon pose - forward bend variation

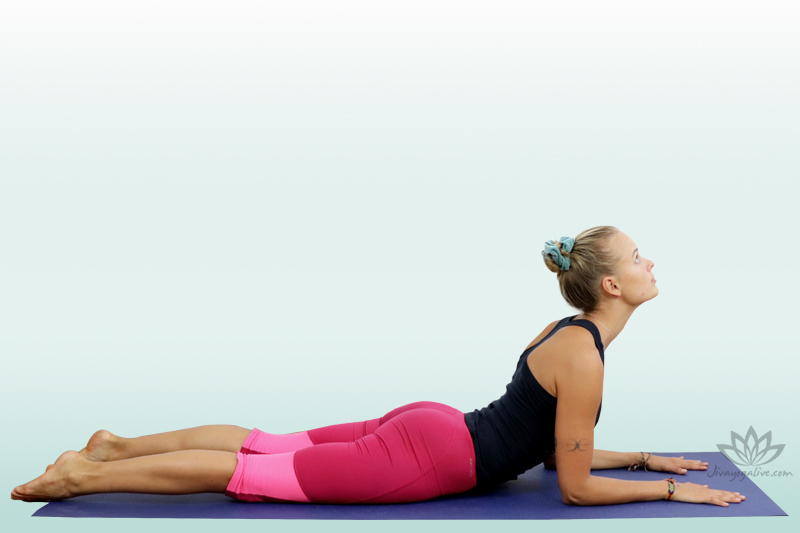
    Sphinx Pose – Salamba Bhujangasana

    Transitioning down onto the belly next so you can move into Sphinx Pose. Press the forearms and palms down into the mat, making sure that the elbows are in line with the shoulders. As we press down into the earth we can work to drag the heart forward, opening the chest and at the same time creating a healthy compression in the lower back.

    Sphinx Pose is one of the most therapeutic backbends you can move through when working with low back pain. It’s very gentle, but very rewarding, especially is practiced with consistency. It lengthens the abdominal muscles and stretches the spine, all whilst opening the shoulders and the chest.

    sphinx

    Featured Video: Beginner Yoga For Lower Back Pain

    Yoga for Lower Back Pain and Sciatica

    Sciatica is the experience of tenderness or pain anywhere along the Sciatic nerve, a nerve which runs from the spinal cord, down the leg and into the foot. We house two of these nerves, one in each leg. Studies show that lower back pain is one of the most common causes of limited activity in people under the age of 45 and the second biggest reason that people are making doctor’s appointments! One review on Trajectories of Low Back Pain (2013), indicates that between 25-80% of low back pain patients will experience some form of recurrent back problem in the following year.

    The Journal of Neurosurgery: Spine (2005), claims that there is a 40% probability that each of us will experience Sciatica over the course of a lifetime and often we will opt for treatment in the form of creams and injections. However, yoga can provide a more natural way to soothe, as opposed to these over the counter drugs or painful needles.

    Saucha, one of our founders here at Jivayogalive was recently bed bound with excruciating pain, unable to walk or to sit without immense suffering (from clocking way too many hours hunched over the computer, working too hard if you ask me!).

    He was quickly diagnosed with sciatica and what did the doctor order? Yoga. Of course. Lol. He was directed to perform a series of very simple and very accessible poses daily and in a matter of days he was up and walking again, and of course,  back at the computer working way too hard.

    3yoga poses that target the specific areas for Sciatic pain

    Cow Face Pose variation – Gomukhasana In this variation you want to extend the bottom leg straight. This is often a tricky pose for beginners, so having a blanket underneath the hips will help tilt the pelvis forward and make it a little more accessible.

    Cow Face Pose is a great way to internally rotate the thigh bones which stretches into the hips, which will provide relief along the sciatic nerve. There is the option to lean the torso down over the knees to deepen the stretch.

    One-Legged King Pigeon Pose forward bend variation – Eka Pada Rajakapotasana

    When the piriformis is tight there is often pressure being exerted onto the sciatic nerve and this pose can provide one of the deepest stretches to this muscle. There are a number of tell-tale signs to look for that can indicate that sciatic pain is linked to a tight piriformis; is there pain when walking on the heels and toes? Any burning sensation in the back of the calf extending down to the heel? Pain when sitting? All of these can indicate tightness in the piriformis.   

    Half Lord of the Fishes – Ardha Matsyendrasana This pose will help to restore the spines natural range of motion and relieve back ache and sciatic pain. Be sure to keep the spine straight and use a blanket underneath the hips so as to tilt the pelvis forward.

    Spinal twists are extremely therapeutic, but take care to move slowly and with awareness so as to not strain the back further. Make sure to perform each of these poses on both sides of the body, spending a few minutes in each, allowing the breath to guide you.

    3 Yoga Exercises For Instant Lower Back Pain Relief

    Yoga works to strengthen and stretch the muscles that support the back and spine and a regular practice is a great preventative measure to take that will help to avoid future injury. However, if you are reading this a little too late and there is already suffering in the lower back specifically, there are a number of great poses that will support your road to recovery and provide you with relief. Cat-Cow Pose – Marjaiasana-Bitilasana

    This pose is such a simple and accessible way to work with lower back pain. It stretches the back, the hips and the abdomen and when combined with Cat Pose, there is the opportunity to move back and forth, stretching and compressing the whole length of the spine.  Puppy Dog Pose – Uttana Shishosana

    The Sanskrit translation for the word Uttana is intense, and this means Puppy, so imagine a puppy taking an intense stretch forward with its whole upper body. Although it is considered an intense stretch, there is also an element of relaxation for the shoulders and back. The more you bend your knees and push into your extended finger tips the more you will feel the stretch and experience relief from pain. Wind Relieving Pose – Pavana Muktasana

    After compressing the spine, a nice therapeutic way to finish up can be to come into the Wind relieving Pose. There is the option to roll around on the lower spine and the sacrum just giving the low back a massage and really showing this area some love.

    3 Beginner Yoga Poses For Back Pain

    When back pain is at its worst and you are at the point of no return, often there is the inability to do even the most simple things such as walking and sitting. Some yoga poses will not be accessible, so below are three of the most beginner friendly poses to help ease your pain. Stretching and lengthening movements are often what are needed for the back to feel better, so give these simple poses a go.

    Standing Forward Fold

    Usually we come in to the Standing Forward Fold with the aim of stretching the back of the hamstrings, but in the instance of back pain, we want to take our awareness into the spine. This means we can take a bend to the knees and allow the belly to sandwich down onto the thighs. Now it’s time to really let the upper body hang forward and down. Here we are working to lengthen and mobilize the spine, so there is to be no tension in the torso at all. Just hang out, and let gravity stretch the spine from tailbone right through to the crown of the head.

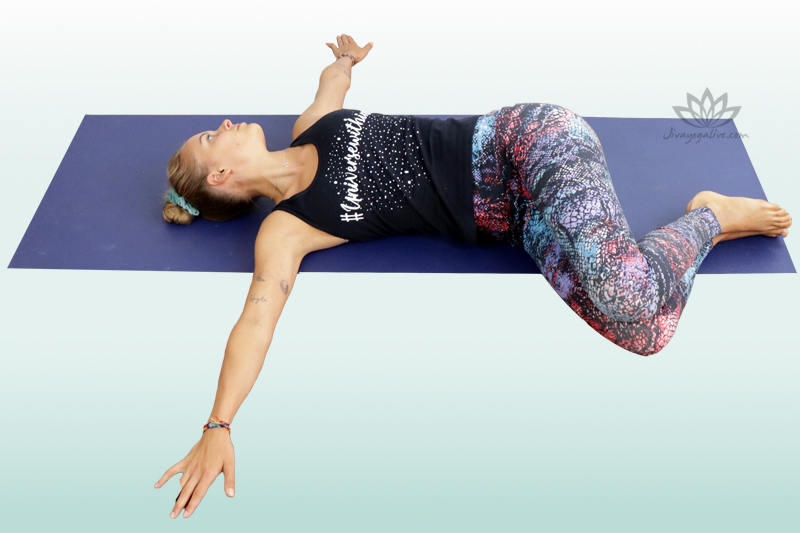
    Supine Spinal Twist

    Twisting the spine can really aid recovery and relieve pain when done with care and when it comes to twists, the Supine Spinal Twist is the most beginner friendly one there is. This pose can relieve the entire back and the neck and requires no physical effort. The job is left to gravity and all you have to do is relax and breathe. Support yourself by putting blankets and cushions under the knees if they don’t reach the floor and just focus on your breath and settle in for five minutes either side. 

    Sphinx

    This pose if one of the most therapeutic when it comes to working with back pain! If we spend a lot of time sitting, the lower back tends to flatten and this can cause a great deal of pain over time. Sphinx Pose accentuates the natural curve of the lower spine, is very beginner friendly and is great at providing a means of preventative care for the future.

    Conclusion

    Lower back pain, and back pain in general can be triggered by a number of things. From injury, to poor posture and even tightness in other unrelated areas of the body. A regular yoga practice encourages mobility of the spine and back in order to prevent injury, but if you are already working with a current injury, these poses when done with caution and respect, will be extremely therapeutic. It is important to keep the body moving to prevent any stiffness settling in further, but make sure to listen to the body. Use props and take modifications to support yourself when necessary and always practice patience with yourself and your healing journey. So give it a go! Namaste

    About

    Charlie Hanna

    Charlie is a Yoga Alliance certified Hatha, Yin Yoga & Meditation teacher with a psychology degree in her back pocket. She is currently on a mission, chasing sun and Read More..

    11 Incredible Yoga Poses For Stomach Bloating You Can Do Anytime to Relieve Pressure and Gas

    Gas problems are never fun to talk about, despite how common they are. They aren’t something you typically want to discuss openly, but if not, then how are you then meant to find advice or figure out what is a normal amount of gas to build up in the body!

    How Yoga Poses for Stomach Bloating Can Support Gut Health

    Yoga poses for stomach bloating have become one of my most trusted tools over the past six years as I’ve worked to restore my gut health. While digestive issues may seem like an uncomfortable topic, they are all too common and deserve open discussion. It’s time to normalize conversations around bloating, constipation, and gas so we can better understand what’s part of healthy digestion—and what signals a deeper issue. Research continues to show how effective yoga can be in supporting those with IBS and other digestive conditions, and for me, these yoga poses have become essential to easing discomfort and maintaining balance.

    Understanding the Gut: The Mind-Body Connection

    You may have heard it before: “The road to health is paved with good intestines.” While the phrase may sound humorous, the truth is deeply rooted in science. Our gut, often referred to as our second brain, directly reflects our mental and emotional well-being. For instance, it’s no coincidence that anxiety can manifest as stomach discomfort. A thriving gut contributes to long-term health and vitality. On the other hand, if the intestines are congested or obstructed, they can foster harmful pathogens, parasites, and inflammation—leading to chronic issues.

    This is why practicing yoga poses for stomach bloating is so vital. These movements not only relieve gas and pressure but also promote overall digestive flow, helping you feel lighter, more energized, and less weighed down.

    Why Gas and Bloating Shouldn’t Be Ignored

    Excess gas can leave you feeling sluggish, bloated, and awkward—even if it’s a common experience. While many consider bloating a normal side effect of enjoying food, persistent symptoms may indicate underlying blockages or imbalances. If the digestive system isn’t working optimally, it can create a breeding ground for bacteria and disrupt your body’s natural rhythm.

    Using targeted yoga poses for stomach bloating can support the body’s natural elimination process. These poses help move trapped gas downward and out of the system, relieving discomfort and aiding in better digestion. When practiced consistently, they also tone and strengthen the digestive tract to prevent future flare ups.

    TRAINING TYPE: FLOW SEQUENCE

    CATEGORY:YOGA

    SUBCATEGORY:MEDICINAL YOGA

    PLANNED TIME:10-15 MINUTES

    LEVEL:BEGINNER  

    PROPS:BLOCK

    What are the best positions to release gas from stomach ?

    This is a series of 11  easy poses that will help to release gas from the stomach. Incorporate them into your daily practice to help strengthen the digestive system so that there is more resilience when these gases start to build up.

    Yoga Poses For Stomach Bloating Infographic 

    yoga for stomach gas infographic

    11 Yoga Poses For Stomach Bloating

    Garland Pose – Malasana 

    Come into a yogic squat pose, by coming down onto your feet with the heels towards the midline of the body and the toes pointing out. Root down through the pinky toe edges of both of your feet and open up your inner thighs and invite your knees out wide. Bring your hands to heart center and use your elbows to help push your knees out a little bit wider. Drop your tailbone down and lengthen up through the spine all the way through to the crown of the head, gently drawing the chin back towards the centerline of the body.When you bring your knees above your hips, this motion activates the downward movement encouraging gas to leave the body. Whenever you bring the knees above the hips, it tells the body to let everything go. This pose invites gentle compression into the abdomen area which helps to massaging the internal organs.

    Garland Pose - Malasana

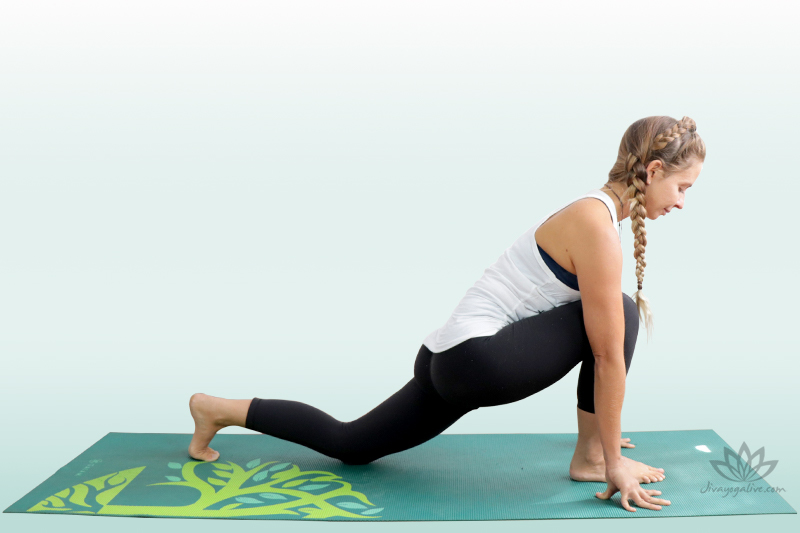
    Low Lunge – Anjaneyasana

    Step your feet apart with your right foot forward and your left foot to the back of your mat. Square the hips forward and support yourself up on your fingertips either side of your front foot. Ensure that your right knee is stacked over your right ankle and send your heart forward here. Lengthen through the spine and and open your chest. This Low Lunge Pose provides an intense stretch to the groin, quadriceps, and back of the legs, while working into your balance, opening the back and stretching the length of the spine.

    Low Lunge - Anjaneyasana

    Revolved Side Angle Pose – Parivrtta Parsvakonasana

    Plant your left hand down firmly into the mat and reach your right arm up towards the sky, coming into an easy Revolved Side Angle Pose. Keep your hips up and squared and keep the outer edge of your leg engaged. Take your gaze up to follow and breathe in to lengthen and exhaling to twist. Twisting at the core here is working to massage the internal organs which will help to relieve gas. 

    Revolved Side Angle pose - Parivrtta Parsvakonasana

    Standing Forward Bend – Uttanasana

    Step your right foot forward and coming into a Standing Forward Bend, so your hips are squared, your feet are about hip width distance apart and your just letting yourself hang heavy here for a moment, releasing your head and your neck and then compressing that lower abdomen here and just hanging heavy.

    standing forward bend - uttanasana

    Low Lunge – Anjaneyasana 

    Take the lunge to the other side. Bring your left foot forward in between the hands and bring your fingertips down to the ground, either side of the front foot for support. Keep your hips engaged and high and squaring forward towards the front and ensure that the left knee is stacked over your left ankle.

    Low Lunge - Anjaneyasana

    Revolved Side Angle Pose – Parivrtta Parsvakonasana 

    Ground down through your right hand and come into a Revolved Side Angle Pose on the left side. Lift your left hand up towards the sky and use the breath to exhale and to twist deeper. Keep the hips lifted and engaged.

    Revolved Side Angle pose - Parivrtta Parsvakonasana                   yoga poses for stomach bloating

    Chair Pose – Utkatasana  

    Walk your feet together and bring the big toes to touch with the heels slightly apart. Bend your knees, drop the hips down and bring the hands to heart center to come into Chair Pose. Squeeze the inner thighs together and root down through the pinky toe edges of your feet. Pull the lower belly in and reach your hands up towards the sky. Chair Pose is going to build energy and engage the entire body which will enliven your entire system, including your digestive functioning.

    chair pose - utkatasana

    Revolved Chair Pose – Parivrtta Utkatasana    

    Hinge the torso forward and bring your left elbow to the outside edge of your right knee, press the palms in towards one another, inhale and then exhale to twist deeper. Draw the hips down one more inch. Bring the arms back through center, reaching both hands up towards the sky. Inhale and then exhale the hands back to heart center and bring the right elbow to the outside edge of your left knee and squeeze the inner thighs. Press the palms in towards one another, inhale to lengthen the spine and exhale to twist. This pose invites strength into the body as it activates the core and the legs. Twist and compress the abdomen, so that any gas that is trapped inside of the body will be encouraged to move through and out. 

    revolved chair pose - Parivrtta Utkatasana

    Downward Facing Dog – Adho Mukha Svanasana    

    Step your feet back to come in to Downward Facing Dog. The hips are up towards the sky and melt your heels down towards the mat. Press into the palms and spread the fingertips wide and find some ease in any perceived effort of the pose. Downward Facing Dog improves circulation while stimulating our digestive system which will help to relieve uncomfortable gas buildup in the abdomen.

    Downward Facing Dog - Adho Mukha Shvanasana             yoga poses for stomach bloating

    Wide Legged Child’s Pose – Balasana  

    Bend your knees and bring your knees down towards the outside edge of your mat and come down to the ground. Bring the big toes to connect and drop your hips down towards your heels. Reach your hands forward and relax your forehead on to the ground. So want to give the belly this unrestricted space so that you can take full breaths in and out. This wide legged position provides extra space so that the belly can be soft and open.

    Wide legged child's pose - prasarita Balasana

    Hero Pose with Block – Virasana

    Come back up onto the knees and close the legs and sit down on a block to come into that Hero Pose variation with a block. Remove the extra flesh from underneath the sitting bones bring the hands into the lap, palms facing down.This pose allows you to connect to your body. Keep the eyes closed and take cleansing breaths in and relaxing breaths out. Visualise any stress in the body and specifically in the belly, to melt away as you surrender into this easy pose. Trust that the body knows what to do with this excess gas and let the mind be at ease.

    Hero Pose on block - Virasana            yoga poses for stomach bloating

    Featured Video: Yoga Poses To Relieve Gas

    Yoga Poses for Stomach Bloating -Gas Problems 

    Gas problems are never fun to talk about, despite how common they are. They aren’t something you typically want to discuss openly, but if not, then how are you then meant to find advice or figure out what is a normal amount of gas to build up in the body!

    I can assure you that excessive gas is not something that should be chalked up as being a normal part of eating. It is an indication of obstruction in the body and it will likely serve your body to consider a cleanse.

    As you work to detox and purify your colon, yoga is going to twist, compress and help to move gas along. Some of the following poses might seem counter-intuitive, as you put your body into a position where the bum is up higher than the hips, but they do the trick! Spend several minutes in each pose to ensure that you can give the body enough time to respond and release that which is not serving you.

    Supine Spinal Twist – Supta Matsyendrasana

    This first pose is going to twist, constrict  and stretch your digestive system as your work from left to right. This movement wrings out the length of the digestive tract and cuts off circulation momentarily and then when you release the pose there is a fresh rush of blood into the area, which pushes against any obstruction and encourages movement of stagnant gases.

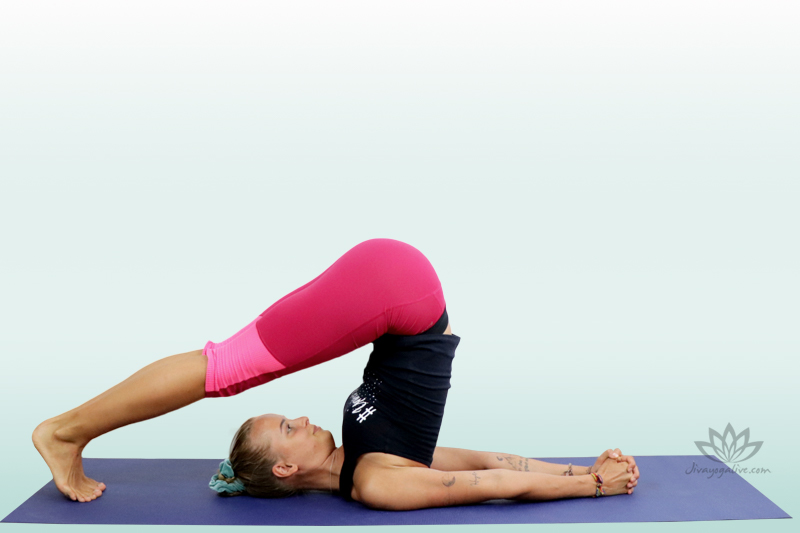
    Plow Pose – Halasana

    Sending the legs up and then behind the head is going to compress the belly and work to pump any gas that has been built up in the stomach. It is the perfect follow up pose after your Supine Spinal Twist which has stretched and wrung out the digestive system and loosened up any waste matter that is causing gas to become trapped.

    Eight Limbed Salutation – Ashtanga Namaskara

    The first two poses have encouraged what is blocking the free flow of movement in the body, to loosen and release and it is now time to send the hips and bum up, while lengthening the torso. This might seem a little counter intuitive, seeing as you are wanting what is trapped inside of the body to move down, but this position works!

    Extended Puppy Pose

    This posture is a little more intense than the previous Eight Limbed Salutation, but provides a deeper variation! It works in the same way, with hips and tailbone up to the sky and at the same time provides a deep stretch for the chest and the shoulders.

    How to Remove Gas in Stomach Instantly?

    If you have had no luck with any of the tried and tested the yoga poses for stomach bloating from this article so far, then it is likely that there is some serious obstruction in the colon. My first recommendation is to cleanse your body.

    Eating a diet of easily digestible fruits and leafy greens will help to not add any more obstruction to the body and you can support this process with yoga and movement, which will ease the release of gas and help to promote intestinal mobility. 

    Upward Abdominal Lock – Uddiyana Bandha

    This technique will stimulate the abdominal organs and massage and tone the core, while working to remove any gas that is trapped. Its involves the pulling in and lifting up of the muscles and it can be used as a part of your sequence or as a stand alone technique to ease digestive distress. Only perform this Upward Abdominal Lock on an empty stomach or ensure to leave a considerable gap after your last meal.

    Breath of Fire – Kapalabhati Pranayama

    Pranayama and other breathing techniques are a great way to stimulate the internal organs and strengthen the core. For Breath of Fire you can take your right hand to the belly and inhale through the nose. When you exhale, actively suck the belly button back towards the spine. Your focus will be on the exhales which will pump the stomach each time. The inhales will come naturally. This technique is an effective means of cleansing even the most remote parts of the body and the vigorous exhalations are going to help to dispel toxins and waste matter from the body quickly.

    Wind Relieving Pose – Pavana Muktasana

    This article would not be complete without a shout out to this very simple yogic asana, as it is renowned for being the ultimate gas eliminator. You want to use this pose as an opportunity to work with the breath, to really send it down into the belly. As you exhale, actively use the strength of the arms to pull the thighs down into the abdomen to really compress into the problem area which will help to send this unwanted gas out of the body.

    What Are The Best Sleeping Position for Gas?

    The digestive system is built in such a way that gas will leave the body voluntary or involuntary, and this involuntary action usually happens while we are sleeping. You simply have to trust in the body and allow it to do its thing, but there are some sleeping positions that can help to promote intestinal fluidity. Studies have been conducted in order to investigate which particular sleeping positions promote better health, including that of the gut and I am going to share the results with you now so you can go to sleep knowing that body will be releasing gas and toxicity while you are resting.

    Left Side Sleeping

    Sleeping on your left side can boost digestion as the position of the transverse colon encourages the movement of waste matter, which could be causing constipation and gas. 

    Lying Prone (Flat on Your Front)

    This position ensures that the gastrointestinal tract is stretched out which can help to free trapped gas. Lying prone applies mild pressure to the abdomen which can gently massage into this space as you breathe. When you sleep curled up, you are constricting the intestines

    Sleeping Elevated

    Try propping yourself up on pillows so that gravity can come into play and do some of the work while you sleep. Being elevated will also help with other digestive discomfort, such as acid reflux, as it brings the oesophagus higher than the stomach.

    Conclusion: Start Your Gut-Healing Journey Today

    The physical body—and specifically the state of your digestion—can be a direct reflection of your mental and emotional well-being. When your mind is calm and at ease, the body naturally becomes softer, more open, and more fluid. This ease supports healthy intestinal movement and overall digestive harmony.

    This article has introduced yoga poses for stomach bloating that can help relieve unwanted gas and digestive discomfort. Use them any time for symptom relief, or integrate them into your regular yoga practice to support long-term digestive health. Movement is key—when there is stagnation in the body, that’s when gas, constipation, and bloating tend to show up.

    Ready to go deeper and unlock a healthier, lighter you? Click here to access our full course and learn how to naturally support your digestion with targeted yoga and holistic practices.

    About

    Charlie Hanna

    Charlie is a Yoga Alliance certified Hatha, Yin Yoga & Meditation teacher with a psychology degree in her back pocket. She is currently on a mission chasing sun and Read More..

    8 Amazing Yoga Poses For Flexibility & Strengthening

    As is the story for most people, my yoga journey began with hopes of having a more flexible and bendy body. I had images of these intricate poses such as Birds of Paradise and Forearm Stand dancing in my mind and had no idea of the kind of strength these poses required. As my yoga journey progressed I let go of attachments

    Yoga Poses for Flexibility & Strengthening

    As is the story for many, my yoga journey began with the desire to become more flexible and bendy. I envisioned myself gracefully flowing into intricate yoga poses like Bird of Paradise and Forearm Stand, unaware of the deep strength required to support those shapes.

    Over time, my focus shifted. Rather than chasing specific poses, I began working on building balanced strength and flexibility throughout my body. Interestingly, the first transformation wasn’t physical—it was mental. My commitment to showing up, breathing through challenge, and staying present helped build resilience and inner strength.

    With consistency, I started to notice changes. My muscles became more defined, my posture improved, and my movements turned more fluid and intentional. The stronger and more open my body became, the easier my practice felt. Poses that once seemed impossible gradually became accessible—not through force, but through patient progress.

    In my daily practice, I always aim to include a combination of yoga poses for flexibility and strengthening.

    TRAINING TYPE:  FLOW SEQUENCE

    CATEGORY:YOGA

    SUBCATEGORY: YOGA POSES FOR FLEXIBILITY & STRENGTHENING

    PLANNED TIME:15 MINUTES

    LEVEL:BEGINNER  

    PROPS:NONE

    What Are The Best Yoga Poses for Flexibility and Strengthening Training?

    ​ 

    Standing Poses provide a great opportunity to work into both flexibility and strength – so long as we are not being lazy and dumping our weight down into our hips! With seated and supine poses we can often utilise the effects of gravity and the weight of the body to pull us deeper into poses, and there isn’t a need to exert too much effort. However, when we come up to standing, we can engage more effort by firming down into the feet and drawing them energetically in towards the midline. This turns on and activates all the muscles of the legs and allows us to simultaneously becomes stronger and more flexible.

    High Lunge – Alanasana

    We are tasked to find both strength and balance in this pose. The key is to create that stable base with the feet and legs. Rooting down into the feet will lend you more power so you can go a little deeper into your flexibility and open up the back hip flexor. This is notoriously tight for most people as a result of countless hours of sitting. As this area begins to stretch and open, we are simultaneously strengthening the front thigh, hamstring and glute. Warrior Two – Virabhadrasana II

    This pose will strengthen and lengthen you from head to toe and is renowned for being one of the most powerful lower body strength builders. It’s important to build this pose from the ground up; firm down into the feet and activate the legs by hugging them toward the midline. Stand in your strength here and welcome any shaking in the legs, as this is a sign that you are really working into the muscles. This pose is also doing wonders above the belt, as it stretches the back, neck and shoulders. Tap into strength and relaxation and don’t forget to breathe!

    Reverse warrior – Viparita Virabhadrasana

    When moving into this pose, there is a tendency to back off and come up out of the bend in the front knee, as you look for some relief from your Warrior Two Pose. However, the key is to staying low in the legs! If you can get away from your mind and any thoughts of perceived effort and commit to your depth here, you are really encouraging strength to build in that front leg. At the same time you are opening and stretching the side body and solidifying the core.Remember to balance the whole body and take each of these poses to the other side!

    Yoga Stretches for Beginners

    You will learn beginner friendly sequence that will lay the foundations for deepening into your flexibility. Although the poses are simple, they are great building block asanas to start to open the body in a way that is safe. I invite you to grab some props if you have them available, if you don’t have a block or a bolster, a book and a rolled up blanket or cushion will work great. The poses you will learn will work to open your legs, groins, hips, back, chest and neck. These poses include; Standing Forward Bend, Garland Pose, Seated Forward Bend, Head to Knee Pose, Half Wild Thing Variation, Bound Angle Pose and Half Lord of the Fishes Pose. If this is the very beginning of your yoga journey, expect there to be a little tightness in the body and be ok with that. They body will open over time, but you only if you respect its boundaries and work with where it is at.

    INFROGRAPHIC: Yoga Poses for Flexibility & Strengthening Beginners

    yoga poses for flexibility beginners_CH1023

    Upward Salute – Urdhva Hastasana

    Begin with the hands together at the center of the chest in Prayer and then inhale as you raise them overhead. Take a moment here to move and stretch the arms and body and then settle into Upward Salute, arms raised above, palms facing the midline.

    Upward Salute is usually one of the first opportunities you get to create some space in the body. It stretches the sides of the body, spine, shoulders, armpits, and belly.

    upward salute

    Standing Forward Bend – Uttanasana 

    Hinging at the hips, start to fold forward, keeping the spine straight and the neck and head in line. The hands are extending forward as you come down into Standing Forward Bend. Hands can come down to the mat or we use a block to bring the earth a little closer. Inhale and press down into the feet and slowly start to roll up to standing, neck and head coming up last.

    This is a great beginner pose for opening up the back of the legs as there is not much physical effort required, as the torso hangs down heavy and gravity does the work of elongating the spine. Especially when starting out, it is perfectly fine to have a slight bend in the knees and to rest the hands down onto the thighs or the shins.

    Standing forward Bend

    Garland Pose – Malasana

    Take the feet slightly wider than hip width and with an inhale raise the arms up, palms come together to touch and then bending the knees, drop down into Garland Pose. Press the palms firmly together and bring the elbows into the thighs to create a resistance and stretch into the inner thighs.

    Garland Pose stretches the thighs, groin, hips, ankles, and the torso and is often easier than it looks, especially for beginners. The heels don’t necessarily have to touch the earth, but try to keep the spine straight and the chest open.

    garland pose

    Seated Forward Bend – Paschimottanasana

    Come down to sitting, legs extended out long in front, making sure your strap is handy. Remove the flesh from underneath the sitting bones and create a long spine through to the crown of the head. Begin to fold down, forehead aiming towards the toes, the heart towards the knees. Looping the strap around the soles of the feet and settle into Seated Forward Bend.

    The seated Forward Bend offers a deep stretch for entire back side of body from the heels to the neck and is an opportunity to relax down over yourself. As you go internal with this pose, focusing on the breath and the sensation of stretching, you can calm down the mind and relieve stress

    seated forward bend

    Head to Knee Pose – Janu sirsasana 

    Bring the right leg out on a diagonal and the left sole of the foot in to meet the right thigh. Keep the strap handy and turn the torso to face the extended leg. Inhale the arms up and exhale, folding down. The strap can go around the sole of the foot in order to keep the leg straight.

    Head to Knee Pose is going to stretch the spine, shoulders, hamstrings, and groins. It is calming and relaxing, while offering a deep stretch.

    head to knee pose - half seated forward bend 4           yoga poses for flexibility & strengthening

    Wild Thing Variation – Camatkarasana 

    Bring the left hand to the base of the lower spine. Press into the palm and into the toes of the front foot. Come up onto the left knee. Sweep the right arm and hand up and behind, coming into Wild Thing Variation. Bring the hips back down to the earth. Take Head to Knee Pose and Wild Thing Variation to the other side.  

    This variation of Wild Thing is an more accessible way to open up the shoulders, lungs, and chest. It also opens the hip flexors and the front of the legs. It is one of the juiciest counter stretches out there.

    wild thing pose knee to floor variation          yoga poses for flexibility & strengthening

    Bound Angle Pose – Baddha Konasana  

    Bring the soles of the feet together and interlace the fingers around the toes. Walk the groins towards the feet for a more intense stretch. Inhale the spine straight and exhale, start to lean forward. Elbows can come into the calf muscles. Drop the head down, coming into Bound Angle Pose.

    This pose is great for beginners because you can take it as deep or as easy as you like. While the hips and inner thighs are receiving a deep opening, the spine is being elongated from the base right through to the crown of the head.

    bound angle pose 3

    yoga poses for flexibility beginners Video

    CH1023 yoga poses for flexibility beginners v1

    Yoga for Flexibility and Balance

    When practicing balance poses you want to cultivate a lightness of body and mind, and by that I mean to try not take yourself so seriously! When you wobble, it is a sign that the body is building strength. When you fall out of a pose, you simply jump back in. The balance in the body is different from day to day – whether that be the fault of the moon or a reflection of your state of mind, who knows, but even the most advanced yogi can and will have an off day. Another thing to keep in mind, is that you should never expect both sides of the body to feel the same as we are not perfectly symmetrical beings. Here are three poses if practiced daily, you will start to find yourself a little more balance body and mind, both on and off the mat.

    Better balance is something we can all benefit from, especially if we are engaged with other sports. A 2017 study on The Effects of Yoga on Flexibility and Balance, found evidence to support that yoga was able to boost athletic performance across a range of activities and that a regular practice could lead to significant improvements in a little as six weeks.  

    Lord of the Dance Pose – Natarajasana

    This pose is an expression of power, grace and strength. Multiple things are happening in the body as we stretch into the shoulders, chest, thighs, groin and abdomen. Simultaneously you are strengthening the legs and ankles. However, the cherry on top of the mindfulness cake, is the ability of this pose to improve the quality of the mind. You are required to find balance and concentration, yet remain graceful and poised. Frustration will likely come as you fall out of this pose time and again, so your patience and resilience can be tested. Find balance in the body with this pose and you’ll cultivate more balance in the mind.  

    Eagle Pose – Garudasana

    This pose requires endurance and unwavering concentration to find the balance. The trick is to squeeze everything to the midline of the body. Squeeze the elbows and knees and try to keep them stacked in one line. This pose really has it all when it comes to flexibility and balance. The challenge really comes from having your Drishti Point (single point of focus) obstructed by the hands. When you come out of this pose and unwind the body there is a beautiful experience of unbinding the mind too.   

    Half Moon Pose

    This pose relies on the stability of the standing leg and ankle; while you extend the top leg straight and strong, to find that perfect tipping point of balance. In Hatha Yoga, Half Moon is an expression of channeling the lunar energies in order to maintain a sense of body orientation in space. You are building strength in the lower body as you work to firm down into the standing leg – at the same time you are encouraging a dynamic sense of balance in both the body and the mind.  Repeat these poses on the other side to work with both the yin and yang aspects of the body. This balances the masculine and the feminine energies to ensure whole body harmony.

    TEACHERS INSIGHTS

    yoga poses for flexibility & strengthening

    Don’t be afraid to use props and take modifications, especially in the beginning. The body wants to open and will become more flexible over time. Moving slowly and taking the options for support are only going to strengthen your practice, and the key is not how far you can push yourself in a single practice, but instead showing up over time and practicing with consistency.

    Conclusion: Yoga Poses for Flexibility & Strengthening Training

    These poses are excellent foundational asanas for beginners looking to build both flexibility and strength throughout the entire body. It’s common to fixate on achieving advanced postures like the splits and focus solely on opening the legs—but true progress often comes when we take a more holistic approach. The body is deeply interconnected, and by practicing yoga poses for flexibility & strengthening, we support overall mobility and balance.

    This broader view is especially important when addressing common issues like low back pain, which often stems from tight hips or weak supporting muscles. When we prioritize full-body integration over isolated goals, we not only prevent injury but also move more efficiently toward those milestone poses.

    Stay consistent, trust the process, and believe in your body’s natural ability to open, strengthen, and transform through mindful movement.

    How to Start Yoga at home for beginners  PDF, will guide you through the best way to start yoga at home. Includes a beginner sequences designed to give you the best poses to get started. Easy poses accessible to all ages and levels,  you will find in this  pdf simple poses and their benefits, Images and  tips.  Included in this Free Yoga PDF Download:

    • Yoga asanas names with pictures and benefits
    • Printable Sequence Infographic
    • Teacher Tips
    • Resource Links

    Ready to deepen your practice? Click here to explore the yoga courses designed to build strength and flexibility.

    Yoga Pose for Bloat: 8 Poses to Relieve Gas, Flatten Your Belly, and Feel Lighter

    This article is to introduce you to a number of poses that you are going to be able to use to counter against bloating. Whether it’s your classic food baby bloat, or the more severe nine month pregnant distension, bloating is uncomfortable and it can leave you feeling heavy, lethargic and self conscious.

    Yoga pose for bloat — it’s one of the simplest and most effective tools to ease digestive discomfort. Whether you’re dealing with a mild “food baby” or a more extreme, distended belly that leaves you feeling nine months pregnant, bloating is never fun. It can leave you feeling heavy, lethargic, and even self-conscious.

    If bloating is something you experience often, it’s more than just an inconvenience—it’s a sign that your digestive system may be in distress. Recurring bloating can point to underlying issues like poor gut function, sluggish elimination, or inflammation. While it’s important to review your overall diet and lifestyle, incorporating targeted yoga poses can help move things along and provide almost immediate relief.

    Why Use Yoga for Bloating?

    Certain yoga poses gently compress and twist the abdomen, stimulating digestive organs, relieving trapped gas, and encouraging bowel movements. With consistent practice, these movements can help strengthen your core, support detoxification, and promote better long-term digestive health.

    childs pose vector           yoga pose for bloat

    TRAINING TYPE: FLOW SEQUENCE

    CATEGORY:YOGA

    SUBCATEGORY:BEGINNER YOGA

    PLANNED TIME:10 MIN

    LEVEL:BEGINNER  

    PROPS:NONE

    Why to try a yoga pose for bloat and discomfort 

    If you’re searching for a yoga pose for bloat relief, you’re in the right place. Yoga’s twisting and compressive postures help stimulate digestion and keep your bowels moving, which is essential for clearing out excess gas and toxins. By practicing the right yoga poses regularly, you can support a clean, spacious digestive tract and let stagnant energies flow freely downward and out of the body.

    Why Choose a Yoga Pose for Bloat Treatment?

    Bloating often signals that something is obstructing your digestive system—whether it’s slow transit time, poor gut health, or inflammation. This obstruction can lead to toxicity buildup, making you feel lethargic and mentally foggy.

    Using a yoga pose for bloat treatment helps by:

    • Massaging and compressing the abdominal organs to encourage movement.
    • Stimulating peristalsis (the natural wave-like motion in your intestines).
    • Supporting detoxification through improved circulation.
    • Strengthening your core and digestive muscles for better long-term function.

    Yoga Poses For Bloating Infographic

    yoga poses for bloating infographic

    Poses To Help Relieve Bloating

    Wide Legged Child’s Pose – Balasana

    Walk your knees to the outside edges of the mat, bring the big toes to touch, and come down into a Wide Legged Child’s Pose. Walk your hands forward, continuing to lengthen the spine as you lower down towards the mat, melt the hips down towards your heels. You can connect your forehead to the ground and actively press into the palms, and this will help sink your hips closer towards your heels.Having the knees wide here allows us to create space so the belly can breathe in and out with restriction. This can help with any uncomfortability caused by bloating by giving the belly some extra room.

    Wide legged child's pose - prasarita Balasana             yoga pose for bloat

    Cat-Cow Pose – Marjaryasana-Bitilasana

    Move into a table top position, stacking the shoulders over the wrists and hips over the knees. Starting in Cow Pose, drop the belly down and send the tailbone up towards the sky. Lift the chest forward, sending the heart out, allowing the gaze to go slightly up, but still lengthening the back of the neck.  Inhale, and starting from the base of the spine, begin to tuck the tailbone under, rounding the spine vertebrae by vertebrae. Really push the spine up towards the sky and draw the chin down towards the chest, exhale out your air. Inhale for Cow Pose, heart goes up and out. And then exhale, rounding the spine for Cat Pose.As you breathe through your Cat-Cow Postures, find expansion in the belly and visualise the bloating stretching its way out of the body. These alternating movements of lengthening and contracting the core is going to help pump the stomach and encourage movement and more space.

    cat-cow - marjaryasana - bitilasana          yoga pose for bloat


    Downward Facing Dog – Adho Mukha Svanasana

    Start to lift the hips high to come into a Downward Facing Dog. Spread all ten fingers wide on the mat and press down into the heels of the palms and this will naturally send your tailbone up towards the sky. Drop the heels down towards the mat and find a nice inverted V shape with the body. Make sure to take big breaths in and full exhalations out. Enjoy this unrestricted breath here as the belly expands and works to remove all that bloated discomfort.

    Downward Facing Dog - Adho Mukha Shvanasana

    Standing Forward Bend – Uttanasana

    Make sure the feet are about hip distance apart and place a soft bend in the knees. Place the hands down to the mat. Release your head and your neck and allow yourself to hang heavy. Send the weight into your toes but continue to root down through the heels. Start to straighten the legs and send your tailbone up towards the sky to lengthen the spine. Let each exhale bring you deeper. There is the option to grab opposite elbows and allow the natural weight of the body to carry you down.This posture creates compression in the stomach which is going to help massage the organs and remove bloating. Send your awareness into the belly and visualise waking up the organs, by taking big breaths in and full exhales out. 
     

    standing forward bend - uttanasana            yoga pose for bloat

    Tip Toe Pose Variation – Prapadasana  

    Come down into a crouching position and up onto the tips of the toes. Lift the heels up off the earth and the have the fingertips down for balance. This posture creates a nice compression inside the belly. There is the option to challenge the balance further, by wrapping one arm, maybe both, around your knees. Pick one point to focus on to help with balance and try to come up higher on the toes. This posture is a great way to compress the stomach by curling up into the smallest ball that you can and dropping the head down towards the knees. Simultaneously you are stretching into the feet and challenging balance.

    tip toe pose variation - prapadasana

    Half Lord of the Fishes Pose Variation – Ardha Matsyendrasana

    Take a seat and extend the legs straight along the mat. Bend your right knee and step your right foot over the left leg. Scoop the hands up towards the sky as you inhale and then drop the right hand down towards the back of your mat, and wrap the left arm around the right knee, exhaling as you twist. Press into your right palm to lengthen the spine and as you exhale finding a little bit more depth in the twist. Take this twist to the other side. Another great posture for compressing and twisting the belly, by cutting off circulation so that when you release the pose there is a fresh rush of blood into the problem area, which can assist in pumping obstruction out. Twists are great because they help to move the organs which aids in removing indigestion and bloating.

    Half lord of the fishes 2 - ardha matsyendrasana          yoga pose for bloat

    Seated Forward Bend Pose – Paschimottanasana    

    Sit up tall with a straight spine and remove any extra flesh from underneath the sitting bones. Sweep the hands up towards the sky, inhale to lengthen the spine and then start to reach the hands towards the feet. Keep the head in line with the spine and then slowly exhale coming into a Seated Forward Fold. With every breath there is the opportunity to continue to lengthen through the spine, and with every exhale try to fold a little bit deeper. As this posture compresses the belly and helps to remove boating, it also lengthens the entire back side of the body from the heels through to the crown of the head.

    Seated Forward Bend - Paschimottanasana

    Featured Video: 7 Relief Yoga Poses For Bloating

    Conclusion

    Bloating is not a normal part of eating, even though so many have chalked it up as a standard consequence of enjoying food. Of course, if we overeat or ignore some of the rules of proper food combining, we may suffer from bloating, but regular bloating is a sign that the digestive system is in need of a clean—and yoga poses for bloat can definitely help aid this process!

    This article has equipped you with the means to twist, compress, and detoxify your belly through effective yoga poses for bloat. Use these postures daily to help keep your body in a state of fluidity and keep excess gas at bay. When you consistently work into the core with these poses, you will build strength and resilience in your digestive tract, helping to reduce the severity of bloating.

    However, it’s also recommended to take other measures such as cleaning up your diet, supporting your colon health, and reducing stress—because all these factors play vital roles in digestive health and overall wellbeing.

    About

    Charlie Hanna

    Charlie is a Yoga Alliance certified Hatha, Yin Yoga & Meditation teacher with a psychology degree in her back pocket. She is currently on a mission, chasing sun and Read More..

    Ready to take your healing further? Click here to access yoga courses and start your journey toward lasting wellness today.

    GERD and Yoga: Gentle Poses to Ease Acid Reflux Naturally

    We are currently suffering from an epidemic of digestive disorders. It is no surprise when you see how far we have come from nature. I’m talking about our food choices, the toxins we are exposed to, and just the high levels of stress we consider a ‘normal’ part of life.

    Natural Relief for GERD: Yoga for Digestive Wellness

    We are currently facing an epidemic of digestive disorders, and GERD and yoga have become an important topic of interest. GERD (Gastroesophageal Reflux Disease) is one of the most common and uncomfortable digestive issues, often caused by poor dietary choices, environmental toxins, and high stress levels. Rather than relying solely on pharmaceutical interventions, this article explores a natural solution: a targeted yoga for GERD flow designed to soothe both the body and the mind.

    Why GERD and Yoga Are Connected

    The gut is often called the body’s second brain. Emotional stress and mental unrest frequently manifest as physical symptoms in the digestive tract. GERD can be exacerbated by anxiety, tension, and shallow breathing. Practicing gentle yoga for GERD helps calm the nervous system and stimulates digestion through mindful movement and breathwork.

    A Natural Approach: Yoga Poses That Help Alleviate GERD

    This article introduces five specific yoga asanas selected for their ability to reduce GERD symptoms naturally. When performed with conscious breathing, these poses help relax the esophageal sphincter, ease heartburn, and support digestive function.

    childs pose vector

    TRAINING TYPE: FLOW SEQUENCE

    CATEGORY:YOGA

    SUBCATEGORY:MEDICINAL YOGA

    PLANNED TIME:10-15 MIN

    LEVEL:ALL LEVELS  

    PROPS:NONE

    What is Gerd?

    ​ 

    GERDGastroesophageal reflux disease. This is when there is acid in the stomach that comes up into the esophagus and creates a burning sensation in the chest and throat. It is more commonly known as acid reflux or heartburn and is extremely unpleasant. This article is designed to give you the option of a more natural way to treat the body as opposed to harsh pharmaceutical drugs.

    Practicing yoga and conscious deep breathing regularly improves digestive functioning. It ensures that there is fresh blood being pumped into this area to keep things moving and from getting stagnant. The following poses work to stretch and massage the digestive organs.

    Gerd and Yoga Support Infographic

    yoga for gerd infographic

    (Top 5 Yoga Poses For Gerd)

    Cat Pose – Marjariasana 

    Push down into the palms and round the upper back to settle into Cat Pose. Be as dramatic as you can be, puffing up through the shoulder blades with the chin down to the chest. Draw the navel to spine and send your awareness and breath to the core.

    Cat Pose increases flexibility of the neck, shoulders, and spine and is a great pump for the digestive system as it massages the internal organs.

    cat pose

    Downward Facing Dog – Adho Mukha Svanasana 

    Tuck the toes, send the hips high and push back into Downward Facing Dog.

    Downward Facing Dog as a follow up to Cat Pose is an opportunity to release any tension in the belly, while stretching the body from feet to hands.

    downward facing dog pose

    Extended Child’s Pose – Balasana

    Drop the knees as wide as your mat, bring the big toes together to touch and sit the hips back on the feet. Allow the belly to fall in between the space of the thighs. Forehead comes down to the mat and extend the arms pressing down into the palms.

    When working with digestive disorders, you want to take the knees wide in your Extended Child’s Pose, so that the belly can really hang down. Send the breath down into this space and let it be soft and relaxed.

    extended child pose               gerd and yoga

    Half Lord of the Fishes – Ardha Matsyendrasana 

    Extend the right leg along the mat, bend the left knee up and bring the left sole of the foot across. There is option to bend the bottom knee to stack the knees or you can leave this leg extended. Take the left hand behind to the base of the spine and the wrap the right elbow around the left knee. Twist to the left, opening the chest, the neck, the head. You can even turn the gaze to stretch the eyes. Repeat on the other side.

    Twisting the abdomen is great for digestive discomfort, as when you release the pose you are sending a fresh rush of blood into the area and boosting circulation and purification.


    4 half lord of the fishes pose 2             gerd and yoga

    Wind Relieving Pose – Pavana Muktasana

    Come down onto your back and bring the knees into the chest. Lift the shoulders up off the earth, wrap the arms around the knees and squeeze the knees together. Draw the thighs down into the belly. Rest the shoulders and the head back down on the mat, slightly tucking that chin.

    Another great opportunity to compress the digestive organs and work with the breath. With each exhale  pull the thighs down to massage the belly.

    wind relieving pose                gerd and yoga

    Featured Video: Yoga For Gerd

    SUBSCRIBE & WIN

    Pranayama for Acid Reflux

    The more commonly known benefits of Breath of Fire Pranayama are the cleansing effects it can have and the increase in energy and heat in the body. What is not such common knowledge however, is the power of this Pranayama against severe symptoms of GERD and acid reflux. A 2013 study on the effects of yoga and conscious breathing, reported that regular practice can control and/or alleviate symptoms related to digestive diseases! Breath of Fire – Kapalabhati PranayamaAlso known as the Skull Shining Breath as it is thought to purify and rejuvenate the mind and body. This Pranayama can be practiced ten times, in rounds of three or four. Directions Find a comfortable seat either cross legged on the floor or on a chair with the soles of the feet connecting to the earth. Brings the hands to the belly.

    Inhale through the nose and fill the belly with your breath. Vigorously through the nose and draw the naval back to the spine.  Continue to breathe like this, focusing on the exhales and sucking the belly back. The inhales will come naturally.

    Can Yoga  Help Bile Reflux?

    Bile reflux is a disorder where the bile from the small intestine flows up and into the stomach and esophagus. There are a number of reasons why you could be suffering, including having a diet that is too high in fat! One of the functions of the liver, is to release bile when fat is detected, even in small amounts. So an excess amount in your food choices could be the culprit.

    Stress has also been identified as being a major contributor and so this is where yoga can come in. Whatever the cause of your distress; when symptoms are severe they can include heartburn, nausea, and vomiting bile. Yoga can offer you a more natural way to soothe the body.

    Try these three poses to find some relief.

    Seated Forward Bend – Paschimottanasna

    Any pose that compresses the belly, is great for working into the abdomen, as it encourages the movement of stagnant energies. For treating bile reflux I recommend to close the eyes and really drop into the belly. It is important that you only come as far into this fold as is comfortable and allow the breath to guide you deeper.

    Camel Pose – Ushtrasana

    Camel Pose is very stimulating for the abdominal organs and encourages blood flow to this region. Work slowly towards the full expression, moving cautiously and listening to the body.

    Diamond Pose – Vajrasana

    This pose is a common asana for tackling digestive woes; it’s thought to be effective means of boosting digestion after a meal. It is very easy on the body and has a calming effect on the mind. You can spend as long as you have here, taking steady, even, natural breaths. Come out of the mind and away from worries about your reflux and let the breath be your anchor into the body.

    Yoga For Strong Oesophagus

    The throat and the esophagus is often overlooked. However, its role in the body is critical, as it is the beginning of the GI tract. It is also an integral part of the throat chakra and an area that is subject to both physical and emotional strain. This Chakra is our communication center and influences how we express ourselves, as well as how we able to listen and make decisions. These three poses work to activate and stimulate this area!

    Plow Pose – Halasana

    Send you awareness into the compression of the throat and allow this area to be soft and relaxed. As the neck compresses, the back of the neck is being opened and you are working to squeeze out any negativity.

    Shoulderstand – Sarvangasana

    Here you have an opportunity to reverse circulation and send fresh blood to the throat! It is a powerful pose for igniting your throat Chakra, but it also stimulates the thyroid gland. As you hang out here you are not only strengthening the legs, core and bum, but you are also opening the shoulders and neck.

    Half Lord of the Fishes – Ardha Matsyendrasana

    Although there is a lot of focus on the twisting going on at the core here, there is also the opportunity to really open the throat in your Half Lord of the Fishes Pose. You’re also stretching the side body, upper back and neck.

    Conclusion: GERD and Yoga

    GERD and other gastrointestinal disorders are extremely common today as a result of years of poor food choices, an accumulation of toxins, excessive alcohol consumption and high stress levels.  It is therefore important that we have access to natural healing protocols so as to avoid having to take over the counter drugs.

    Yoga is a great tool to help relieve digestive discomfort during times of distress. At the same time is can strengthen abdominal functioning in order to prevent further flare ups. The key is to practice with consistency, so including these yoga for gerd asanas into your daily practice will have profound effects over time on overall digestion.

    About

    Charlie Hanna

    Charlie is a Yoga Alliance certified Hatha, Yin Yoga & Meditation teacher with a psychology degree in her back pocket. She is currently on a mission, chasing sun and Read More..

    Want to dive deeper into natural solutions for GERD and digestive balance? Click here to access our full courses on therapeutic yoga and start transforming your health today!

    Yoga for Gastric Problem: Relieve Bloating and Improve Digestion Naturally

    I think I can confidently put my hand up as the poster girl for Gastric problems! This is not a comfortable thing to admit. There’s nothing cute about a bloated belly or excess gas in the body. It was six years ago when all of my gastric problems came knocking. They sent me off on a rollercoaster

    Relieve Discomfort Naturally with Yoga for Gastric Problem Relief

    I can confidently raise my hand as a personal advocate for yoga for gastric problem relief. Admittedly, this isn’t the most glamorous topic—there’s nothing fun about bloating, gas, or the discomfort they bring. My struggle began six years ago with a barrage of tests, inconclusive diagnoses, and mounting frustration. But turning inward and embracing natural healing—especially through yoga—was one of the most powerful decisions I’ve made.

    How Yoga Became a Lifeline for Gastric Issues

    Alongside diet and lifestyle changes, yoga became my most supportive ally. Practicing yoga made me more aware of my body, which in turn helped me become mindful of what I consumed. More importantly, it provided physical and emotional relief. Specific movements helped compress, twist, and stimulate my digestive system, encouraging stagnant energy and trapped gas to move out of the body.

    The Connection Between Gut Health and Mental Wellbeing

    Our gut is known as our second brain. I’ve experienced firsthand how gastric issues affect your mood, confidence, and emotional balance. When you’re stuck in a loop of discomfort and frustration, it feeds the issue. This is where yoga for gastric problem relief offers not just physical release, but also mental peace. The act of moving, breathing, and meditating helps break the cycle of digestive distress.

    childs pose vector

    TRAINING TYPE:  FLOW SEQUENCE

    CATEGORY:YOGA

    SUBCATEGORY:MEDICINAL YOGA

    PLANNED TIME:10 MIN

    LEVEL:ALL LEVELS  

    PROPS:BLOCKS

    Can Yoga Give Your Stomach Pain Relief ?

    Stomach pain is very elusive and famously hard to diagnose! Often allopathic doctors don’t know what to do with you. They will stick you with the label ‘Irritable Bowel Syndrome’ and tell you to up your fluids and fiber. It’s all very frustrating, but it does force you to take your healing into your own hands. Yoga one tool that can help to relieve your stomach pains. Randomised controlled trials were conducted with individuals with Irritable Bowel Syndrome, in order to determine whether or not yoga could be recommended as an intervention. Results indicated that those who practiced yoga were reporting better digestive functioning and less anxiety related to their disorder. This article is designed to help tackle stomach problems in all their ugly shapes and sizes. Whether its bloating, constipation, indigestion or heartburn – these poses work with the body in a way that gently encourages obstruction, waste, acidity to move onwards and out. Incorporate them into your regular practice, and you are not only going to have means of easing suffering when it hits. You’ll also be strengthening the digestive system and building its resilience over time.

    6 Yoga Exercises For Gastric Problems Infographic

    Exercises for gastric problems

    Easy Pose – Sukhasana  

    Find a comfortable cross legged seat to come into Easy Pose. There is the option to sit up on a block. Elongate the spine through to the crown of the head. Easy Pose is a great starting posture as it is extremely grounding. To work with stomach problems, you can place your hands on to your belly to connect with the problem area. Have your eyes closed and connect to your breath.

    As you breathe in, feel your lower abdomen expanding and as you breathe out, draw your belly button back and in towards your spine. This will help to provide a nice compression against your organs.

    easy pose - sukhasana sara                    yoga for gastric problem

    Revolved Easy Pose – Parivritta Sukhasana  

    Scoop the arms up towards the sky, taking a breath in and bring your gaze up. Drop your shoulders down away from your ears and focus on lengthening through the side bodies and the rib cage. Take a breath in and as you exhale, drop your right hand towards the back of the mat and your left hand to your right knee, twisting and opening the chest towards the right. Take a breath in to lengthen the spine and a full exhale deepen the twist. Make sure to continue to root down through both sitting bones. Inhale, and bring both hands back up towards the sky, lengthening through the side bodies and then take the twist to the other side, by bringing your right hand down to your left knee and your left hand towards the back of your mat. Gentle twists through the abdomen are a great way to massage the organs, which will encourage extra movement inside of your belly. Use the breath to lengthen the spine and exhale to deepen the twist.

    revolved easy pose - Parivritta Sukhasana Sara

    Seated Forward Bend Pose – Paschimottanasana 

    Come down to sitting, with the legs extending forward. Removing any extra flesh from underneath your sitting bones and sit up tall to lengthen up through the spine. Flex your toes towards your face and sweep the arms up and overhead. Take a breath in to lengthen and as you exhale start to hinge at the hips, bringing the torso down. Bring your hands down towards the mat, rotate your thumbs in and have your fingertips out. This posture is going to compress the belly and encourage the movement of stagnant energies inside of the the digestive tract. It is also a deep stretch for the entire length of the back body from the heels through to the crown of the head.

    Seated Forward Bend - Paschimottanasana               yoga for gastric problem

    Wind Relieving Pose – Pavana Muktasana

    Slowly lower down on to your back and draw your knees in towards your chest. Wrap your arms around your knees, interlacing at opposite elbows. Drop your shoulders, neck and head back down to the mat and connect your sacrum and your lower spine down to the ground. This is Wind Relieving Pose compresses the organs and encourages some healthy movement inside the belly. Deep breaths to fill up the belly can help to create more space in this area and squeezing the knees down is going to help to pump obstructed waste.


    wind relieving pose - pavana muktasana

    Supine Spinal Twist – Supta Matsyendrasana  

    Keep you knees drawn in towards your chest and make goal post shapes with your arms. Slowly drop your knees down to the right side of the mat and aim to have both shoulders connecting down. There is the option to slide a block underneath your knees to make the pose more restorative. With every breath in, lengthen your spine and with each exhale, twist a little deeper. Inhale the legs back through center and then drop the knees to the opposite side. Relax into this gentle twist and visualise any stomach problems moving down and out of the body. Twisting at the core like this supports movement inside of the colon and intestines and with help with any stomach problems. This posture is also helping to lengthen, relax and realign the spine.

    Supine Spinal Twist - Supta Matsyendrasana                 yoga for gastric problem

    Featured Video: Yoga Exercises For Gastric Stomach Problem

    SUBSCRIBE & WIN

    3 Positions to Release Gas from Stomach

    I don’t know who spread the rumour that gas was a normal part of eating, but this is far from the truth! Gas is created in the body when there is obstruction in the intestines and our foods are fermenting. If this is something you’re dealing with more often than not, then the chances are that your colon is in need of some cleaning. “Let food be thy medicine and medicine be thy food” – Hippocrates. You can help support this process by eating a diet that is high in fruits and leafy greens. These foods dislodge obstruction and waste. Use this tool – Yoga for gastric problem to keep things moving through. Give these poses a go and spend as long as you have in each of them!

    Wind Relieving Pose – Pavana Muktasana

    The king of asana when it comes to releasing gas from the stomach! You will see this pose being recommended for all kinds of digestive discomfort and there is good reason for this. As you draw the thighs down into the belly you are massaging the internal organs, which creates space and for excess gas to move through.     

    Eight-Limbed-Salutation – Ashtanga Namaskara

    This is from my own personal experience and it is not a pose you see recommended so often for releasing gas from the stomach. I often wonder why. Maybe the positioning of the hips up high is counterintuitive when wanting to encourage gas to move down; but I can assure you that it works. The position lengthens and stretches the abdomen. So it makes sense to me, that in this posture you are creating space in the digestive tract. Give it a go and spend as long as as is comfortable here and see if it does the trick.

    Extended Puppy Pose – Uttana Shishosana

    This is another one that I am sharing with you,  that I have personally tried and tested throughout my years of digestive hell.  I assure you that it works, even if you don’t seeing it being shouted from the rooftops as being the king of the gas releasing postures, like old faithful The Wind Relieving Pose, but it works! It is a little more intense than the Eight-Limbed-Salutation, but there is the option to slide some pillows underneath the chest for support. I recommend using the support so you can spend some time hanging out here and give it some time!

    3 Poses of Yoga for Gastric Problem & Acidity

    We can twist the body and compress the internal organs, send all of our good intentions and breath into the belly, but STILL find that we feeling stuck and constipated! You need to really take a look across the board at what you might be holding onto, that is no longer serving you.

    From my own experience, I remember a time where my digestion would shut down every time I considered getting back into an unhealthy relationship. It was crazy! Every time I started to make moves to go back, to what absolutely did not serve me, my bowels would shut down. The research available in this area, is also on our side! A 2016 study, on the effects of yoga on chronic constipation indicated that after one week of yoga intervention, physical discomfort, psychological discomfort and anxiety levels had all decreased.  Whatever the cause of your slow digestion and constipation, yoga can help support your gut health by moving obstruction!

    Plow Pose – Halasana

    Taking the feet and legs behind the head compresses the internal organs and helps to strengthening the abdominal muscles. A strong core can improve digestion and prevent waste from getting trapped.

    Boat Pose – Paripurna Navasana

    Strengthening the core and the  abdominal area is going to help with the digestive processes. When you elevate the diaphragm you are relieving the stomach and encouraging a free flow of air through the belly. Bow Pose – DhanurasanaThis posture helps to create space in the abdominal area. It stretches the front side of the body and the digestive tract. When you extend the legs and arms you are creating space for oxygen to flow more freely. Supported bridge pose – Supported Setu BandhasanaStretching the abdomen realigns the internal organs which will promote efficient digestion. Supporting yourself with a block underneath the hips, takes some of the intensity out of the pose, so you can really release and relax the belly.

    2 Yoga for Poses For Gas Problem in Chest

    Gas in the chest can be triggered by an over acidic condition in the stomach and cause a great deal of discomfort. Yoga can help to ease the pain, but it is not recommend that you do too intense a practice.

    Avoid inversions where your head comes below the heart. Instead gives these poses a go. Send the breath deep into the chest, really filling up the lungs and the ribs and creating space for the gas to move through.

    Reclined Hero Pose – Supta Virasana

    This pose stretches the torso and realigns the abdominal organs.  This will promote healthy digestion and take any pressure out of the chest. There is the option to support yourself with cushions and under the spine, to take some of the intensity out, and instead you can work on sending the breath into the chest.

    Cobra Pose – Bhujangasana

    This posture stretches and lengthens the abdominal area. This boosts circulation, encouraging better digestion throughout the body. All of these poses that lengthen the front side of the body are going to help create space for unwanted gasses and aid in the elimination process.

    How Yoga Helps with Digestion and Constipation?

    We can twist the body and compress the internal organs, send all of our good intentions and breath into the belly, but STILL find that we feeling stuck and constipated! You need to really take a look across the board at what you might be holding onto, that is no longer serving you.

    From my own experience, I remember a time where my digestion would shut down every time I considered getting back into an unhealthy relationship. It was crazy! Every time I started to make moves to go back, to what absolutely did not serve me, my bowels would shut down. The research available in this area, is also on our side! In the study, on the effects of yoga on chronic constipation indicated that after one week of yoga intervention, physical discomfort, psychological discomfort and anxiety levels had all decreased.  Whatever the cause of your slow digestion and constipation, yoga can help support your gut health by moving obstruction!

    Plow Pose – Halasana

    Taking the feet and legs behind the head compresses the internal organs and helps to strengthening the abdominal muscles. A strong core can improve digestion and prevent waste from getting trapped.

    Boat Pose – Paripurna Navasana

    Strengthening the core and the  abdominal area is going to help with the digestive processes. When you elevate the diaphragm you are relieving the stomach and encouraging a free flow of air through the belly. Bow Pose – DhanurasanaThis posture helps to create space in the abdominal area. It stretches the front side of the body and the digestive tract. When you extend the legs and arms you are creating space for oxygen to flow more freely.

    Supported bridge pose – Supported Setu Bandhasana

    Stretching the abdomen realigns the internal organs which will promote efficient digestion. Supporting yourself with a block underneath the hips, takes some of the intensity out of the pose, so you can really release and relax the belly.

    Create Space, Breathe Deeply, Feel Better

    Incorporating yoga for gastric problem into your daily routine can ease both body and mind. Spend a few mindful minutes each day sending breath and awareness to your abdomen. These movements help create space in your digestive system and reduce the mental burden of constant discomfort.

    Conclusion: Reclaim Comfort Through Yoga for Gastric Problem Relief

    Yoga provides a holistic pathway to relief, easing both physical symptoms and emotional distress. Whether you’re just beginning your healing journey or looking for tools to manage recurring issues, these poses can offer meaningful support.

    Ready to explore a full yoga sequence designed to support digestion and inner calm? Click here to access our courses and take control of your wellness from the inside out.

    About

    Charlie Hanna

    Charlie is a Yoga Alliance certified Hatha, Yin Yoga & Meditation teacher with a psychology degree in her back pocket. She is currently on a mission, chasing sun and Read More..

    The Ultimate 10 Minute Morning Yoga Routine

    When I first started out on my yoga journey, I would only ever roll out my mat to practice if I knew I had an uninterrupted hour or so on my hands. This often meant that it wouldn’t happen every day; and it was even less likely to happen in the morning when time was limited. I always had the best intentions though.

    Unlock the Power of 10 Minute Morning Yoga

    When I first started out on my yoga journey, I believed I needed at least an hour to practice for it to be worthwhile. It never occurred to me that a 10 Minute Morning yoga could be just as powerful. Because I waited until I had a full, uninterrupted hour, I rarely practiced daily. Mornings were especially difficult—time was always limited. I often had the best intentions of practicing in the afternoon or evening, but let’s face it: by the time I got home, my priorities shifted to food and catching up on shows. My yoga mat stayed rolled up and forgotten.

    Everything changed when I shifted my mindset and embraced the simplicity and accessibility of 10 Minute Morning yoga. Once I prioritized short but intentional movement first thing in the morning, I started seeing profound benefits. Those ten minutes brought more clarity, calm, and energy to my day than I ever imagined.

    Small Time Investment, Big Impact

    10 Minute Morning yoga doesn’t just stretch the body—it nurtures the mind and creates a calm stillness that sets the tone for the day ahead. These brief sessions stack up over time, delivering a compounding effect that enhances both physical and mental well-being.

    Yoga is not about the duration, but the consistency and presence you bring to each session. When practiced regularly, even in short bursts, it transforms your internal state. This form of morning yoga is especially valuable for people with busy schedules who still want to experience meaningful self-care.

    Scientific Support for Morning Yoga

    Studies continue to support the effectiveness of regular yoga. A 2016 study focused on cortisol levels in individuals dealing with chronic stress, anxiety, and depression found that consistent yoga practice significantly reduced cortisol—the primary stress hormone in the body. The results? Decreased anxiety, less fatigue, and improved emotional resilience.

    By adopting a 10 Minute Morning yoga routine, you align your day with intention. You start with movement and breath, which improves mood regulation and boosts your overall mental health.

    TRAINING TYPE: FLOW SEQUENCE

    CATEGORY:YOGA

    SUBCATEGORY:BEGINNER YOGA

    PLANNED TIME:10 MIN

    LEVEL:BEGINNER  

    PROPS:NONE

    10 minute quick morning yoga routine

    ​ 

    Today your going to learn the components of the Sun Salutation (Surya Namaska A), so that you will have a series of poses that are the perfect morning poses for beginners to practice at home. These poses are very beginner friendly and are a great way to start your day. As the name suggests, it represents a Salute to the Sun, the source of all life.

    Each pose will be broken down in depth and you will be cued with the proper alignment so as to avoid injury over time. There is the option to work through these poses in isolation or sequence them together into a flow.  

    This will give you twelve poses that you will be able to perform in isolation. Spending some time in each pose to allow the body to open, or you can string together into a flow. They are great poses to do upon waking up, as they stretch all parts of the body. Starting your day with a few rounds of the Sun Salutation invites stillness of mind and body and sets you up for the day ahead.

    10 Minute Morning Yoga Poses for Beginners Infographic

    morning yoga poses for beginners at home infographic

    How To Do 10 Minute Morning Yoga

    Mountain Pose with Hands in Prayer – Tadasana Namaskar

    Making sure the legs and feet are hip width apart. Rooting down into all four corners of the feet, feel the stability in the legs. Tailbone is slightly tucked. Spine is long, right through to the neck and the crown of the head. Chin is slightly back and parallel to the earth. Bring the palms together, centre of the chest.

    Mountain Pose is the most basic of all the standing poses and the foundation of all others. When the alignment is correct you are working to improve your posture, strengthen your legs and increase awareness in the body.

    mountain pose with hands in prayer

    Upward Salute Pose – Urdhva Hastasana

    Inhale and raise the arms up overhead. Taking the arms as apart, palms facing one another. Drop the shoulders down away from the ears and draw the shoulder blades back together.

    This is the perfect pose to start to create space in the body. In the spine, the shoulders and the chest. It is typically not very physically challenging, so there is the chance to really work on focusing on breath and body awareness and come out of the mind.  

    upward salute

    Standing Forward Bend -Uttanasana

    Hinging at the hips, slowly start to bring the torso down. Keeping the spine straight with the neck and head in line. As you come down, notice the stretch in the back of the legs and bring a slight bend to the knees if needed. Allow the upper body to hang down, letting go of any tension in the head. Arms will hang down and hands can come onto the shins, the floor or onto a block.

    The Standing Forward Bend encourages the back of the legs to open and at the same time creates space in the back as it elongates the the whole spine from the tailbone right through to the crown of the nead.

    Standing forward Bend

    Low Lunge – Anjaneyasana

    Step the right leg back, dropping the back knee down for support. Bringing the fingertips down either side of the front foot for support. Spine is straight, head and neck are in line.

    A common misalignment in Low Lunge is to have the front knee too far forward. The key is to keep it in line with the ankle. We all carry tension in our hips, and this is a great beginner friendly way to start to open up into this space.


    low lunge 2

    Downward Facing Dog – Adho Mukha Svanasana  

    Press down into the palms, lifting the back knee up off the earth and then pushing back into Downward Facing dog.

    Downward Facing Dog is often used as a transitionary pose when moving a sequence to the other side of the body. It’s an opportunity to find your center and balance and come back in to the present moment.

    downward facing dog pose

    Eight Limbed Salutation – Ashtanga Namaskara

    Exhaling all the air out of the lungs, take the knees down to the earth, drop the chest between the palms, keeping the hips and tailbone up. Hug the elbows in towards the body and have the weight in the hands. Chin is lightly resting on the floor.

    The Eight Limbed Salutation is another transitory pose that is used to take you from standing to lying on the belly or up into Cobra Pose. It improves the mobility of the back and increases the strength of the arms.

    Eight limbed salutation - ashtanga namaskara           10 Minute Morning yoga

    Cobra- Bhujangasana    

    With an inhale, slide forward onto the belly and press through the palms to straighten the arms and come up into Cobra Pose. Open the chest and drop the shoulders away from the ears. Draw the shoulder blades back and together.

    Cobra Pose is an asana you can play around with to see how deep you want to take the back. It can be as subtle or dramatic as you like, but at all levels it offers a healthy compression to the spine and opening for the chest.

    cobra pose           10 Minute Morning yoga

    Downward Facing Dog – Adho Mukha Svanasana      

    Exhale and push back into a Downward Facing Dog. Take a moment here to notice the difference in the left and right side of the body, to find the breath and to prepare yourself for the other side. Repeat the left side and then finish at the top of the mat, hands in Prayer at the centre of the chest. Take a moment to feel into the body and notice the heat and energy that’s been created. Allow this body sensation to be your anchor into the present moment.

    You can spend a few breaths pedaling out the legs, bending into the right knee and then the left. This will encourage the back of the legs to open and prepare you to move into the next side of the body.

    downward facing dog pose          10 Minute Morning yoga

    Low Lunge – Anjaneyasana     

    Step the right leg back, dropping the back knee down for support. Bringing the fingertips down either side of the front foot for support. Spine is straight, head and neck are in line.

    low lunge 2

    Standing Forward Bend -Uttanasana

    Hinging at the hips, slowly start to bring the torso down. Keeping the spine straight with the neck and head in line. As you come down, notice the stretch in the back of the legs and bring a slight bend to the knees if needed. Allow the upper body to hang down, letting go of any tension in the head. Arms will hang down and hands can come onto the shins, the floor or onto a block.

    Finish at the top of the mat, hands in Prayer at the centre of the chest. Take a moment to feel into the body and notice the heat and energy that’s been created. Allow this body sensation to be your anchor into the present moment.

    Standing forward Bend

    Featured Video: 10 Morning Yoga Poses For Beginners at Home

    7 Yoga Poses You Should Do First Thing In The Morning

    The Sun Salutation as broken down earlier in this article is one of the best way to start both your practice and your morning, but if you have a little more time on your hands, here are seven more poses to add into your routine.

    Chair Pose-Is going to get the body fired up, which makes it a great addition to your morning practice. It requires that you tap into the strength of the legs, the core and the upper body and it also stimulates the diaphragm and the heart. It’s a fierce posture that promotes inner power and is a great opportunity to check in with the quality of the mind. Is it quick to jump into stories of effort? Remember the body is often willing to do the hard yards even after the mind has called it quits, so get your head in check by focusing on breath.  

    Eagle PoseThere is a lot going on in this pose and it simultaneously requires strength, balance and coordination. As you bind and twist the body together you are compressing and constricting circulation, so when you release there is a fresh rush of blood to those areas. The binding of the arms encourages the shoulders and wrists to stretch which are typical areas of tension in the body. Bring the elbows higher for a deeper stretch to the back of the shoulders.

    Garland PoseIf you watch young children, you’ll notice that they can hang out in a deep squat for lengthy periods of time without any issue, yet this pose can be exceedingly difficult for many adults. When did we lose this ability? We are so reliant on chairs in Western culture that we have become unfamiliar with what was once the familiar, but this is a great pose to spend some time in the morning as you are challenging the structure of the entire body as it works into the ankles, knees, hips, pelvis and the spine.

    Bound Angle PoseThis pose finds itself in almost all of my practices. It actually follows me off of the mat and into any opportunity I have to sit on the floor AND it also makes for a great meditative seat. It is a great way to open the hips, strengthen the back and it works to instill a sense of stability and groundedness first thing in the morning.  

    Seated Forward BendThis is another pose I love to hang out in and just allow gravity to do all the work. At first the hamstrings might give you hell, but in this case it’s perfectly fine to take a bend to the knees or prop your hips onto the edge of a blanket or cushion. Allow the breath to take you deeper and over time work towards having the legs straight. Even with bent knees, you are still opening into the back of the legs, stretching the spine and compressing the digestive organs which helps to get them firing.

    Bridge PoseIs going to wake up the body and the mind, so it is a perfect addition to your morning practice. It rejuvenates the back after lying down all night and encourages more flexibility. It stretches into the chest, back of the neck and the hips, while simultaneously strengthening the back, bum and hamstrings.

    Wind Relieving PoseHere you have a pose that is renowned for its benefits to digestive functioning. The compression of the belly is an effective means of encouraging stagnant energies to move downwards and out. Practicing first thing in the morning is a great way to release any trapped gases in your digestive tract before you go about your day – BUT, it’s also an opportunity to give yourself a squeeze and show some love first thing in the morning. Why should we rely and wait on other people to give us a hug later in the day!

    10 Min Morning Yoga Poses In Bed

    Whether it is because there is no space to roll out the mat, or you are just too lazy to get out of bed, the good news is that you can even enjoy your yoga practice in the comfort of our own bed!

    How you spend the first hours of your morning is so important. It sets the tone of your quality of mind. What is the first thing you do once your eyes have popped open?Reach for your phone to connect back immediately to a world of impressions and distraction? Or do you continue to press snooze until the bitter end for only a few minutes extra sleep? Instead, why not try some simple yoga poses in bed? and the beauty is, you don’t even have to open your eyes!

    Reclined Bound Angle Pose – Supta Baddha Konasana This pose is great way to settle the mind before you jump into your day. It can ease any residual thoughts from the day before or any unsettling dreams you might have had. You can take one hand to your belly and one to your heart and just become aware of the sensation of breathing inside of the body.

    Supine Spinal Twist – Supta Matsyendrasana You rely heavily on your spine to support you throughout the day, so this is a perfect opportunity to send it some love. When you sleep deeply, sometimes the body becomes heavy and immobile, so twisting the spine opens up the back and brings back some mobility before you get moving.

    Happy Baby Pose – Ananda Balasana Another great pose that still hasn’t required you to get off of your back, so why not? I can say quite confidently that you probably won’t get many opportunities to open the hips and the groins during the day and roll around like a happy baby – so the privacy of your own bed really seems like the perfect place.

    Legs Up the Wall Pose  Here you are simply taking advantage of the fact that you are already lying down and very likely have a wall at your disposal. This pose is extremely soothing, especially for those who are going to be on their feet all day. If there is tightness in the hips, luckily you have a pillow handy to slide underneath the hips.

    Conclusion

    These poses are great to perform in isolation, so spending a few minutes in each finding stillness and allowing the breath to take you deeper. Take your time! The aim of yoga is to not only open the body, but to come into the beauty of the present moment and enjoy where you are at. Allowing everything to be, just as it is. This is the key to enjoying life both on and off the yoga mat!

    Ensure that you get the alignment correct from the start as the repetitive nature of this sequence, if done incorrectly, can lead to strain and injury over time. Once you have built up some confidence with the poses, try to find some meditation in the movement by allowing the breath to be your guide.

    About

    Charlie Hanna

    Charlie is a Yoga Alliance certified Hatha, Yin Yoga & Meditation teacher with a psychology degree in her back pocket. She is currently on a mission, chasing sun and Read More..

    Ready to take your healing further? Click here to access yoga courses and start your journey toward lasting wellness today.

    Yoga For Indigestion: Soothe Your Stomach Naturally With These Gentle Poses

    Most of us are familiar with some degree of digestive drama and indigestion – whether that be in the form of bloating, constipation, excess gas or heartburn.

    Over indulging and high stress are both common triggers. Both of these can be hard to avoid at times. Sometimes we just have to eat enough vegan pizza

    Yoga for Indigestion: Simple Poses to Soothe Your Gut Naturally

    Yoga for indigestion is one of the most natural and effective ways to ease bloating, constipation, gas, or heartburn. If your digestive system feels off-track—whether from overindulging or feeling overwhelmed by stress—these yoga poses offer immediate relief and long-term support. This guide walks you through easy-to-do postures that you can start using today to alleviate discomfort and build a stronger digestive system.

    Understand the Triggers: Overeating and Stress

    Bloating, constipation, excess gas, and heartburn are common symptoms of indigestion. And let’s face it—there are times when avoiding the triggers feels impossible. Whether you’ve downed an entire vegan pizza or found yourself finishing a full tub of hummus, your digestive system may end up paying the price.

    While it’s okay to indulge occasionally, repeated digestive strain can weaken your system. High stress only compounds the problem by putting your body into fight-or-flight mode, which slows digestion even more. That’s where yoga for indigestion becomes an essential daily tool.

    Why Yoga for Indigestion Works

    Yoga works on both the physical and nervous systems. The gentle compression and twists stimulate your internal organs, encouraging movement in your digestive tract. Meanwhile, deep breathing and mindful movement calm your nervous system, reducing the stress that slows digestion.

    When practiced regularly, these poses do more than provide temporary relief. They help create a digestive system that’s more resilient and efficient.

    childs pose vector

    TRAINING TYPE:  FLOW SEQUENCE

    CATEGORY:YOGA

    SUBCATEGORY:MEDICINAL YOGA

    PLANNED TIME:15 MIN

    LEVEL:ALL LEVELS  

    PROPS:NONE

    Yoga Poses for Indigestion and Bloating

    ​ 

    Indigestion can rear its ugly head in many forms, from nausea, heartburn, to constipation and one of my very least favourites, bloating! Bloating in the belly can range from mild to chronic, from your classic over-ate food baby bloat, to that heavily nine month pregnant inflamed distension. Bloating can be innocent and a self inflicted consequence from eating too much of the foods that don’t agree with you. However, sometimes it is a sign of something much more serious going on in the body. Making dietary changes might be necessary, but bringing in some yoga can also help to manage your symptoms. Clinical studies have shown that moving the body regularly with yoga can help improve symptoms of Irritable Bowel, like indigestion, constipation and nausea. Yoga works to stretch and twist the body. This stimulates the movement of digesting foods. It helps to prevent gas from building up, which often is the cause bloating and discomfort.

    3 Amazing  Poses for Good Digestion

    These indigestion  poses are great to get stagnant energies moving in the body and will counter against indigestion and bloating. Spend at least five minutes in each, sending conscious breaths to the problem area.

    Upward Salute Variation – Urdhva Hastasana Variation

    A simple posture, but an effective way to start creating space in the abdomen. In this variation you want to have your arms extended up over head. Then pull the right wrist with the left hand, over to the left, coming into a side body stretch. Take it to the other side and really work to stretch the belly up and then left and right. Lengthen the belly as much as you can and see if you can make a little more room in the colon to get things moving along.  

    Abdominal Lock – Uddiyana Bandha

    Uddiyana is translated from Sanskrit as “to fly” or “rise up”. The posture works to draw the diaphragm and the organs of the abdomen up in order to hollow out the belly. As you physically lift these muscles up you are encouraging movement inside of the digestive tract. The focus is on the gut and your Solar Plexus Chakra, which is in charge of digestion. The action of drawing the belly in and up also works to tone the inner abdominal muscles.   

    Half Lord of the Fishes Pose – Ardha Matsyendrasana

    Twisting the abdomen is another great way of getting things moving internally. As you compress the belly, you are essentially cutting off circulation, so that when you release the pose there is fresh rush of blood directly into the area. This  can aid in boosting proper digestive functioning.

    “Where focus goes, energy flows”

    This is a great quote and it is true in yoga also. Send your attention into your problem area and this will help to promote healing.

    11 Exercises for Indigestion

    This is a short guided flow that you can move through to help when indigestion hits, and to strengthen the abdomen to promote better digestive functioning overall. Spend some time in each of the poses and work with the breath.

    Yoga Poses For Indigestion Infographic

    yoga poses for indigestion infographic

    Easy Pose – Sukhasana  

    Take a comfortable crossed legged seat. Bring your hands to your lap and gently close your eyes. Relax your shoulders, lengthen your spine up nice and tall and connect back to your breath.  Easy Pose is a simple pose that allows you focus on your breath. Fill your belly and notice it expand as you inhale. As you exhale draw your belly button back towards your spine, which will give your organs a gentle massage. Inhaling deeply through the nose and exhaling completely and send your indigestion out with your breath.

    easy pose - sukhasana sara

    Revolved Easy Pose – Parivrtta Sukhasana

    Sweep your hands up toward the sky with the palms facing in. Length up through the side bodies and relax your shoulders down away from your ears. Take a breath in and as you exhale begin to rotate your chest towards the left side of your mat, bringing your right hand to the left knee, and your left hand towards the back of the mat. Gently pressing in to the left hand to lengthen the spine as you breathe in and then gently twist as you exhale, allowing your gaze to follow. Twists are amazing for indigestion because they help to move and massage the organs. They invite movement inside your body to help push indigestion and stagnant energy through

    revolved easy pose - Parivritta Sukhasana Sara

    Cat Pose – Marjaryasana

    Begin in a Table Top position, stacking your shoulders over our wrists and your hips over your knees. Engage the core to remove any arching in the lower spine. Take your gaze down and then firmly press into your palms here, lengthen the back of your neck. To move into Cat pose, start to round your spine, starting from your tailbone, sending your spine all the way up towards the sky. Tuck your chin towards your chest as you exhale out all of your air.Cat Pose compresses and massages the internal organs which will help to bring fresh blood into this space and remove any waste and obstruction that is causing indigestion.

    cat pose Marjaryasana

    Cow Pose – Bitilasana  

    Begin to unwind your spine vertebrae by vertebrae, dropping your belly down towards the ground, and inhaling as you shine your heart forward, taking your gaze slightly up. Lengthening the intestines after compressing them in Cat Pose, provides a release and fresh rush of blood into this space which improves circulation and detoxifying the body.


    cow pose - Bitilasana

    Sphinx Pose – Salamba Bhujangasana 

    Come to lying down on your belly to prepare for Sphinx Pose. Come up onto your forearms, stacking your shoulders over your elbows and have the palms pressing down. Press firmly into your forearms and the tops of the toes. Send your chest and heart forward, to lengthen the spine. The connection of the belly down to the mat is working to fight against indigestion as it encourages gentle movement inside of the abdomen. Take conscious, deep breaths and work to open the chest in order to lengthen the front side of the body. This is going to create more space and ease your indigestion and discomfort.

    Sphinx Pose - Salamba Bhujangasana

    Bow Pose – Dhanurasana 

    Bend your knees, keeping your legs parallel to one another and then extend your arms back to grab the outside edges of your feet or ankles. Take your gaze down, exhale out all of your air. As you breathe in, kick into your feet and lift your chest and knees up. Continue to lengthen the back of your neck.Bow Pose puts pressure on and massages the lower belly area and you can really work with the breath to help move any indigestion along. The harder you kick, the higher your chest will lift up and you can work with the breath to move deeper into the abdomen.

    Bow Pose - Dhanurasana

    Extended Child’s Pose – Balasana  

    Walk your knees towards the outside edge of your mat here and connect your big toes together. Drop your hips down towards your heels here and extend your arms forward coming into an Extended Child’s Pose. Having the knees as wide as your mat encourages the belly to relax into an unrestricted space which is especially beneficial when there is indigestion. This extra room allows the belly to fully expand and will take away any pressure that is giving your discomfort.

    Wide legged child's pose

    Bridge Pose – Setu Bandhasana   

    Come down to lying on your back and bend the knees, bringing the soles of the feet down to the mat. Walk the feet closer towards the hips so that the fingertips can touch the back of the heels. Draw the lower belly down towards the mat, so that the sacrum and low back are connecting down. Press into the heels and lift the hips off the ground to come into Bridge Pose. Walk the shoulder blades underneath and keep the legs parallel towards one another and slightly tuck the chin. Embrace the stretch in the back of the neck and the closing of the Throat Chakra. You can work with the breath and send the hips a couple of inches higher with each exhale. Bridge Pose can help relieve indigestion by compressing the organs while also delivering fresh blood to the heart.

    bridge pose - setu bandhasana

    Wind Relieving Pose – Pavana Muktasana     

    Draw your knees in towards your chest here and wrap the arms around the knees. Continue to use the strength of the arms to draw the thighs down into the belly. Wind Removing Pose compresses the organs which helps to move toxins out of the intestines. This is the king of the poses when it comes to digestive distress and you can really work with the breath inside of the belly and the thigh connection to pump into this area and move excess gas downwards and out.

    wind relieving pose - pavana muktasana           yoga for indigestion

    Supported Shoulder Stand – Salamba Sarvangasana   

    keep the knees in towards the chest and send your hips up and off the ground. Bring your hands to your lower back and start to walk the palms down towards your shoulders as you send the hips higher. Start to straighten your legs to come up into Shoulder Stand.Inversions like Shoulder Stand can relieve indigestion as they ease up the stress of digestion by reversing the impact of gravity on the intestines. It can help to stimulate the movement of any obstruction which can relieve pain caused by excess gas in the colon, but only practice these poses on an empty stomach to avoid acid reflux.

    Supported Shoulder Stand - Salamba Sarvangasana               yoga for indigestion

    Plow Pose – Halasana     

    Begin to drop your toes towards the back of your mat, behind your head. Keep your hands at your lower back the entire time, or until your toes reach the mat. If your feet do not sit comfortably down on the earth, there is the option to bring the knees down onto the forehead. Plow Pose will massage and compress the organs in the lower belly, which encourages the movement of stagnant energies, blocked waste and gas which will help relieve indigestion pains.

    Plow Pose - Halasana          yoga for indigestion

    Featured Video: Yoga Poses for Indigestion

    SUBSCRIBE & WIN

    Can Yoga Poses Help Heartburn During Pregnancy?

    If you have a little (or a lot) of digestive discomfort, including heartburn, Yoga can offer a more holistic approach to treatment as opposed to over the counter drugs. However if your heartburn is severe, it is recommended that you stay away from any poses where the head goes below the heart. This means staying away from: inversions, standing forward folds and even the humble Downward Facing Dog. They will all just encourage the acid further up and into the oesophagus. What is recommended are poses that open the chest. You want to lift the front of the body in order to counter against any pressure in the oesophagus and create more space in this area.

    Supported Camel Pose – Supported Ushtrasana

    Typically you are reaching back for your feet or ankles in the full expression of Camel Pose, but you want to bring the earth a little closer in this variation. You can use blocks if you have them, but you can also use whatever is available around the house; cushions, a chair, a table. If you have none of the above, you can keep you hands to your low back for support and just work at opening the chest, and relieving pressure in the chest and throat.

    Cat/Cow Pose – Marjaryasana/Bitilasana

    Moving through some Cat-Cow postures, in a flow with the breath, is a great way to both stretch and release the abdominal muscles, while opening the chest and the heart. It is also going to relieve stress from the back and the belly region as it massages into these areas.

    Extended Triangle Pose – Utthita Trikonasana

    This posture can help to relieve heartburn caused by indigestion. At the same time, it can be incredibly relieving of backache as it creates length through the side body. It is stimulating for all of the abdominal organs!If you have access to blocks, they can be a great way to support your body, especially while pregnant. They take some of the intensity out of the poses. So you can just focus on opening the chest and relieving any heartburn you’re experiencing.

    Supported Fish Pose – Supported Matsyasana

    In this variation use a block underneath the shoulder blades and one underneath the head, and you can have the knees bent. This will support the body, yet still provide a deep stretch to the muscles of the belly and the front of the neck.

    Supported Reclined Bound Angle Pose – Supported Supta Baddha Konasana

    Use the support of bolsters (pillows) underneath the full vertical length of your spine – starting at the base and up and under the back of your head. If you have an unlimited amount of cushiony goodness on hand, slide some underneath the knees and one in between the feet to broaden your pelvis. Now the body is in full relaxation mode, while still stretching into the lower abdomen, the groin and the hips.

    Yoga for Stomach Gas Problems

    Excessive gas in the stomach can be uncomfortable on many levels. It is not something that should be chalked up as being a ‘normal’ part of digestion. A small amount can be innocent enough, but a lot means that you need to take a look at the foods you are putting in to your body. Things to consider; Are you over eating? Are you making poor food combining choices (fats with sugars)?

    Eating a diet of high water content fruits and greens is best, as they are easily and quickly digested and they will keep your system hydrated and clean.

    In addition to making the right food choices, yoga is going to help keep things moving through the system. A 2017 study on the effect of yoga on the digestive system reports that certain asana can directly assist the digestion process.

    This article is a compilation of some of the best poses that you can do to really encourage the movement of digesting food and gas through the body. They are going to help keep discomfort at bay, and here are three more!

    Wind-Relieving Pose – Pavana Muktasana

    This pose will always get a shout out when it comes to unwanted gas in the body. That is because it really is the king posture when it comes to relieving any kind of digestive disorder. As you send the breath into the belly and use the strength of the arms to pull the thighs down. You are really working into the internal organs, massaging them and moving unwanted gas that might be trapped.

    You can do one leg at a time, to really focus on getting into the sides of the abdomen. Spend as long as you have here, breathing and compressing. Really try to visualise letting go of all that is not serving you.

    Reclined Hero Pose – Supta Virasana

    This pose can help to alleviate intestinal gas as you stretch the belly and internal organs. At the same time you are stretching into the thighs, hip flexors, and the ankles. Only move into the full expression if the bum can sit comfortably down between the feet – and if it can’t there is no need to push yourself into the full reclined version. Stay leaning back on the hands, or use cushions under the back. You will still receive the digestive support if you use props to support you. Take modifications as needed!

    Supine Spinal Twist – Supta Matsyendrasana

    Twisting the abdomen is always going to support the stomach and any gas problems that you might have. Imagine wringing out a sponge – this is essentially what is going on when you come into a Supine Twist. When you release this pose, there is a fresh rush of blood into the area which improves circulation and removes waste and toxins from the area.

    3 Stretches for Acid Reflux

    Acid Reflux is extremely unpleasant and can cause mild discomfort to severe burning pain. It’s hard to calm to the mind when you’re suffering, but it is key to letting the body know it can relax. Yoga can be your best friend here and offer some ease to the both the body and the mind.

    Diamond Pose – Vajrasana

    This pose is often used as a meditative seat, so straight away you are putting the body into a position that lets it know everything is OK. Many postures are supposed to be avoided after eating, but this one is an exception and can be used even after a heavy meal to promote digestion and counter against acid reflux.

    Cobra Pose – Bhujangasana

    This therapeutic backbend is also great for stretching the abdominal muscles and stimulating circulation in this area. Really push into the palms and open the chest and heart. This will take away any pressure at the front of the chest and throat.

    Bow Pose – Dhanurasana

    This posture will open up your chest and neck and relieve pressure and tension that might be causing your reflux discomfort. The alternating stretching and releasing of the abdominal muscles will also increase blood flow to this area, improving overall digestive functioning.

    Conclusion

    Yoga for indigestion is a powerful tool to ease discomfort in the body. When the breath is combined with gentle postures, it creates space to release what no longer serves you—physically, mentally, and emotionally.

    Any symptoms of indigestion—whether bloating, gas, or discomfort—are gently encouraged to move through and out with greater ease. As your mind calms, it signals to your body that everything is OK, allowing the digestive process to resume smoothly. When paired with lifestyle and dietary changes, a consistent yoga for indigestion practice becomes a supportive and sustainable path to long-term relief and wellness.

    This article has introduced to you to a number of poses that will support your gut health and digestive functioning overall. However, to have an open mind in regards to making some changes to your habitual eating patterns. Stress can also trigger indigestion, so make time for yoga and self-care so that you can counter against your suffering from all angles.

    About

    Charlie Hanna

    Charlie is a Yoga Alliance certified Hatha, Yin Yoga & Meditation teacher with a psychology degree in her back pocket. She is currently on a mission, chasing sun and Read More..

    Ready to take your healing further? Click here to access yoga courses and start your journey toward lasting wellness today.

    How Do You Start Yoga At Home: Easy Routines for Every Fitness Level

    I remember when I was a beginner and first started out on my yoga journey,”by myself” and this was before it began to dominate the online realm. I had heard great things, but had no clue what I was doing. I would spend an embarrassing few minutes trying and failing to get into the splits, feel defeated and call it quits

    How Do You Start Yoga

    How do you start yoga when you’re completely new and unsure where to begin? This question shaped my own early journey with yoga. I remember being a beginner, navigating it all by myself before yoga exploded into the online world. I had heard all the benefits, but honestly, I had no idea what I was doing. I’d attempt a few stretches (usually the splits), fail miserably, feel defeated, and call it a day. I resigned myself to thinking maybe I just wasn’t made for yoga.

    Eventually, I found a studio I liked, and that provided more structure and insight. I still couldn’t master advanced poses, but the guidance of a teacher kept me going. Most importantly, being part of a class kept me accountable. Practicing on my own often ended with me quitting halfway through, no matter how good my intentions were.

    Discovering the Power of Consistent Practice

    As time went on, I began to experience the benefits—my body grew more flexible, and my mind became noticeably calmer. This progress made me prioritize my practice. I didn’t want to feel good only when the studio schedule allowed. I wanted that peace and clarity every day. That’s when I decided to start practicing at home. If you’re wondering how do you start yoga by yourself, know this: consistency is the key. Once you commit, momentum builds and you naturally keep going—even if you take a break, you’ll always come back to it.

    Make It Work for You—Start Small

    When I committed to home practice, I discovered that it didn’t need to be long. Not even an hour. Just fifteen minutes a day created profound shifts in my life. If I couldn’t get to a class, I didn’t feel off-track because I could always squeeze in 10–15 minutes to move, breathe, and reconnect with the present moment. The impact? Incredible.

    This beginner’s guide on how to start yoga by yourself is here to help you take the first step from home with confidence, ease, and joy.


    What Is the Best Way to Start Yoga?

    The best way to start yoga is simple: just begin. All you need is yourself and an open mind. Don’t have a yoga mat? A towel or sarong works just fine. No props like blocks or straps? Use books, belts, or cushions for support. Search online for yoga videos that match your level and goals. Once you start, committing becomes easier over time.

    There’s no finish line in yoga—it’s a lifelong journey meant to be savored. Be patient and respect where your body is. With time and dedication, your physical and mental capacity will expand naturally.

    The true benefits of yoga often appear off the mat—in your relationships, mood, and inner peace. The quiet, mindful awareness you cultivate in practice begins to influence every part of your life. So if you’re asking yourself how do you start yoga, remember that the most important step is simply to start and keep showing up.


    What You’ll Need to Start a Home Yoga Practice

    Just You and an Open Mind

    To begin your yoga practice at home, all you need is yourself and a willingness to try. Ideally, a yoga mat helps, but it’s not essential. A towel or blanket can be a great substitute.

    DIY Props

    Yoga props are helpful but not required. Be resourceful—books can replace blocks, a belt can act as a strap, and a rolled-up blanket can be your bolster. It’s more important to get started than to have perfect equipment.

    Create a Dedicated Space

    Design a space that’s quiet, clean, and free of distractions. A tidy area reflects the mental clarity yoga cultivates. An inviting space makes it easier to commit to your practice regularly.

    Use Online Resources

    If you’re not confident leading your own session, turn to online yoga videos. There’s an abundance of free and paid content from instructors of all levels. Spend some time exploring different styles and teachers until you find one that resonates.

    Make It a Habit: Schedule Your Practice

    The real challenge in starting yoga is not finding a class or video—it’s following through. To ensure consistency, schedule your practice like any other important appointment. Look at your weekly calendar and block off a minimum of 15 minutes for yoga. This short amount of time is manageable and can lead to long-term commitment.

    The flexibility of home practice is a double-edged sword—it’s convenient, but easy to skip. Stay accountable by treating it as a non-negotiable part of your day. If you’re still asking how do you start yoga, the answer is: plan it, schedule it, and start small.


    TRAINING TYPE: FLOW SEQUENCE

    CATEGORY:YOGA

    SUBCATEGORY:BEGINNER YOGA

    PLANNED TIME:10-15 MIN

    LEVEL:BEGINNER  

    PROPS:NONE

    What Is The Best Way to Start Yoga?

    ​ 

    The best way to begin yoga, is to just start! All you really need is yourself and an open mind.  If you don’t have a mat, roll out a towel or sarong. If you don’t have props like blocks and straps, find things around the home like books and a belt. Use cushions for support and jump online to find yoga videos that you can connect with and suit the level you are at. Once the ball is rolling, it’s much easier to commit to practicing. Over time you can work on getting all the right equipment and creating a space that invites you in every day.

    There is no end goal with yoga, the journey is life long and every step should be enjoyed. It’s always important to listen to your body and respect where it’s at and trust in the process. Over time and with commitment the body and the mind will expand and grow.

    It doesn’t take long until you’ll start to notice the benefits across all aspects of your life. The best rewards from yoga are actually those you reap out in the world and in your relationships with others and with yourself. That quiet, calm mind that you cultivate on the mat, will start coming with you to other places. You’ll find yourself more content in the moment and less triggered or caught up in the stories of the mind. All of this and more is yours when you start practicing yoga regularly, so what are you waiting for?

    What will you need to start a good at home Yoga Practice?

    All you really need is yourself and an open mind. Also, preferably a yoga mat, but if you don’t have one right now, even just a sarong or towel will suffice! When it comes to props, they are not essential, but there are so many things lying around the house you’ll be surprised you can use. Instead of a block you can use books. Grab a belt in the place of a strap and instead of a bolster grab yourself a blanket and roll it up.

    Create the Space

    Creating a space that is inviting and conducive to stillness can really help motivate you onto your mat and into your practice. You know what they say about a clean room being the key to a clear mind, well it’s definitely true. We want to create a space that is a reflection of the state of mind we are trying to cultivate – quiet, clear and free from distraction! This will help set the tone and drop you into the zone a little easier.

    Jump Online

    If there isn’t the confidence there yet to lead yourself through a practice, there is still absolutely no reason to not practice at home! There are so many teachers and yoga videos online to offer you support and guidance, you might just have to flick through a few videos to find one that resonates.

    The great thing about the online yoga realm, is that there is an abundance of options out there. You can really get specific with what you are after, what parts of the body you want to target and how long you want to practice for.

    Schedule a Time

    If you’ve gone through all of these steps, then you’re pretty much ready to go. All that’s left is to get on your mat! However, we all know It’s one thing to plan and create the space to do yoga at home, but actually committing to your practice, that’s another thing entirely. In order to make sure you see it through, it’s recommended to schedule a time in advance.

    Yoga is only going to be effective if you are persistent and show up regularly! One of the benefits of a home practice is that you aren’t restricted to a specific class schedule or length of class. This can also be your downfall as there is no teacher or time frame to keep you accountable. So with that in mind, I recommend looking at your week ahead and scheduling a time in advance to practice and treat it like a non-negotiable appointment. Aim for a minimum of 15 minutes, it’s short enough that it’s not overwhelming, but still long enough that it will encourage a steady habit.

    Yoga Practice at Home Sequence

    We will break down the steps needed to be taken to set up a successful home yoga practice for beginners. It goes over what is needed, the type of space you want to create, the importance of scheduling a time and finding a videos online that can provide guidance until there is more confidence in practicing alone.

    When you are practicing at home without support it is important that you listen to your body and take modifications when needed. Never be afraid to simply rest in Child’s Pose and don’t push yourself past your limits, as the body takes time to open up. The real benefits of yoga are the transformations you start to see off of the mat, and they will come with consistent practice. Trust the process and enjoy the ride.

    Start Yoga at Home For Beginners ​Infographic 

    how to start yoga at home for beginners infographic         how do you start yoga

    Cat-Cow – Marjaryasana-Bitilasana 

    Coming into a Table Top position, making sure that the wrists are in line with the shoulders and that the knees are in line with the hips. Spine is neutral, head and neck in one line, and the gaze is slightly down and towards the top edge of the mat. Inhale, drop the belly down, take the heart forward, arching the back, coming into Cow.

    Exhale and move into Cat Pose by pushing into the palms, rounding the upper back, bringing the belly button back towards the spine and dropping the chin to the chest. Inhale, again coming forward, opening the chest. Exhale, pushing back, rounding the spine. It’s good to work through a few rounds of these Cat-Cow movements in order to warm up the spine and let it know we’re going to move into it.

    This pose mobilises the spine, shoulders and the neck and is the perfect warm up for all levels of yogi. It is a gentle way of preparing the body and the spine for deeper stretches and is a safe way of relieving tension from the back.

    cat-cow

    Downward Facing Dog – Adho Mukha Svanasana

    Tuck the toes and push into the palms and take the hips up into Downward Facing Dog. Start by pedalling out the legs and bending the knees. Pushing down into the palms, fingers are spread wide and allow the head and neck to drop.

    Downward Facing Dog is an opportunity to catch you breath and balance before moving onto the other side of the body during your flow.

    downward facing dog pose           how do you start yoga

    One Legged Downward Facing Dog – Eka Pada Adho Mukha Svanasana

    Rise the right leg back and up, coming into a One Legged Downward Facing Dog.

    It is very common to dump the weight of the body into the left shoulder here, but try to keep the shoulders square by pressing evenly into both hands.

    one legged downward facing dog             how do you start yoga

    Low Lunge – Anjaneyasana

    Bend the right knee and come forward, transferring the weight into the hands and step in between the palms, coming into Low Lunge. Hands will frame either side of the front foot and you can use the fingertips for support. There is the option to rise the back knee or you can take it down for more support. Make sure that the neck and head are in line with the spine.

    In Low Lunge you can start to work into the flexibility of the back hip flexor by squeezing the gluteus muscles. Try to keep the hips square, by sending the back hip forward.

    low lunge 2

    Revolved Side Angle – Parivrtta Parsvakonasana 

    Take the left palm and press it flat down into the earth and take the right arm. Spinning the chest open coming into an Revolved Side Angle. Gaze is up to the top hand. Really pressing down into the left palm and the ball of the back left foot. Take a breath, and open the chest more.

    This pose strengthens and stretches legs, groin, hamstrings and at the same time opens the chest, the shoulders and the spine.

    revolved side angle pose - twist

    Warrior 2 – Virabhadrasana II  

    Spin the back foot down and cartwheel the arms, coming into a Warrior Two. The front toes are facing forward, and the back foot is in on an angle. Press down firmly into the outer blade of the back foot. Arms are extending long to the sides and as you exhale, drop a little deeper, staying low in the legs.

    Warrior 2 is working deep into the strength of the legs and is particularly powerful if you energetically hug the legs together. This turns on the underside of the thighs and requires strength, determination and concentration. All of this is going on, while you are cultivating balance and groundedness.

    warrior 2

    Reverse Warrior – Viparita Virabhadrasana   

    Inhale and lean the torso forward and flip the front palm. Lean back, stretching the front hand up and back, coming into a Reverse Warrior. Stay low in the legs and find strength by hugging the feet to the midline, activating the underside of the thighs.

    The key in Reverse Warrior is to stay low in the legs. It might seem like a reprieve and a moment to take rest after a strong Warrior 2, but keep in mind that the mind will often bow out before the body is ready, so see if you can stay low for a couple more breaths!

    reverse warrior pose           how do you start yoga

    Eight Limbed Salutation – Ashtanga Namaskara    

    Cartwheel the arms down to the ground and push back into a Downward Facing Dog momentarily. Take a deep breath here and then move into Eight Limbed Salutation, also known as Knees-Chest-Chin Pose. Drop the knees directly down, take the chest down in between the palms and have the weight is in the hands. Hips and tailbone are staying up to the sky. Hugging the elbows in towards the body, with the chin slightly resting on the earth.

    Knees-Chest-Chin Pose pose can seem tricky at first, but the key is to have the weight in the hands and to be drawing the elbows in towards the body. Everything else is relatively light and the chin is only gently resting on the mat.

    Eight limbed salutation - ashtanga namaskara

    Upward Facing Dog – Urdhva Mukha Svanasana    

    Come down onto the belly and then slide forward into Upward Facing Dog. Make sure the shoulders are down away from the ears and draw the shoulder blades back and together. Exhale, and bend the elbows and lower the torso and forehead back down to the earth.

    Here you are stretching and strengthening the spine and shoulders, toning the abdomen and opening the chest and lungs. The key is to really lift the chest and squeeze the shoulder blades back and together. There should be ample room between the shoulders and ears.

    upward facing dog              how do you start yoga

    Downward Facing Dog – Adho Mukha Svanasana  

    Push back into a Downward Facing Dog and then preparing to move into the other side of the body. Notice the difference between your first Downward Facing Dog of your practice and your last. When the body is stiff this pose can feel like a full workout, but as the body warms and opens, it gets easier and easier to hang out here.

    downward facing dog pose

    Extended Child’s Pose – Balasana

    After finishing up the other side of the body, drop the knees down as wide as the mat and settle back into a Extended Child’s Pose. Dropping the forehead down to the earth, allow the belly to be soft in between the thighs and take rest.

    This is the perfect pose to take rest in, both during and after your practice. It’s an opportunity to bring everything back into balance, to find your breath and to elongate the spine.  

    Downward Facing Dog – Adho Mukha Svanasana   

    extended child pose             how do you start yoga

    Featured Video How to Start Yoga at Home for Beginners

    Yoga Poses for Beginners

    If you are still feeling a little lost on your mat, its ok, because Ive got your back :). I want to share with you some very beginner friendly poses that lay the foundations for most of the yoga flows you will be introduced to in a class. It also means if you don’t have access to the internet and an online tutorial. You can simply move through these simple poses two or three times, spend some time is Savasana (laying flat on your back) at the end and bam, you’ve got yourself a solid yoga practice. If you can get comfortable with these poses, and even better their Sanskrit names, you’ll be ahead of the game when you finally do make it into a class.

    Cat-Cow – Marjaryasana-Bitilasana

    Moving through a few rounds of Cat-Cow is extremely juicy and therapeutic for the whole back and neck. The opposing movements allow you to both stretch and compress the spine, inviting more space and increasing mobilisation. Really be dramatic with the postures by pulling the shoulder blades apart when you’re imitating an angry cat and sucking the belly button right back to the spine in Cow. Spend a few extra minutes working into some intuitive free movement, moving the spine back and forth, the hips from side to side and taking some body rolls – anything that feels good in YOUR body in order to warm up the spine.

     Downward Facing Dog – Adho Mukha Svanasan

    Downward Dog is one of those poses that in the beginning it simply sucks! Your heels refuse to reach the floor, the shoulders and arms are quick to tire and it feels like your instructor is making you hang out there for hours. You’d rather drop the knees and take a Child’s Pose. However, over time, and once you have the proper alignment down, Downward Dog starts to become your home base. It becomes a pose you can relax into and it provides a reset and full body stretch between flows and the more difficult poses. The key is getting the foundations of the pose down right from the get go. I encourage you to get an instructor to guide you into the pose in class or find a tutorial online!  

    Low Lunge – Anjaneyasana

    Get the alignment of the legs and feet right in a simple Low Lunge and you already have the the foundational base ready to jump into other standing poses, such as the Warriors! Here you have the option to work into both your strength and flexibility; and there is always the option to take a modification and drop the back knee down to the earth. This makes this pose very accessible and beginner friendly, yet you will still be working to stretch, strengthen and simultaneously improve balance and focus. Revolved Side Angle – Parivrtta ParsvakonasanaThe trick to finding some ease in the perceived effort of this pose, is to hug the feet towards the midline. This goes for all the standing poses in order to find strength and activate the underside of the legs. This will tap into your power reserves and you’ll be surprised at the strength you have. Remember, the mind will always want to quit before the body does, so when you feel like coming out of a pose, firm into the legs and see if you can find just two more breaths!

    Warrior 2 – Virabhadrasana

    I invite you to stand in your strength in this pose, as an incarnation of a fierce warrior, Shiva. When that front leg starts to tire, keep in mind that zen archers would practice holding a bow for two years in this position before they were allowed to shoot their first arrow. Find some ease in the effort by energetically drawing the feet towards the midline, as though you want to bunch up your mat at the middle. The aim is to stand firm and strong, yet at the same time relaxed and at ease.

    Cobra – Bhujangasana

    An energizing back bend to open the chest and heart. Bhujang means ‘serpent’, and this pose is an essential component of the Surya Namaska – the Sun Salutations. It is a powerful chest opener and at the same time, it is extremely therapeutic for the spine. It also works to stretch and tone the abdominal muscles and organs and stimulate the digestive fires.

    Is Doing Yoga at Home Effective?

    The more consistent you are with your yoga practice at home, the more effective it is going to become. The same with anything, consistency is the key, but this doesn’t mean that you have to practice for an hour, seven days a week! Spending twenty minutes each day on your mat, to stretch the mind and the body is going to have profound effects on your life across the board. If there are days you don’t feel up to yoga, give some meditation or Pranayama a go.

    Meditation

    If you are new to meditation, then the chances are that sitting in silence trying to quiet the mind is going to lead to a whole lot of frustration and very little stillness. Meditating in this way is actually very advanced, as you’ll find out quickly that it can be very challenging to quiet down the stories of the mind. A better option in the beginning is to find some guided meditations that resonate.

    Pranayama Breathing is something we do so naturally, that it requires no conscious effort. It is an involuntary action that is happening whether we are awake or sleeping. To breathe, is to live. Pranayama is the practice of controlling the breath, with Prana meaning ‘life force’ and yama meaning extending or stretching in Sanskrit. Controlled breathing can decreases the effects of stress, instil focus and mental clarity and can energize and detox the body.

    One simple Pranayama technique, is known as the Cooling Breath Pranayama / Sitali Pranayama. Find a comfortable easy seat. Curl the tongue into a U shape and project it out of the mouth slightly. If you can’t curl the tongue it is fine to make an O shape with the mouth. Take the chin to the chest and then begin to inhale through the mouth, taking the chin up and dropping the neck back as far as is comfortable. Close the mouth and exhale through the nose as you drop the chin back down to the chest.

    Repeat for eight to twelve breaths. Any time spent on your mat, is time well spent and over time there is an accumulative effect that takes place and the benefits start to ripple out and have a domino effect across so many aspects of your life.

    How do you Start Yoga When Overweight

    Going into a yoga studio can seem a little daunting if you don’t think you fit the typical yogi image, but yoga can (and should!!), be practiced by everyone. At all ages and stages of life, and by all shapes and sizes. We all start somewhere and there are so many styles of yoga and variations of the poses, that make them accessible to all. If there is some doubt and anxiety in the mind though, there is the perfect opportunity here to start practicing at home.

    Jessamyn Stanley is a great role model to check out! She is using yoga to promote positive body image and breaking down mental and emotional barriers to practicing. She emphasizes how you FEEL, as opposed to how you look and she celebrates her students bodies in all the shapes and sizes that they come in. She has a top selling book on Amazon called, Every Body Yoga: Let Go of Fear, Get on the Mat, Love Your Body, and I HIGHLY recommend checking that out!

    Yoga is a mindset that cultivates self love and body confidence. Love your body where it is at and show it some kindness by taking this time for self care. With consistency your body will open and start to change, so enjoy the journey and allow the transformation to unfold.

    Conclusion: How do you start yoga?

    A few things to keep in mind before you jump in! Firstly, always make sure to listen to your body. You know it best and are the only one that can hear its subtle cues. Never force your body into a pose and don’t be scared to take modifications or rest in Child’s Pose when needed. Trust that over time and with consistency your body will open up along with your flexibility. You have the necessary steps in mind now to really get your at home practice going. I promise that the hardest part is just making it onto your mat. Make the time, prioritise this self care and watch yourself blossom and grow.

    This article has provided the necessary steps to establishing an at home yoga practice. Grab the essentials, create the space, find some videos online that resonate and schedule the time like a non-negotiable appointment! Prioritise taking care of yourself and loving yourself just as much, if not MORE than you love others. This is not selfish, this is KEY to being the best version of who you already are, for yourself and for others. You have to fill your cup first and yoga is a great tool to do just that.

    About

    Charlie Hanna

    Charlie is a Yoga Alliance certified Hatha, Yin Yoga & Meditation teacher with a psychology degree in her back pocket. She is currently on a mission chasing sun and Read More..

    Ready to begin your own yoga journey from home? Click here to access our full beginner-friendly yoga course and start building a daily practice that transforms your body and mind from the inside out.